Installation instructions, Installation, Unpacking – Stovax E-Studio PR0776 User Manual
Page 16: Control upgrade, Safety precautions, Installation of the gas supply, Preparing the appliance
16
INSTAllATION INSTRUCTIONS
INSTAllATION
1. UNPACKING
1.1 • Remove the appliance from its packaging, and check that
it is complete and undamaged
• Put the loose ceramic parts to one side so that they are
not damaged during installation.
2. CONTROl UPGRADE
2.1 Your fire is fitted with a control valve that can be easily
upgraded to battery powered remote control. This upgrade
can be fitted by anyone capable of simple DIY jobs and
requires no special training. This upgrade can be obtained
through your local Gazco stockist.
2.2 STANDARD REMOTE CONTROL This remote control can
control the fire after the pilot has been lit. It can turn the
main burner on and regulate it from low through to high
and back again. It can turn the main burner off leaving the
pilot burning. GAZCO PART NUMBER 8455.
2.3 PROGRAMMABLE THERMOSTATIC AND TIMER REMOTE
CONTROL. This remote control can control the gas
appliance after the pilot has been lit. In MANUAL MODE it
can be used to turn the main burner on and manually
regulate it from low through to high and back again. It can
be used to turn the main burner off, leaving the pilot
burning. In AUTO MODE it will automatically regulate the
room temperature to a pre-set temperature. In
TIMER MODE it will turn the fire on and off according to
pre-set programme and automatically regulate the room
temperature during the two periods. GAZCO PART NO.
8456.
3. SAFETY PRECAUTIONS
3.1 This appliance must be installed in accordance with the
rules in force, and used only in a sufficiently ventilated
space. Please read all instructions before installation and use
of this appliance.
3.2 These instructions must be left intact with the user.
3.3 Do not attempt to burn rubbish on this appliance.
3.4 In your own interest, and those of safety, this appliance
must be installed by a competent person in accordance
with local and national codes of practice. Failure to install
the appliance correctly could lead to prosecution.
3.5 Keep all plastic bags away from young children.
4. INSTAllATION OF ThE GAS SUPPlY
E-STUDIO BF
NAT GAS @ 20MB
PROPANE @ 37mb
8692BFCHUC
P8692BFCHUC
E-BOX BF
NAT GAS @ 20MB
PROPANE @ 37mb
8692MCUC
P8692MCUC
8692PBUC
P8692PBUC
TO ChANGE FROM ONE GAS TYPE TO ANOThER A
COMPlETE ENGINE ASSEMBlY wIll BE REQUIRED.
SEE SECTION 12 REPlACING PARTS.
4.1 Before installation, ensure that the local distribution
conditions (identification of the type of gas and pressure)
and the adjustment of the appliance are compatible. See
table above.
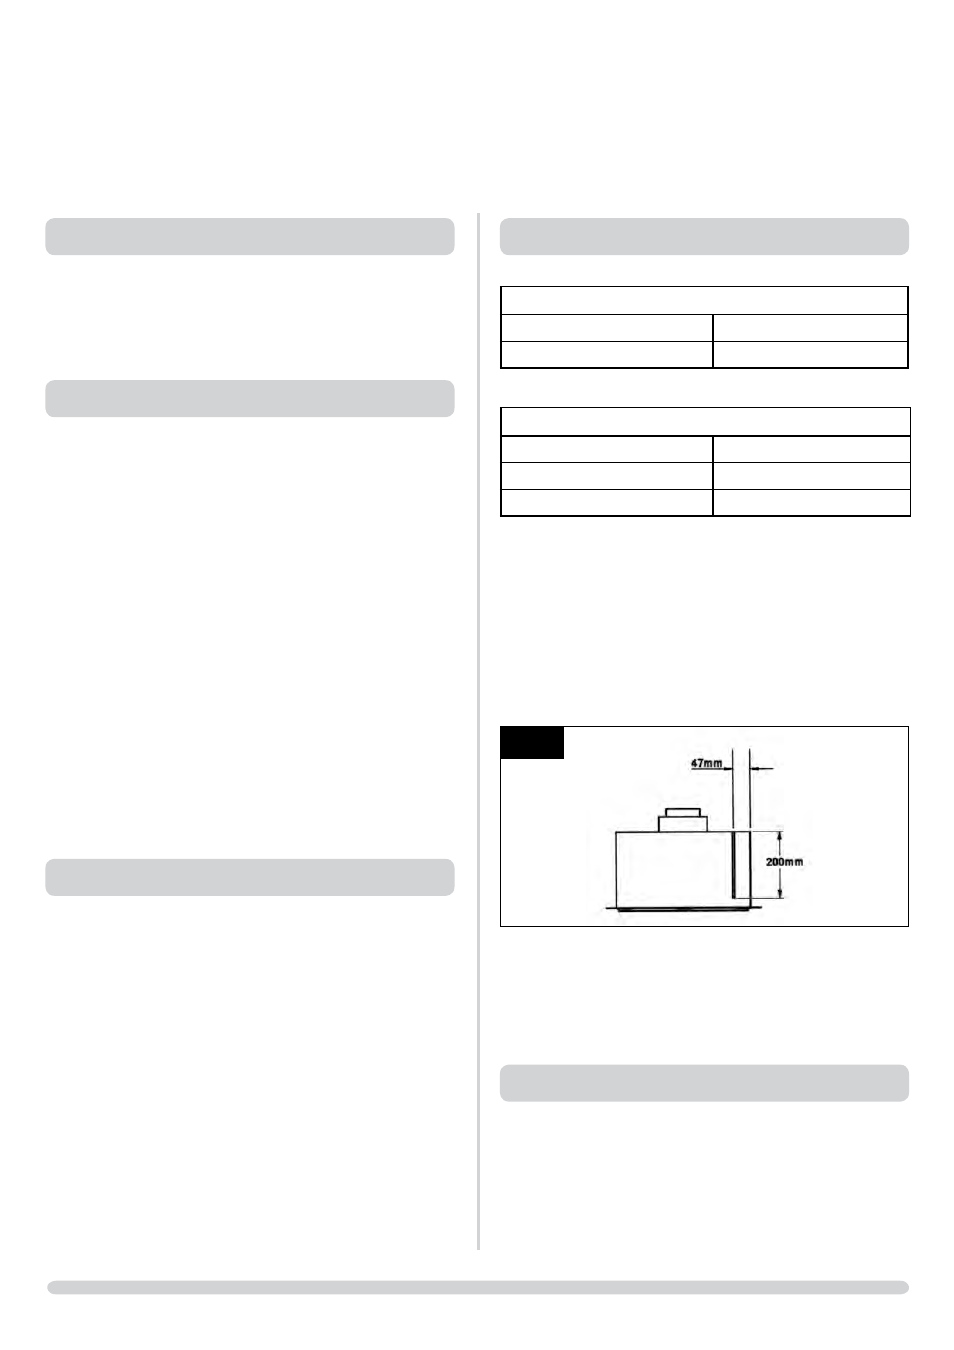
4.2 The position of the gas inlet pipe is shown, Diagram 3.
3
AR1467
4.3 All supply pipes must be purged of any debris that may
have entered, prior to connection to the appliance.
4.4 The gas supply enters through the silicone panel located on
the rear of the outer box. This will need to be slit with a
sharp knife prior to passing the supply pipe through.
5. PREPARING ThE APPlIANCE
5.1 Remove the backing from the self-adhesive silicone sealing
strip and apply to the rear flange of the firebox ensuring that
the strip is positioned as close to the outer edge as is
practically possible, Diagram 1, arrow A.