ATL Telecom OM100 User Manual
Page 22
6.3
CONFIGURATION SCREENS
6.3.1
Entering data
6.3.2
Moving between check boxes
Select check boxes and radio buttons in the same way.
Pressing either the right cursor key, or the
left cursor, or
6.3.3
Turning functions on and off
Find the appropriate check box associated with the function you want to change. Move the
cursor to that check box. Then press the space bar to change the box. Repeat for all other
required changes. Press the
Note: The configuration is not accepted until the
can be corrected before the data is entered. Beware though, if you exit the screen before
pressing
and exits the screen, so you may want to make more than one change to the screen before
pressing the
OM100 Mon 01 Nov 2002 00:34:32
Config > User Ports
Urgent Alarm:On Non-Urgent Alarm:Off
Subsystem: LT
Lock Clock
Enable to Reference
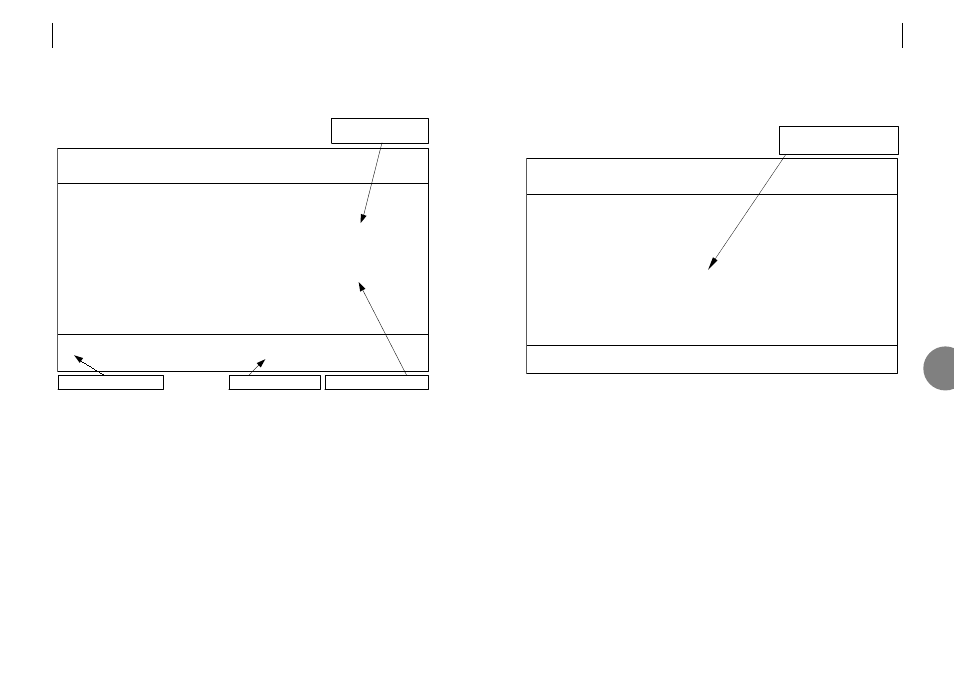
Port 1 [X]
Port 2 [X] [ ]
Port 3 [X] [ ]
Port 4 [X] [ ]
Press Return to Accept or Escape to Cancel
F1 Help F3 Previous Menu F4 Main Menu
Check boxes turn functions
ON and OFF.
ATL USER GUIDE
OM100 Optical Multiplexer
41
40
ATL USER GUIDE
OM100 Optical Multiplexer
6.2
INFORMATION SCREENS
These screens provide version, alarm and performance information about the system. They are
particularly useful in helping locate problems with any of the ports.
A master unit can view information about itself and about the remotely connected slave unit. A
slave unit can only view it’s local information.
[X] indicates that the
alarm detector is active
Trip counters can be reset
View the remote unit
View next port statistics
OM100 Mon 01 Nov 2002 00:54:49
Performance > User Port
Urgent Alarm:Off Non-Urgent Alarm:On
Subsystem: LT
Port: 1
LOS Detected [ ] BER > 1E-3 [x]
AIS Detected [ ] BER > 1E-6 [ ]
Line Code Violations 0 Trip Counter 0
Available Seconds 100 Trip Counter 100
Unavailable Seconds 0 Trip Counter 0
Severely Errored Seconds 0 Trip Counter 0
Errored Seconds 0 Trip Counter 0
Error Free Seconds 100 Trip Counter 100
Press Escape to Exit
F1 Help F3 Previous Menu F4 Main Menu F5 Previous Channel
F6 Next Channel F7 Previous Subsystem F8 Next Subsystem F9 Reset Trips
F10 Reset System Counters
6