Float switch, Fig. 15 – Hoshizaki KM-61BAH User Manual
Page 64
59
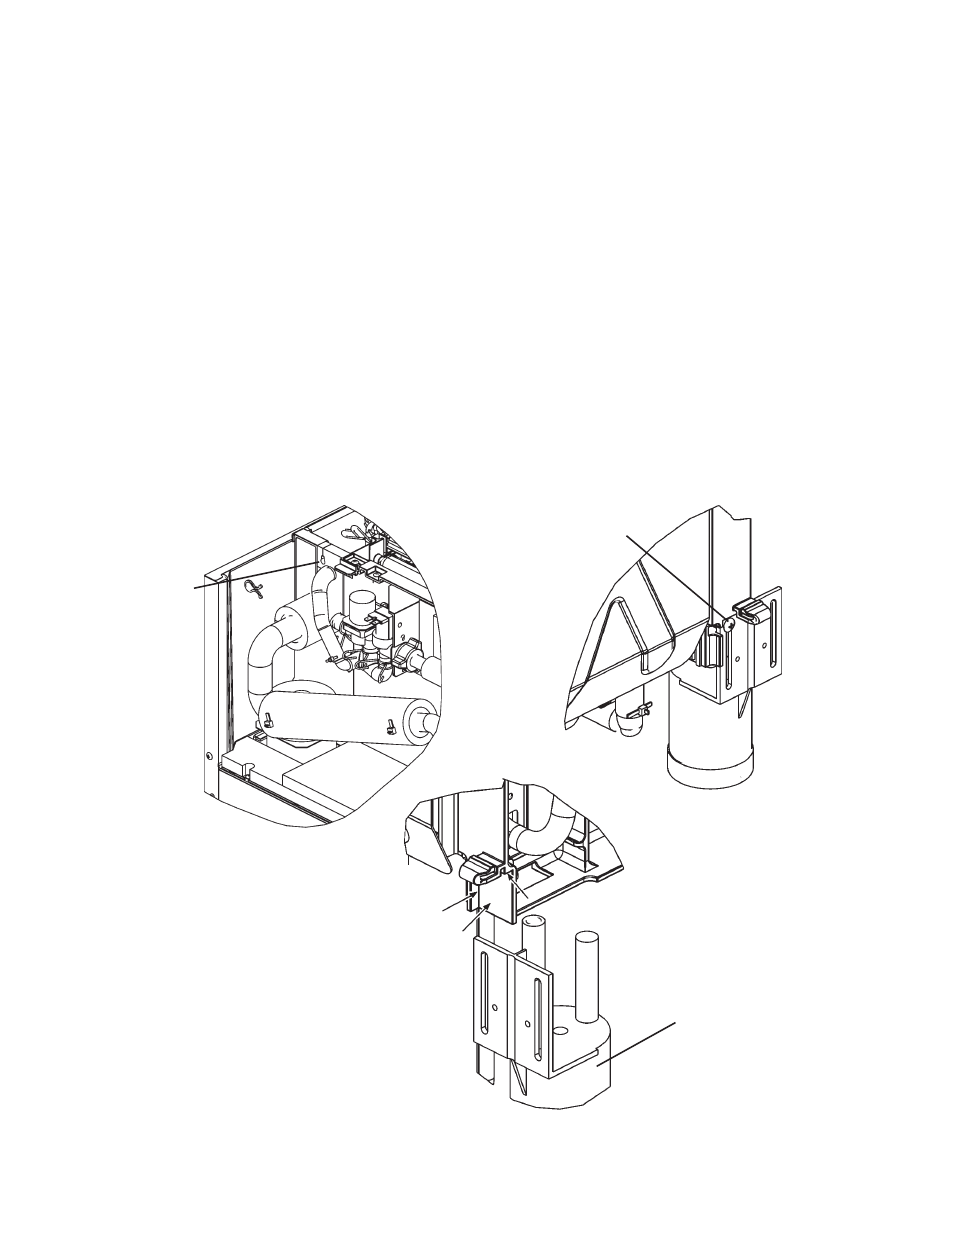
15. FLOAT SWITCH
[a] KM-61BAH, KM-101BAH
1) Unplug the icemaker or disconnect the power source.
2) Remove the Top Panel and unscrew the Rear Panel.
3) Disconnect the Connector of the Float Switch lead and remove the lead wire from
the grommet opening.
4) Remove the Water Tank (see “19. WATER TANK”).
5) Remove the screw securing the Float Switch.
6) Install the new Float Switch in the reverse order of the removal procedure.
7) Refi t the panels in their correct positions.
8) Plug in the icemaker or connect the power source.
Fig. 15
Grommet
Opening
Mounting Screw
Float Switch
* Attach to three arrowed
surfaces when fi xing
with screw
This manual is related to the following products:
See also other documents in the category Hoshizaki Freezers:
- SELF-CONTAINED CRESCENT CUBER KM-201BWH (22 pages)
- F043-809 KMD-410MAH (65 pages)
- KM-1400SWH/3-M (24 pages)
- KM-1601MRH (12 pages)
- KMD-450MWH (25 pages)
- DCM-500BWH (69 pages)
- SELF-CONTAINED CRESCENT CUBER KM-250BWF (21 pages)
- HUR68A(-D) (64 pages)
- KM-1900SRH/3 (38 pages)
- FD-1001MAH(-C) (44 pages)
- CUBELET ICEMAKER/DISPENSER DCM-750BAH (69 pages)
- STACKABLE CRESCENT CUBER KM-1301SWH-E (59 pages)
- MODULAR CRESCENT CUBER SERENITY SERIES KMS-1400MLH (21 pages)
- KM-320MAH-E (30 pages)
- KM-1300SRH-E (65 pages)
- MODULAR CRESCENT CUBER KM-650MAH (54 pages)
- KM-201BWH (81 pages)
- KMD-901MWH (27 pages)
- KM-1301SAH/3 (84 pages)
- MODULAR FLAKER SERENITY SERIES SRC-10H (25 pages)
- DCM-750BAH(-OS) (32 pages)
- DCM-750BAH(-OS) (26 pages)
- DCM-300BAH(-OS) (25 pages)
- KM-1301SAH-E (22 pages)
- KM-320MWH (50 pages)
- MODULAR CRESCENT CUBER KM-630MWH (67 pages)
- F-450MAH(-C) (20 pages)
- KM-630MRF (61 pages)
- F-500BAF/-C (38 pages)
- AM-50BAE-ADDS (34 pages)
- KM-2500SRH3 (61 pages)
- DKM-500BAH (41 pages)
- MODULAR CUBELET SERENITY SERIES FS-1022MLH-C (57 pages)
- STACKABLE CRESCENT CUBER KM-1800SWH/3 (32 pages)
- KM-901MAH (87 pages)
- MODULAR FLAKER F-801MWH/-C (58 pages)
- RELIABILITY IS A BEAUTIFUL THING KMD-900MRH (35 pages)
- AM-100BAE (21 pages)
- C-100BAF-DS (40 pages)
- AM-50BAE-DS (21 pages)
- KML-250MAH (28 pages)
- MODULAR FLAKER F-1000MRF/-C (74 pages)
- KM-501MWH (27 pages)
- AM-150BAF (31 pages)