Install etf-500 faucet (continued), Install etf-700 faucet, Install etf-500 faucet – Sloan ETF-500 Faucet User Manual
Page 3
3
1B
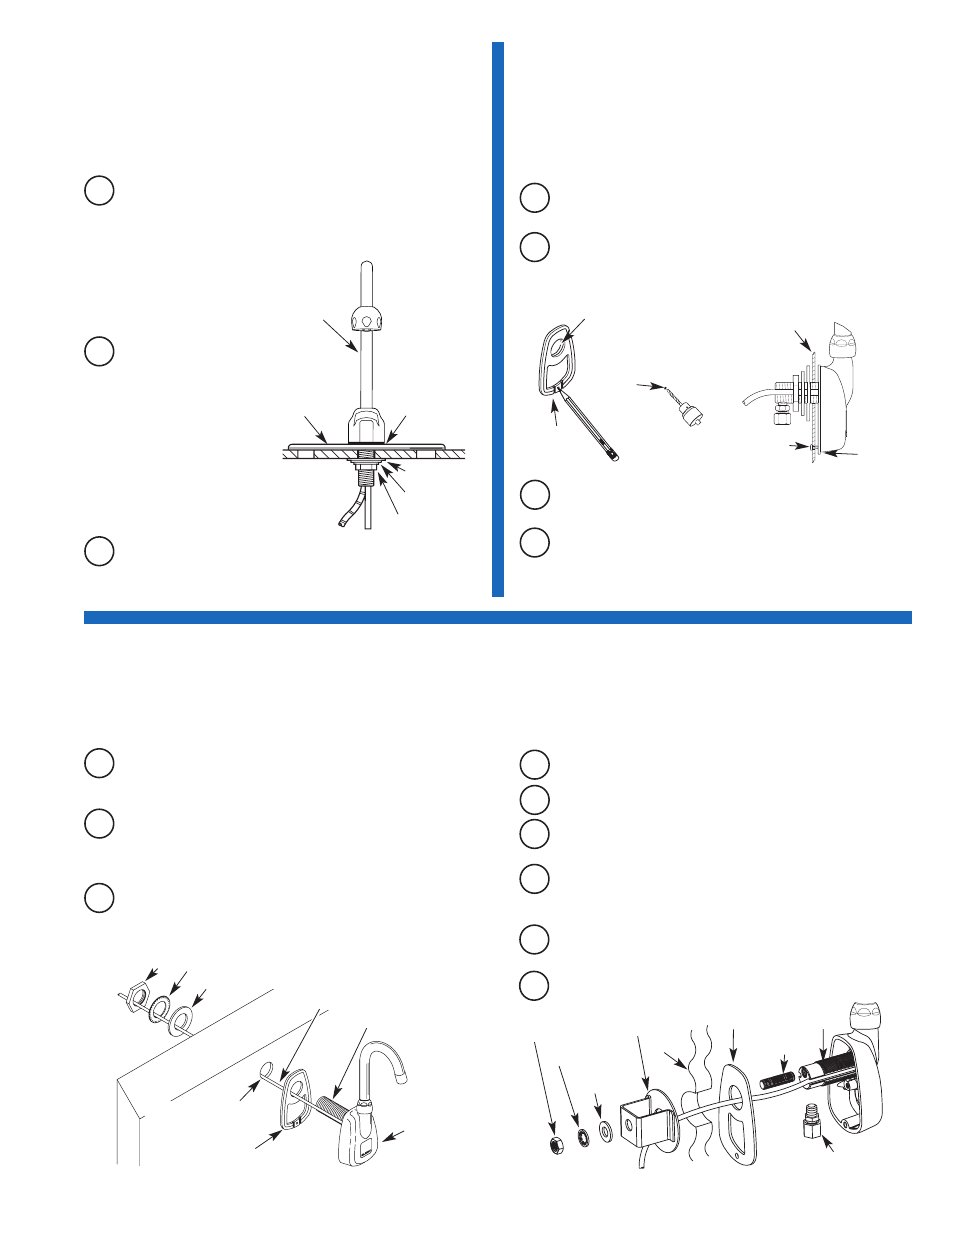
Install ETF-500 Faucet (Continued)
Note: When installing the faucet with a Sloan mixing valve, both these Installation Instructions AND those packaged with the mixing valve MUST be followed.
A
Route Sensor Cable through groove on side of Spout Shank.
Insert Sensor Cable and Spout Shank through Base Gasket and
Mounting Hole of sink.
B
Secure Faucet with the Flat Washer, Lockwasher and Nut
Supplied.
C
TO MOUNT ON A SURFACE LESS THEN .41 INCH (10 mm) THICK
1A
Install ETF-700 Faucet
Note: When installing with a Sloan MIX-110-AA Mixing Valve,
install Mixing Valve and Trim Plate before installing Faucet. For
complete installation guidelines, refer to the Installation
Instructions supplied with the Sloan mixing valve.
A
When optional Trim Plate is used, place Spacer between deck and
Trim Plate making certain that Spacer is aligned with hole in Trim
Plate and hole in deck.
Insert Sensor Cable and
Spout Shank through
Rubber Washer and then
through center deck hole.
B
Secure using Flat Washer, Lockwasher and Nut supplied.
C
TO MOUNT ON A SURFACE BETWEEN .41 INCH (10 mm) AND 1
INCH (25 mm) THICK
HEX JAM NUT
DO NOT
OVERTIGHTEN
FLAT WASHER
LOCKWASHER
WALL
BASE
GASKET
MOUNTING
SPACER
MOUNTING
STUD
MALE CONNECTOR
BASE GASKET
SPOUT SHANK
FAUCET
HOLE OF SCRUB OR
WASH-UP SINK
SENSOR CABLE
FLAT WASHER
NUT LOCKWASHER
1B
Install ETF-500 Faucet
SPOUT
TRIM PLATE
W/SPACER
(OPTIONAL)
RUBBER
WASHER
FLAT WASHER
LOCKWASHER
NUT
Note: Sloan Valve Company does NOT supply hardware necessary for mounting the faucet on surfaces thicker than 1” (25 mm) thick.
FAUCET MOUNTING HOLE OF
STAINLESS STEEL SURFACE
BASE
GASKET
STAINLESS STEEL
MOUNTING
SURFACE
BASE
GASKET
DRILL 7/64” (3 mm)
HOLE AT MARK
PLACED ON STAINLESS
STEEL MOUNTING
SURFACE
SELF-TAPPING
SCREW
A
Place the Base Gasket over the faucet mounting hole using it as a
template.
B
Mark the stainless steel mounting surface at the center of small
hole at the bottom of Base Gasket.
D
After Faucet body is mounted, insert the Self-Tapping Screw
through the drilled hole and into the small hole in the back of the
Faucet body. Tighten the Screw.
Note: The anti-rotation feature uses a screw to anchor the faucet in the
vertical position and is intended for use ONLY on stainless steel sinks.
C
Drill a 7/64" (3 mm) diameter hole through the stainless steel
mounting surface at the location just marked.
OPTIONAL ANTI-ROTATION FEATURE
F
Install Male Connector into Spout Shank.
Secure using the Flat Washer, Lockwasher and Hex Jam Nut
supplied. Do NOT overtighten the Hex Jam Nut.
A
Screw Mounting Stud into end of Spout Shank.
Route Sensor Cable through groove on side of Spout Shank.
B
From behind wall, install Mounting Spacer onto Faucet Shank as
illustrated. The Mounting Stud should protrude through the smaller
hole of the Mounting Spacer.
E
Insert Sensor Cable and Spout Shank through the Base Gasket
and then through the mounting hole of scrub or wash-up sink.
C
D
SPOUT
SHANK