Install valve module, Install batteries – Sloan EBF-187 Faucet User Manual
Page 4
4
4
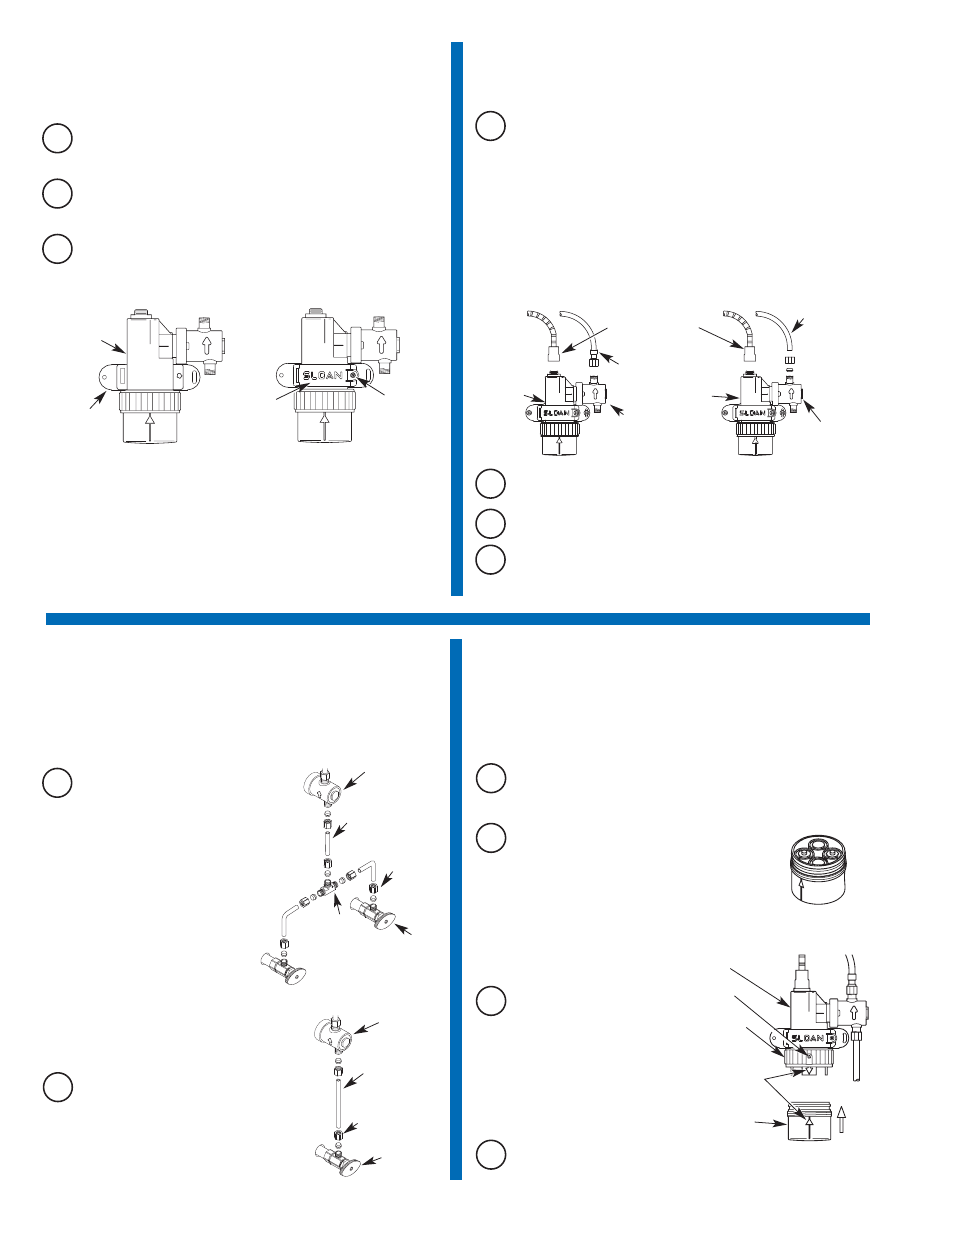
Install Valve Module
5
Connect Flex Hose or Copper
Tubing to Solenoid Valve and
Connect Fiber Optic Cable
7
Install Batteries
A
Loosen security set screw on the Coupling Ring with a 0.05” hex
wrench and Unscrew Battery Compartment Coupling Ring.
Remove Battery Compartment.
Important: DO NOT INSTALL THE BATTERIES UNTIL THE FAUCET IS
COMPLETELY INSTALLED. If the batteries are installed before the fiber
optic cable has been connected to the valve module, the faucet will not
properly set the sensing range for the sink on which it is installed.
B
To ensure proper operation, insert four (4)
new C-size Alkaline batteries. Check that the
orientation of each battery matches the
positive (+) and negative (-) symbols shown
at the bottom of the Battery Compartment.
Make sure that Spout is properly centered
and that no objects are in the sink.
A
Install Valve Module into Wall Bracket Base as shown below.
C
Swing Wall Bracket into position as shown below and secure
using the Self-tapping Screw provided.
VALVE
MODULE
SOLENOID
VALVE
3/8” (10 mm)
COPPER
SUPPLY TUBE
(FROM
SPOUT)
VALVE MODULE
FIBER OPTIC CABLE
CONNECTOR
(FROM SPOUT)
FLEX HOSE CONNECTION
COPPER TUBE CONNECTION
SOLENOID VALVE
FLEX HOSE
(FROM SPOUT)
A
Connect the free end of the Flex Hose or Copper Tube (now
attached to the Spout) to the outlet side of the Solenoid Valve as
shown below.
B
Remove the Rubber Caps from the Fiber Optic Cable Connector
and Valve Module.
D
The Cable Connector is keyed and will slide into Valve Module in
only one orientation. Thread the Connector Cap onto Valve Module
to secure the connection.
Note: An arrow on the body of the Solenoid Valve indicates the water
flow direction and points toward the outlet side of the Solenoid Valve.
The Valve Module can be rotated and positioned in the Wall Bracket to
accommodate tight installation requirements. Additionally, the Solenoid
Valve can be rotated 360 degrees on the Valve Module. The Solenoid
Valve should be rotated to the most convenient position for making
water line connections.
VALVE
MODULE
WALL
BRACKET
BASE
WALL BRACKET
SELF-TAPPING
SCREW
6
Connect Supply Line(s) from
Supply Stop to Solenoid Valve Inlet
C
Reattach the Battery
Compartment to the
Valve Module by aligning
the arrow on the Battery
Compartment with the
arrow on the solid tab of
the Valve Module.
D
Secure by tightening Battery Compartment Coupling Ring. To
deter unauthorized removal of batteries, use a 0.05” hex wrench
to tighten the security set screw on the Coupling Ring.
BATTERY
COMPARTMENT
VALVE
MODULE
SET SCREW
BATTERY
COMPARTMENT
COUPLING RING
ALIGN ARROWS AND
INSTALL BATTERY
COMPARTMENT TO
VALVE MODULE
BATTERY
COMPARTMENT
B
Insert tab of Wall Bracket into slot of Wall Bracket Base.
C
Connect the Fiber Optic Cable to Valve Module.
Important: Keep thread sealant out of your waterway to prevent
component part damage! DO NOT use sealant on compression fittings.
When thread sealant is used, do not apply it to the first two “starter”
threads.
3/8” (10 mm)
COMPRESSION
FITTING
3/8” (10 mm)
SUPPLY TUBE
SOLENOID
VALVE
SUPPLY
STOP
3/8” (10 mm)
COMPRESSION
FITTING
3/8” (10 mm)
SUPPLY
TUBE
SOLENOID
VALVE
SUPPLY
STOP
For Dual Line Hot and Cold Water
Supply Applications
Install a 3/8 inch (10 mm) copper supply
tube between Bak-Chek
®
Compression Tee
and hot and cold supply stops. (Supply
stops and copper supply tube furnished by
installer.) Install a 3/8 inch (10 mm) copper
supply tube between Bak-Chek
®
Compression Tee and inlet side of
Solenoid Valve. Tighten
Compression Fittings securely.
Note: Failure to install the Bak-Chek
®
Tee can result in a cross flow connection
when the faucet is off and the supply
stops are open. If pressure of the hot and cold
water supply differ, hot water can migrate into
the cold water supply or vice-versa. Most
plumbing codes require that the Bak-Chek
®
be
used to prevent this.
A
B
For Single Line Water Supply Applications
Install a 3/8 inch (10 mm) copper supply tube
between the supply stop and inlet side of
Solenoid Valve. (Supply stop and copper
supply tube furnished by installer.) Tighten
Compression Fittings securely.
Important: Flush dirt, debris, and sediment from the supply line(s).
3/8” (10 mm)
BAK-CHEK
®
TEE
USED ON DUAL
WATER SUPPLY
APPLICATIONS
ONLY