Operation – REMKO ML 260 User Manual
Page 5
5
Operation
Two to four seconds after the indoor unit has been con-
nected to the power supply, operation can begin.
Inserting the batteries into the remote control
Prior to initial operation, the batteries supplied with the
unit (2 type AAA batteries) must be inserted into the re-
mote control.
1. Slide off the cover of the battery slot on the back of
the remote control and insert the batteries.
2. Make sure that the polarity is correct.
Use the labelling in the slot.
3. Close the battery slot again.
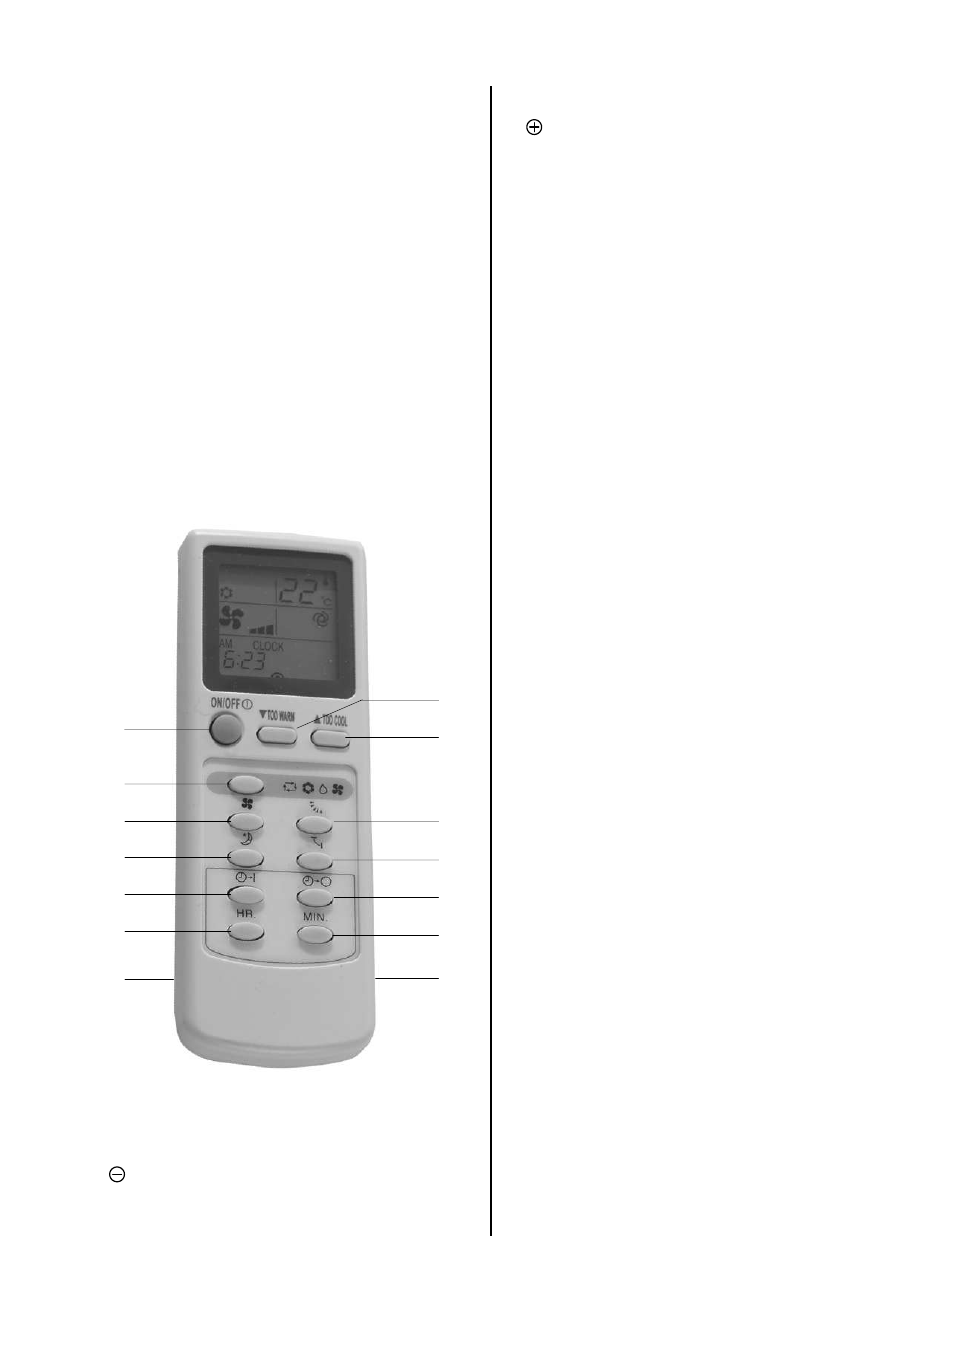
The remote control
The air conditioner is operated using the infrared re-
mote control.
A beep the signal has been correctly received after a
button is pressed.
4
1
2
8
6
5
7
9
11
3
12
10
13
14
3 button
This button is used to increase the temperature up
to a maximum of 31°C.
4 Mode
button
The operating mode is selected with this button. The
indoor unit has 4 modes:
Automatic:
In this mode, the unit operates in cooling or heat-
ing mode.
Operating cycle of the compressor:
On → 20 min.
Off → 10 min.
Cooling:
In this mode, the warm room air is cooled down to
the desired temperature.
Dehumidifying:
In this mode, the room is primarily dehumidified
and the set temperature is maintained.
Heating:
This mode is not available.
If this mode is activated, the compressor begins to
operate and causes the unit to malfunction!
5 Fan
button
The desired fan speed is set with this button.
The following 4 speeds are available:
Automatic, low, medium and high fan speed.
6 Fin
button
The position of the air outlet fins is set with this but-
ton.
There are 5 positions and an oscillating function
available.
7 Sleep
button
After this button is pressed in cooling mode, the tar-
get temperature automatically increases by 1°C
within one hour.
8 SWING
button
This button immediately activates the oscillating
function of the fins to improve the air distribution in
the room.
9 Timer On button
The unit is programmed to automatically switch on
within the next 24 hour-period with this button.
10 Timer Off button
The unit is programmed to automatically switch off
within the next 24 hour-period with this button.
11 HR button
The hours are set with this button.
12 MIN button
The minutes are set with this button.
13 Reset button (in the battery slot)
The settings are reset by pressing this button.
14 Clock button (in the battery slot)
The time setting is activated by pressing this button.
1 ON/OFF
button
The unit is switched on with this button.
The settings appear on the display.
2 button
This button is used to decrease the temperature
down to no lower than 16°C.