Adding refrigerant, Initial operation, Customer service and guarantee – REMKO ML 260 User Manual
Page 20
20
Proceed as follows to add the additional refrigerant
required:
1. Remove the vacuum pump and connect the filling
cylinder.
2. Place the open cylinder on a scale and calibrate the
scale to zero.
3. Ventilate the hose at the height of the manometer
distribution pipe.
4. Use the table above to determine the quantity to
add.
5. Open the suction pressure side of the manometer to
start adding refrigerant.
6. Close the manometer valve when the determined
amount has been added.
Adding Refrigerant
The refrigerant required for operating the system is
located in the outdoor unit.
For refrigerant pipes longer than 5 m per cycle, refriger-
ant must be added using the following table:
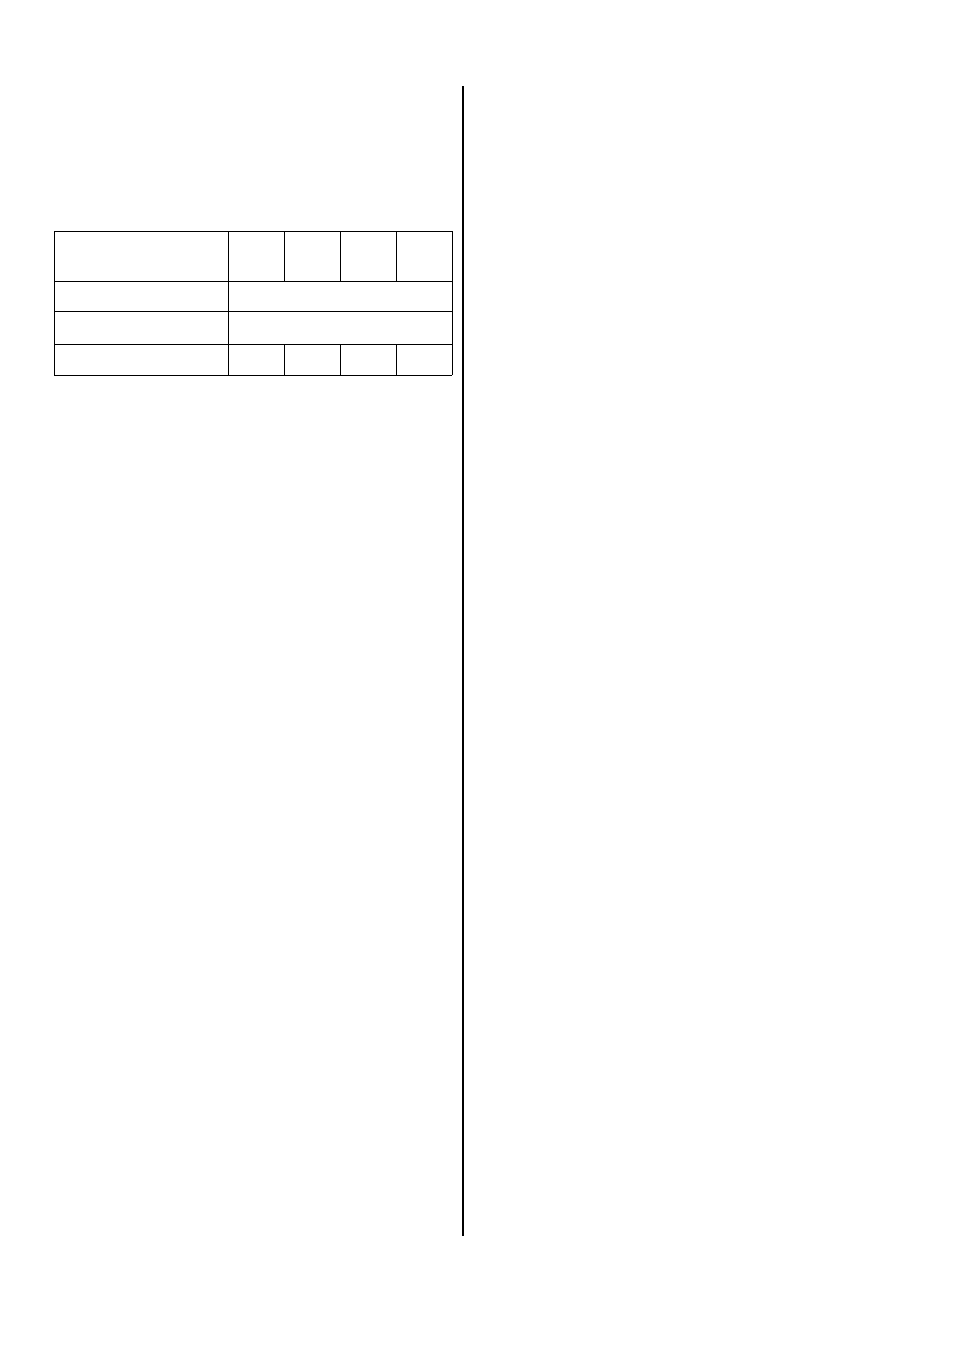
ML 260 ML 350 ML 520 ML680
Length of pipe
Amount per meter
Up to and including 5 m
5 m to max. 15 m
15 g/m 20 g/m 30 g/m 35 g/m
–––
Initial Operation
Initial operation of the unit must comply with the certifica-
tion specifications and be documented.
After all components have been connected and
checked, the system can be put into operation.
To ensure that the unit is functioning properly, a func-
tional check must be performed to identify any irregu-
larities during unit operation before the unit is handed
over to the operator.
Proceed with the functional check as follows:
1. Remove the caps from the valves.
2. To begin initial operation, briefly open the shut-off
valves until the manometer displays pressure meas-
uring approx. 2 bar.
3. Check the impermeability of all established connec-
tions with a leak locator spray or suitable devices.
4. If you did not find any leaks, open the shut-off valves
by turning them all the way counter-clockwise with a
hexagonal wrench.
If you find leaks, the connection must be re-
established. It is absolutely necessary to create a
new vacuum and dry the unit!
*
The compressor starts a couple of minutes later
due to the delayed start of the outdoor unit.
8. Check that the fan and compressor are running
smoothly and that cold air is being expelled from the
indoor unit and warm air from the outdoor unit.
9. During the test run, check all regulating, control and
safety mechanisms to ensure that they are function-
ing and set properly.
10. Check the indoor unit’s control mechanism using the
functions described in the operating instructions.
Timer, temperature settings, fan mode and dehu-
midifying mode as well as all other mode settings.
11. Measure overheating, outside, inside, outlet and
evaporation temperatures and enter these values in
the initial operation log.
12. Remove the manometer and reattach all parts that
were removed.
Make sure that there are seals in the closing caps.
13. Familiarise the operator with the system.
*
Operation/handling which does not comply with
these instructions is prohibited!
In cases of non-compliance, we assume no liability
and the guarantee becomes null and void.
Customer Service and
Guarantee
For the guarantee to be valid, the purchaser or his cus-
tomer must completely fill out the "guarantee certificate"
enclosed with all units and send it back to REMKO GmbH
& Co. KG
.
The units are repeatedly tested at the production site to
ensure that they are working properly. If a malfunction
occurs that cannot be eliminated by the operating per-
sonnel, please contact your dealer or contract party.
Proper Use
The ML … IT indoor units have been designed and
equipped exclusively for operation with ML … AT outdoor
units.
The manufacturer assumes no liability for damage re-
sulting from non-compliance with manufacturer specifi-
cations and legal requirements, or if modifications are
made to the units.
5. Turn the main switch or the fuse on.
6. Adjust the target temperature on the indoor unit to a
lower value than the existing room temperature us-
ing the remote control.
7. Switch the indoor unit to cooling mode using the re-
mote control.