Schedules window, Lead/lag controller technical guide, Setting schedules – Orion System Lead Controller User Manual
Page 33
Lead/Lag Controller Technical Guide
Section 9: Setting Schedules
33
Schedules Window
Setting Schedules
Left click the
button (ON/OFF button) in the Schedules
Status Window (Figure 59, page 32) to open the Schedule Confi gu-
ration Window (Figure 60). You can confi gure up to (4) separate
schedules for various uses on the Lead/Lag Controller, but can
only confi gure (1) schedule on the 2 Lead/1 Lag Controller. These
Schedules are (7) day, (2) event per day Schedules.
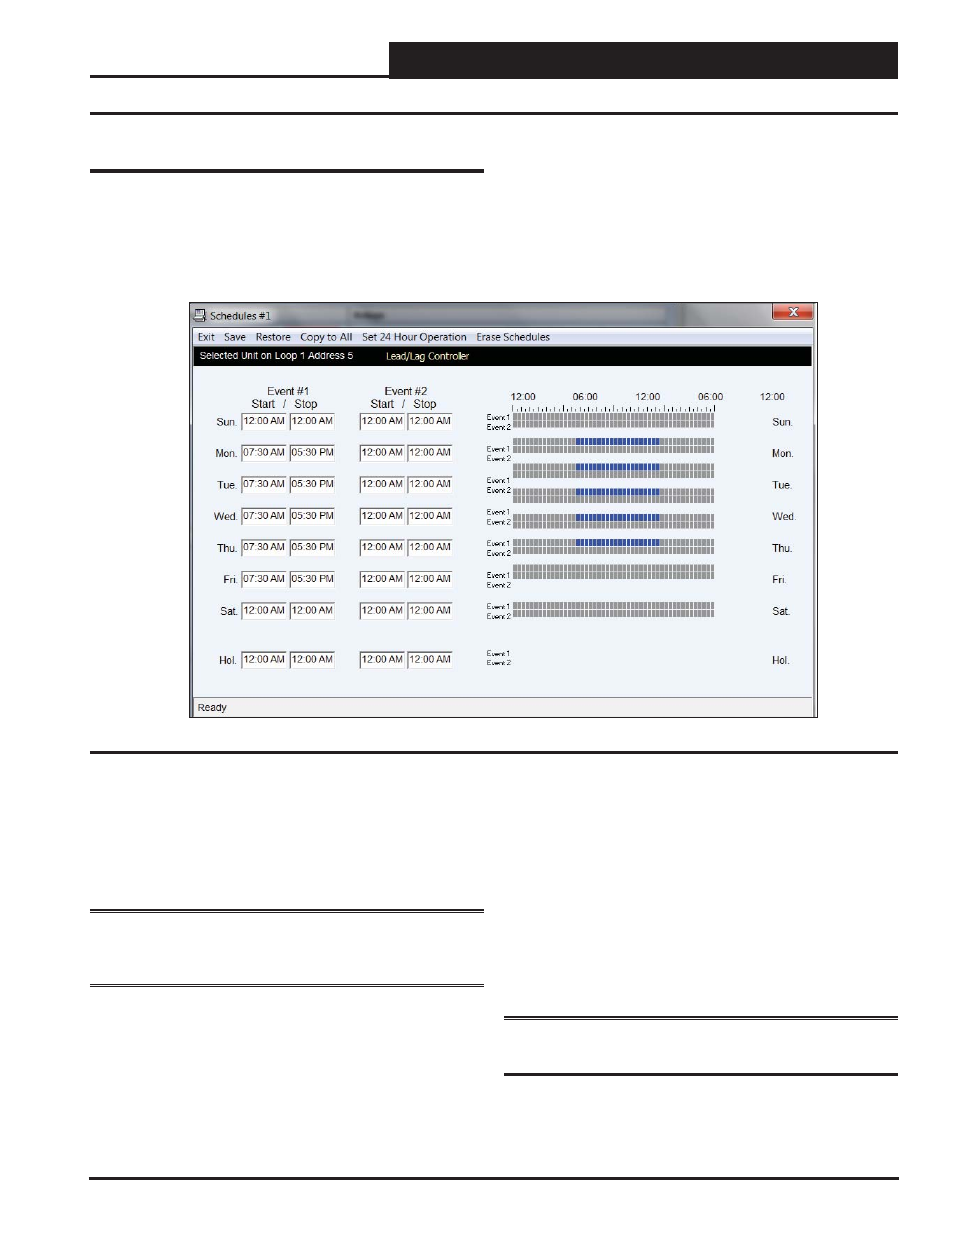
Figure 60: Schedule #1 Confi guration #1 Window
The
Schedule Confi guration Window
in the example shows a 7:30
AM to 5:30 PM operating schedule for Monday through Friday. You
can also use 24 hour military format if you wish. The bars on the right
side of the screen give a visual indication of the selected time periods.
When you enter a time in any fi eld, you must designate AM or PM
and
press
to save.
NOTE:
You MUST press
to have the system accept
your entry. If you do not press
, the bar graph to the right
will either not display or will not change.
The holiday start and stop times will override the standard operat-
ing hours. The holidays themselves are scheduled in the
Holiday
Schedule Window
described on page 35
.
To eliminate a schedule from any event, simply
type
a zero and
press
for the Start and Stop time for that day. The screen will
display 12:00 AM for both the Start and Stop times, indicating that
the equipment will not activate for that day.
If you want the controller to run the full 24 hours,
type
11:59 AM
for the Start time and type 11:59 PM and
press
for the
Stop time. This ensures the full 24-hour period will remain in the
occupied mode without interruption.
Select
to save your schedule.
Select
to restore
a previously saved schedule.
Select
to copy the
schedule to all like controllers,
select
< Set 24 Hour Operation>
to all schedules in this window for continuous operation, and
select
to completely erase the schedule appearing
in the window. See page 34 for an explanation of each of these
functions.
WARNING: < Erase Schedules>
will clear ALL entered
stop/start times, so use with caution.