Fluke Biomedical 956A-201-M2 User Manual
Page 74
4-2
The adjustments listed in Table 4-1 and Table 4-2 is for standard
equipment. If an analog output option board has been furnished
with the ratemeter, refer to the analog output option board
instruction manual for additional adjustment instructions.
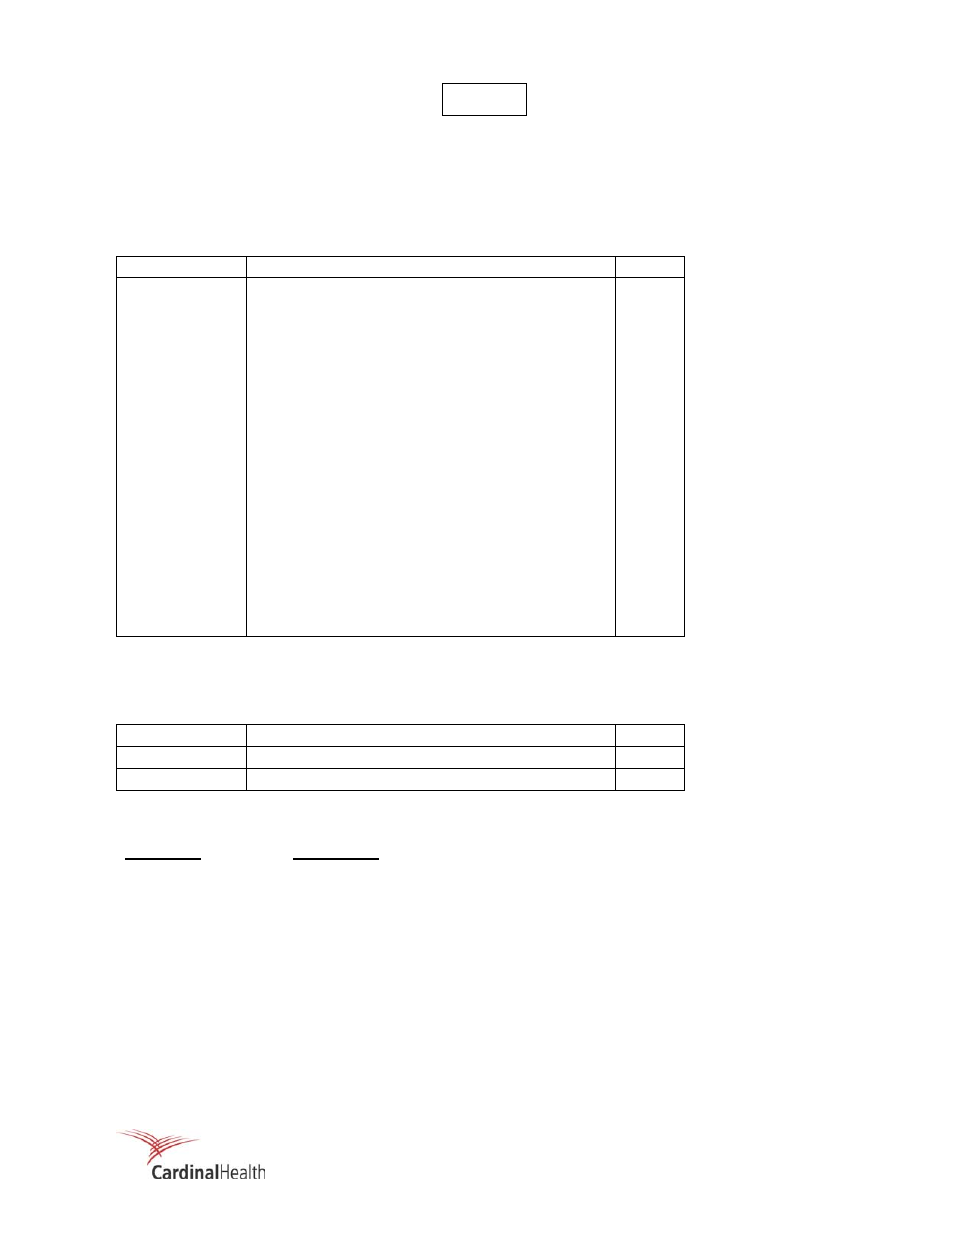
Table 4-1. Electronic Adjustments, UDR
Adjustment Purpose
Type
VR1
Zero Adjust/0 – 10 Volt Analog Output
Field
VR2
Gain Adjust/0 – 10 Volt Analog Output
Field
VR4
20 mA Adjust/4 – 20 mA Volt Analog Output #1
Field
VR5
20 mA Adjust/4 - 20 mA Volt Analog Output #2
Field
VR6
4 mA Adjust/4 – 20 mA Volt Analog Output #2
Field
VR7
4 mA Adjust/4 – 20 mA Volt Analog Output #1
Field
VR8
Gain Adjust/Signal Input Op Amp
Factory
VR9
DC Offset Adjust/Signal Input Op Amp
Factory
VR10 High
Discriminator
Adjustment
Field
VR11 Low
Discriminator
Adjustment
Field
VR12
Anti-Jam Threshold Adjust
Factory
VR13
Write Cycle Clock Adjust
Factory
HV Supply R5
High Voltage Adjust
Field
VR51
+ 5 Vdc Power Supply
Field
R12
Gain Adjust, 942-200-95-M1
Field
R8
ZERO Adjust, 942-200-95-M1
Field
R11
10 mV Adjust, 942-200-95-M1
Field
For the 956A-201-M2, a 0-10 mV output is provided via the Model 942-200-95-M1 analog output option
board. Refer to the 942-200-95D-M1 manual for setup instructions.
Table 4-2. Electronic Adjustments, Detector
Adjustment Purpose
Type
R44
Detector Input Discriminator
Factory
R41 Anti-Jam
Threshold
(Factory Adjustment Only)
Factory
The following factory calibration and test procedures are included for reference at the end of this section:
Document Description
CAL-GM6
Factory Calibration Procedure, 897A G-M Detector
TP897A
Factory Test Procedure, 897A G-M Detector
TP956A-201-3
956A-201 Digital Ratemeter Factory Test Procedure
TP956A/897A-21 X
Loop Test Procedure -Low Range Detector
TP956A/897A-22X
Loop Test Procedure -Medium Range Detector
TP956A/897A-23X
Loop Test Procedure -High Range Detector
NOTE