Removing the blower/chipper engine unit – DR Power Tow-Behind 9.00 Commercial (May 2006 - July 2010) User Manual
Page 49
CALL
TOLL-FREE
1-800-DR-OWNER 45
Removing the Blower/Chipper Engine Unit
•
BEFORE PERFORMING ANY MAINTENANCE, SHUT OFF THE ENGINE, ALLOW FIVE (5) MINUTES
FOR PARTS TO COOL AND DISCONNECT THE SPARK PLUG WIRE.
•
BEFORE PERFORMING THIS PROCEDURE, ENSURE THAT YOUR DR LEAF AND LAWN VACUUM IS
ON LEVEL TERRAIN AND THE BRAKE IS SET ON YOUR LAWN TRACTOR.
•
FOR THE SUBARU ENGINE MODEL, YOU WILL NEED AN EXTRA PERSON FOR LIFTING THE ENGINE.
•
DO NOT USE CHIPPER OR VACUUM FEATURES WITHOUT FIRST SECURING THE ENGINE TO THE
FRAME AND SECURING THE HOSES.
1. Disconnect the Blower Exit Elbow Assembly from the Collector Box Hose (Figure 45 on page 42).
2. -
For the B&S Engine model, lower the three (3) Frame Support Legs by removing the Safety Hitch
Pins (Figure 18
on page 20). When you lower the Legs, re-install the Safety Hitch Pins.
- For the Subaru Engine model, remove the Safety Hitch Pin and raise the Caster Wheel, then re-
install the Safety Hitch Pin (Figure 5
on page 14).
3. Remove the Hitch Clip from the Clevis Pin and remove the Pin (Figure 19
on page 20). Move the
Trailer Tongue from the Tractor Hitch Plate in a side motion. For the Subaru model, you can now
set the Trailer Tongue on the ground.
4. -
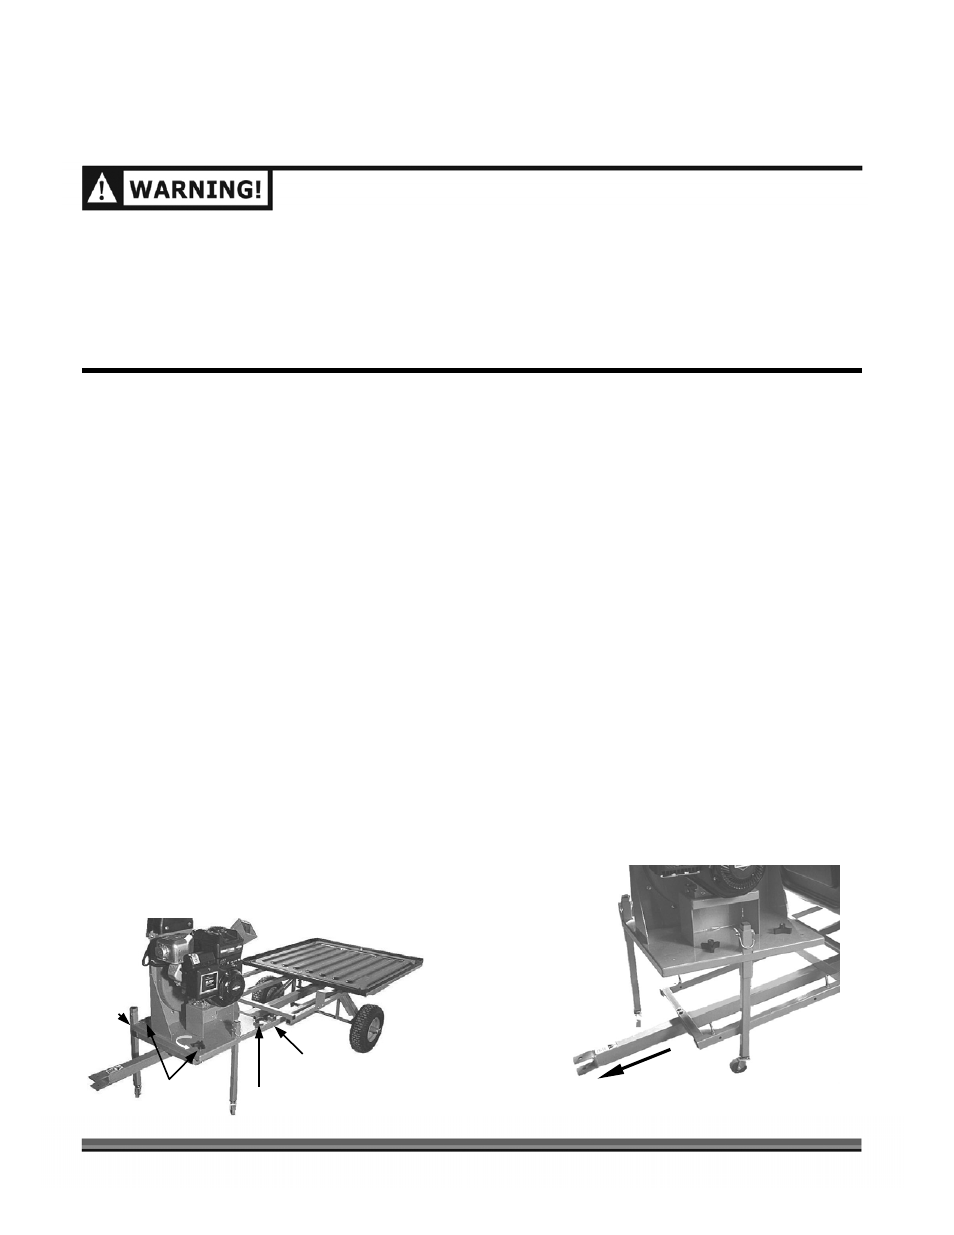
For the B&S Engine model, remove (turn counterclockwise) the two (2) Rear Retaining Knobs
holding the Engine Plate to the Trailer Frame (Figure 52).
- Hold the Trailer Tongue and remove the two (2) Front Retaining Knobs (Figure 52), thus
preventing the Trailer from falling when you remove the last Knob.
- Slowly lower the Trailer from under the Engine (Figure 53). The Engine assembly is now free for
you to move it away from the Trailer.
- Carefully roll the Engine Assembly forward from the Trailer Frame (Figure 53).
- For the Subaru Engine model, remove (turn counterclockwise) the four (4) Retaining Knobs
holding the Engine Plate to the Trailer Frame (Figure 52).
- With the help of another person, carefully lift the Engine off the Mounting Studs and set it on the
attached Dolly Wheels.
5. Store the Engine assembly in a dry location.
6. Reverse this procedure to re-install the Engine Assembly and then refer to page 20, “Connecting
the DR LEAF and LAWN VACUUM to your Lawn Tractor”.
7. Check the Safety Interlock Switch. See page 18.
Figure 52
Figure 53
Rear Retaining Knob (2-places)
Front
Retaining
Knobs
Carefully Roll Engine Assembly Forward
Engine
Plate
Trailer Frame