Cb 1 series, Figure 1 – Code Blue CB 1-E ECONOMICAL HELP POINT User Manual
Page 42
Code Blue
•
259 Hedcor Street
•
Holland, MI 49423 USA
•
800.205.7186
•
www.codeblue.com
GU-157-E
page 42 of 71
CB 1 Series
Administrator Guide
23 Solar and WindAssist™ Installation Instructions
IMPORTANT NOTICE
The following list is provided as a checklist for items required prior to installation or items that
will be required on installation site:
1. Batteries must be FULLY bench charged before installation.
2. A local cellular dealer must provide a SIM card before unit can place calls.
3. Hand/Powered tools, including torque wrench, truck or mechanical lift for the CB 1 unit.
4. At least two persons and ladders for attaching support collar, adjusting solar panel, etc.
1.0 FOUNDATION – (see Anchor Bolt Installation Instructions)
2.0 SET THE UNIT
2.1
Turn one set of nuts and washers onto the anchor bolts – After the foundation has set, turn
one set of nuts followed by one set of washers onto the anchor bolts. Set the nuts such that the
lowest washer is about 2½ inches above the concrete and at an even height. To accomplish
this, use a small level and check from front to back, side to side and diagonally. These nuts
are NOT adjustable after the unit is in place. The bottom edge of the Code Blue unit will be
½-inch above the concrete when installed.
IMPORTANT:
The leveling of the bottom nuts is crucial to the leveling of the unit. A small error
in the adjustment of these will be magnified after installation.
IMPORTANT:
A ½-inch
minimum air gap is required between the foundation and the unit.
Moisture problems may result if this condition is not complied with.
2.2
Set the Code Blue unit on the anchor bolts – Align the phone plate in the desired direction
and lift the Code Blue unit over the anchor bolts. The unit may be lifted using the I-bolt provided
and screwed into one of the solar threaded holes used to mount the solar panel. Note that the
unit weighs approximately 400 pounds. Use appropriate lifting materials and methods to avoid
possible injury and/or damage.
2.3
Secure the Code Blue unit – Access the mounting studs through the door on the side of the
unit, place the second set of washers and nuts on the studs and tighten the mounting nuts
onto the anchor bolts. This may be more convenient if a long socket, extension and universal
joint is used to tighten the hardware.
3.0 INSTALL THE SOLAR PANEL AND WIND GENERATOR
3.1 Adjustable universal mount
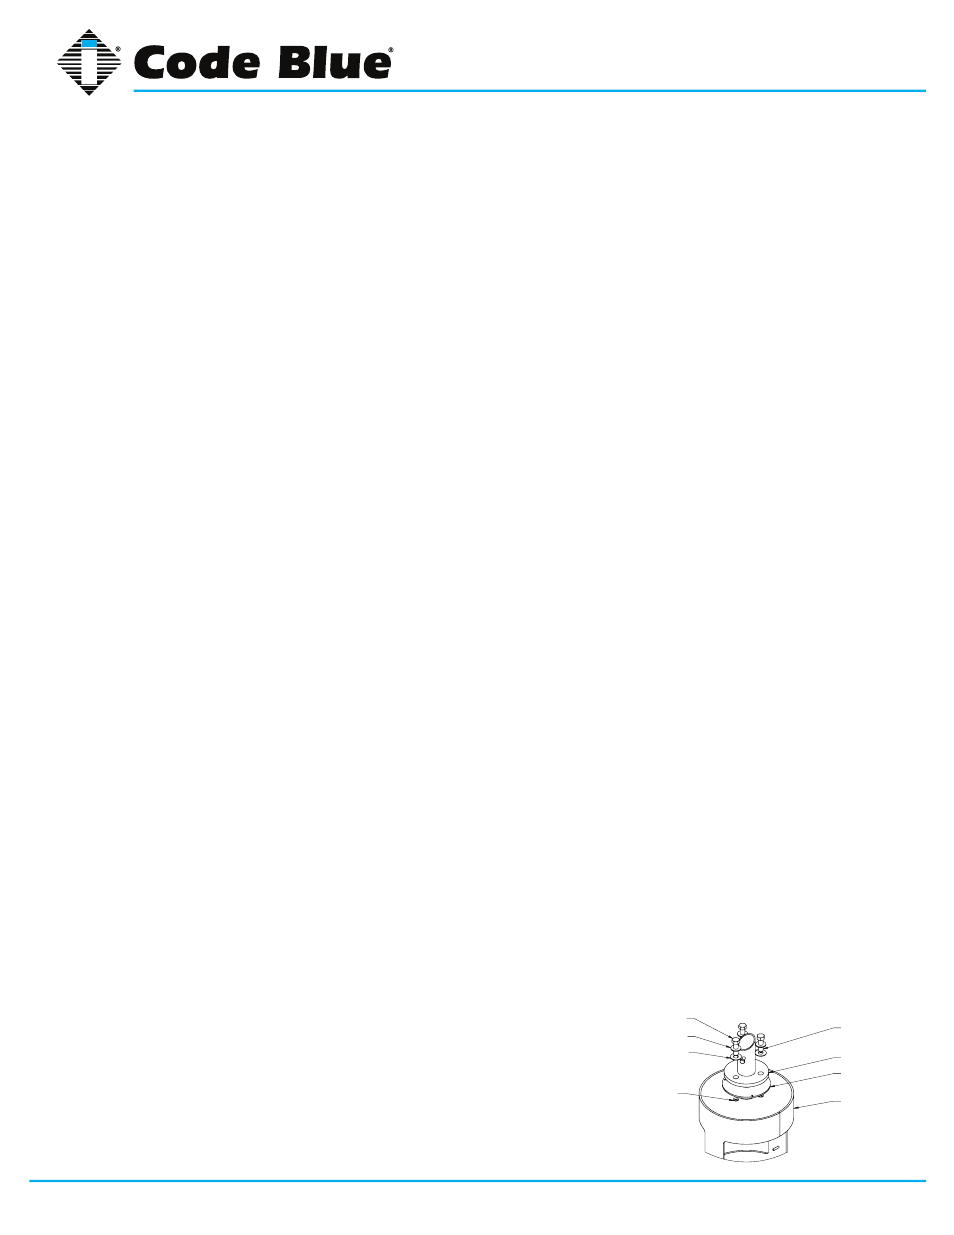
3.1.1
Attach the aluminum pole – Place a combination washer (rubber, then metal) on each
of the three 5/8 bolts with Loctite treated threads. Attach the pole to the top of the unit.
See
Fig. 1.
NOTE:
Completely coat Loctite around the threads. Loctite
MUST dry for 24 hours before being exposed to moisture.
NOTE:
Each time the bolts are removed, they must be
retreated with the Loctite PST.
CAUTION:
Loctite PST is a skin irritant – use the enclosed
rubber gloves to treat the threads. Dispose of gloves when
completed.
SOLAR BOLLARD
GASKET
SOLAR COLLAR
RUBBER WASHER
METAL WASHER
HEX BOLT
APPLY LOCTITE
TO THREADS OF NUT
APPLY LOCTITE TO
THREADS OF BOLT
Figure 1