2 special instrument features, 1 auto zeroing, 2 changing default control mode – Bronkhorst LIQUI-FLOW mini (from 01-07-2013) User Manual
Page 24: Special instrument features, Auto zeroing, Changing default control mode, Section 2.11
LIQUI-FLOW™ mini
9.17.065
Bronkhorst High-Tech BV
24
4.2
Special instrument features
4.2.1
Auto zeroing
To start the auto zero-procedure by digital operation two parameters should be written:
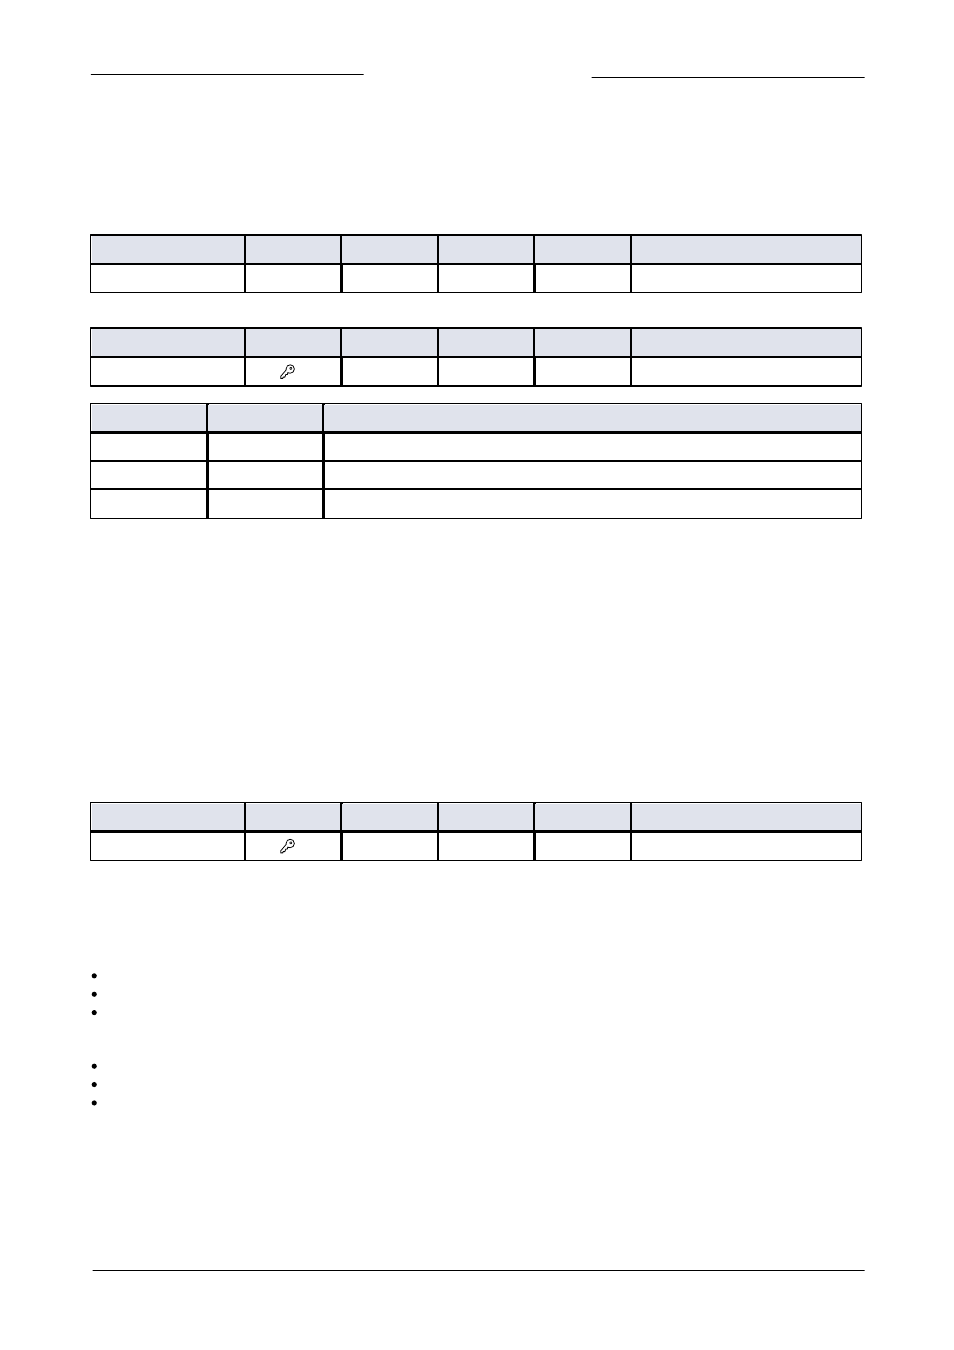
Control Mode
Type
Access
Range
FlowDDE
FLOW-BUS
Modbus
Unsigned char
RW
0…255
12
1/4
0x0024/37
Calibration Mode
Type
Access
Range
FlowDDE
FLOW-BUS
Modbus
Unsigned char
RW
0…255
58
115/1
0x0E61/3682
Value
Mode
Instrument action
0
Idle
Idle
9
Auto zero
Auto-zeroing
255
Error
Idle
Auto-zero procedure:
Step 1: Set ‘Control Mode’ to ‘Calibration Mode’ (value 9)
Step 2: Set ‘Calibration Mode’ to ‘Auto zero’ (value 9)
Step 3: Check ‘Calibration Mode’,
Idle (value 0)
Auto-zeroing succeeded
Auto zero (value 9)
Auto-zeroing active
Error (value 255)
Auto-zeroing failed
4.2.2
Changing default control mode
Instruments are delivered with either analog or digital signal as default, depending on customer’s requirement. After every
(power-up) reset the instrument will return to its default control mode. The default control mode can be changed with the
following parameter:
IOStatus
Type
Access
Range
FlowDDE
FLOW-BUS
Modbus
Unsigned char
RW
0…255
86
114/11
0xF258…0xF259/62041…62042
Bit 6 [7…0] represents the former analog jumper.
1 = default control mode is analog
0 = default control mode is digital
Procedure for changing default digital operation to default analog operation:
Read ‘IOStatus’
Add 64 to the read value
Write ‘IOStatus’
Procedure for changing default analog operation to default digital operation:
Read ‘IOStatus’
Subtract 64 from the read value
Write ‘IOStatus’