Paxton Superchargers Denali User Manual
Page 34
11-2
P/N: 4809639
©2004 Paxton Automotive
All Rights Reserved, Intl. Copr. Secured
12APR04 v3.0(01-03Denali/Esc(4809639v3.0))
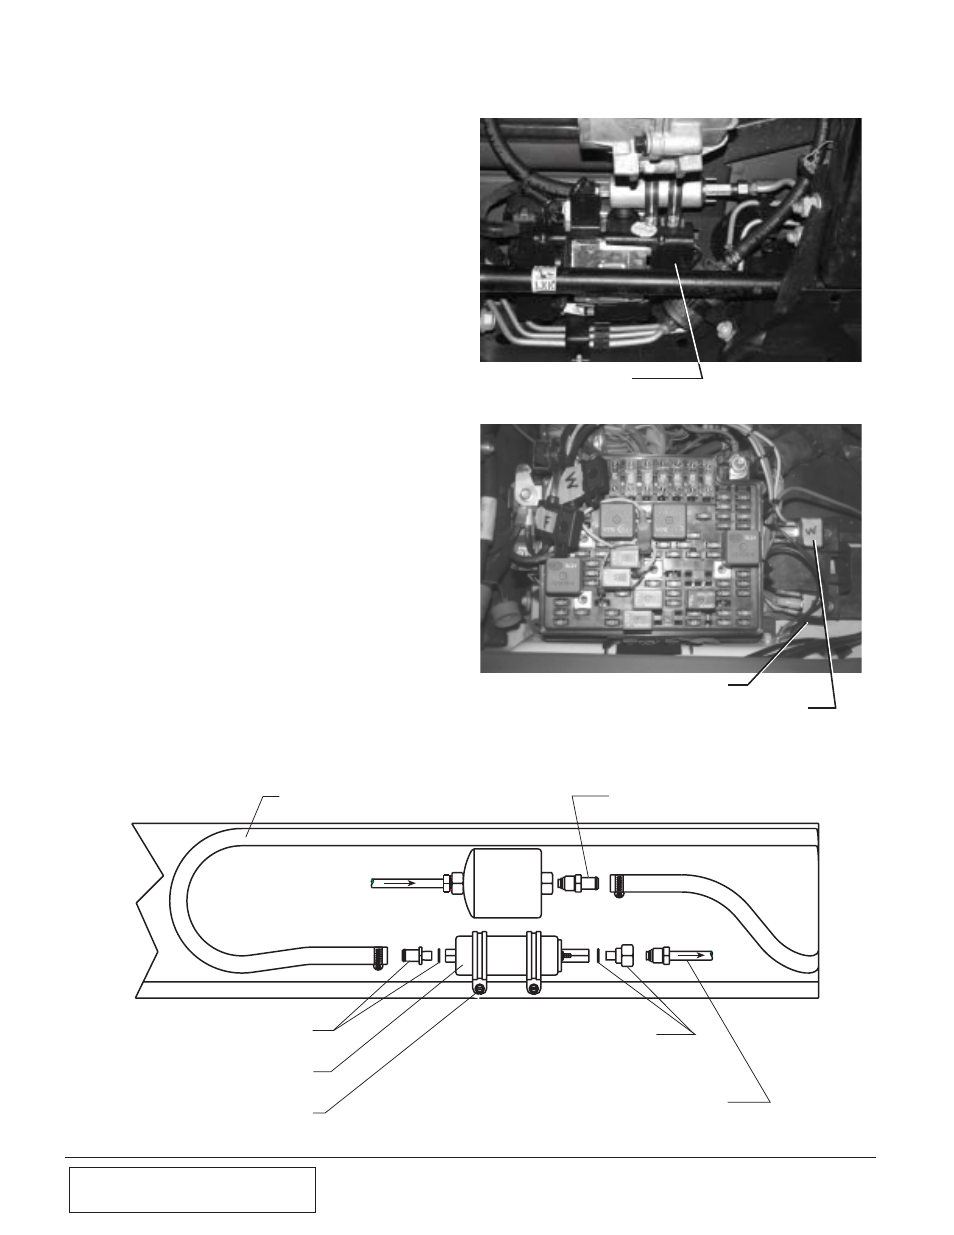
11.A FUEL PUMP WIRING AND INSTALLATION (Escalade/Denali)
F.
Remove the fuel line from the outlet
(front) of the fuel filter. Remove the tube
from the plastic retainer holding it so that
it can be rotated freely. Some models may
vary from the photo slightly. Follow the
same procedure, taking care to mount the
pump so that the hard line is not stressed.
G.
Making sure the O-ring is seated on the
threaded end of the supplied fitting, install
into the outlet (front) of the fuel filter and
tighten.
H.
Making sure the O-ring is seated on the
tube end of the fuel line (removed from the
filter) thread the bump tube into the fitting
installed on the outlet of the fuel pump and
tighten.
I.
Route the free end of the hose connected
to the fuel pump inlet to the fitting previ-
ously installed on the fuel filter outlet. Use
the supplied hose clamp to secure the hose
on the barb fitting. Try to make the bends
as large as possible, so as to avoid kinking
the hose. Secure the hose using the wraps
and tighten all of the hose clamps.
J.
Install the supplied adel clamps onto the
fuel pump and mark holes to be drilled for
#12 sheet metal screws. Drill an 11/64"
hole at each location. Using the supplied
black 12-gauge wire with yellow ring ter-
minal connectors, install one end under the
sheet metal screw nearest the electrical ter-
minal side of the fuel pump. Attach the
other end of the ground wire to the (-) ter-
minal of the fuel pump. Secure to the ABS
module bracket as shown in Fig. 11.A-e.
Tighten both adel clamps.
K.
Attach the previously routed red wire to
the positive terminal of the fuel pump
using the yellow ring terminal connector.
Fig. 11.A-e
PAXTON FUEL FILTER FITTING
(7P625-031) (MAKE SURE THAT THE
SUPPLIED O-RING IS INSTALLED
AND TIGHTEN THE FITTING)
STOCK FUEL LINE:
DISCONNECT FROM FUEL FILTER AND CONNECT TO FUEL PUMP
DISCHARGE FITTING. VERIFY THAT THE FACTORY O-RING IS
INSTALLED ON THE END OF THE TUBE (BEND AS NECESSARY SO
THAT THE FUEL PUMP WILL MOUNT EASILY)
MARK AND DRILL TWO HOLES.
INSTALL THE SUPPLIED CLAMPS AND
SCREWS TO HOLD THE FUEL PUMP
SUPPLIED FUEL PUMP
SUPPLIED FUEL PUMP FITTING:
(VERIFY THAT THE COPPER WASHER
IS INSTALLED AND FITTING IS TIGHT)
PAXTON FUEL PUMP FITTING:
(7P625-030) (VERIFY THAT THE
COPPER WASHER IS INSTALLED
AND FITTING IS TIGHT)
STOCK
FUEL
FILTER
STOCK FUEL LINE
FROM TANK
PAXTON SUPPLIED FUEL HOSE (ROUTE AS
SMOOTHLY AS POSSIBLE, SECURE WITH ZIP TIES,
ATTACH BOTH ENDS TO THE AVAILABLE BARB
FITTINGS AND TIGHTEN THE CLAMPS)
ABS MODULE BRACKET
Fig. 11.A-f
Fig. 11.A-g
FUEL PUMP RELAY
WATER PUMP RELAY