B. lubrication, C. evaporator and condenser coils, D. condensate drain – Bryant 585B User Manual
Page 14: E. evaporator blower, F. condenser fan, G. electrical controls and wiring, H. refrigerant circuit, I. cleaning the heating section, Bliject::ihtp'frpvpl:^ihg!:i,fhhife, Nbt'i poke' .stitsss
Attention! The text in this document has been recognized automatically. To view the original document, you can use the "Original mode".
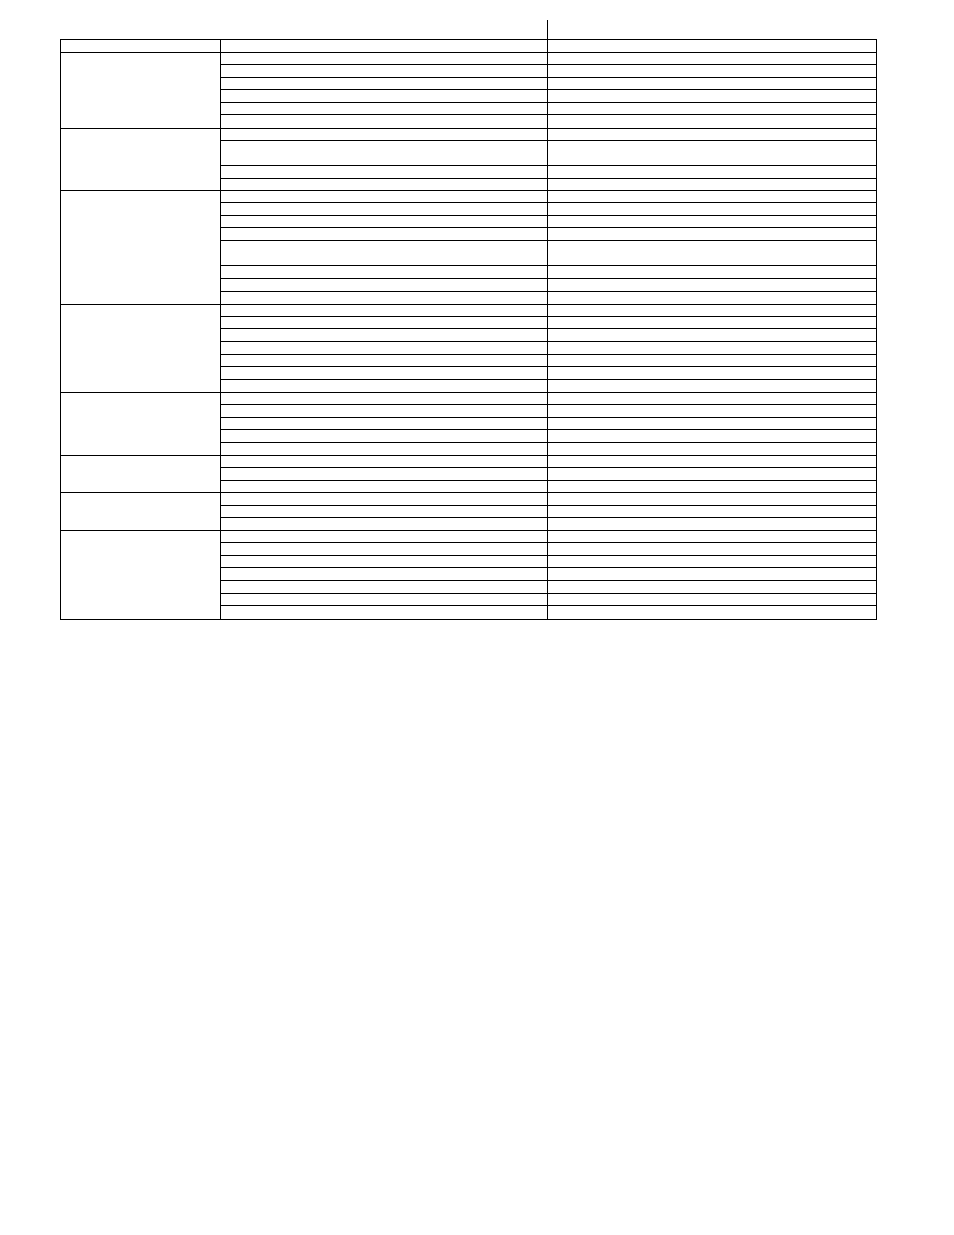
TABLE IX-COOLING SERVICE AN ALYSIS CHART
SYMPTOM
CAUSE
REMEDY
Compressor and condenser
fan will not start.
Power failure
Call power company.
Fuse blown or circuit breaker tripped
Replace fuse or reset circuit breaker.
Defective thermostat, contactor, transformer, or control relay
Replace component.
Insufficient line voltage
Determine cause and correct.
Incorrect or faulty wiring
Check wiring diagram and rewire correctly.
Thermostat setting too high
Lower thermostat setting below room temperature.
Compressor will not start
but condenser fan runs.
Faulty wiring or loose connections in compressor circuit
Check wiring and repair or replace.
Compressor motor burned out, seized, or internal
overload open
Determine cause. Replace compressor.
Defective run/start capacitor, overload, start relay
Determine cause and replace.
One leg of three-phase power dead
Replace fuse or reset circuit breaker. Determine cause.
Compressor cycles (other
than normally satisfying
thermostat)
Refrigerant overcharge or undercharge
Blow refrigerant, evacuate system, and recharge to nameplate.
Defective compressor
Replace and determine cause.
Insufficient line voltage
Determine cause and correct.
Blocked condenser
Determine cause and correct.
Defective run/start capacitor, overload, start relay,
or reset relay
Determine cause and replace.
Defective thermostat
Replace thermostat.
Faulty condenser fan motor or capacitor
Replace.
Restriction in refrigerant system
Locate restriction and remove.
Compressor operates
continuously.
Dirty air filter
Replace filter.
Unit undersized for load
Decrease load or increase unit size.
Thermostat set too low
Reset thermostat.
Low refrigerant charge
Locate leak, repair, and recharge.
Le'aking valves in compressor
Replace compressor.
Air in system.
Blow refrigerant, evacuate system, and recharge.
Condenser coil dirty or restricted
Clean coil or remove restriction.
Excessive head pressure
Dirty air filter
Replace filter.
Dirty condenser coil
Clean coil.
Refrigerant overcharged
Purge excess refrigerant.
Air in system
Blow refrigerant, evacuate system, and recharge.
Condenser air restricted or air short-cycling
Determine cause and correct.
Head pressure too low
Low refrigerant charge
Check for leaks, repair, and recharge.
Compressor valves leaking
Replace compressor.
Restriction in liquid tube
Remove restriction.
Excessive suction pressure
High heat load
Check for source and elim inate.
Compressor valves leaking
Replace compressor.
Refrigerant overcharged
Purge excess refrigerant.
Suction pressure too low
Dirty air filter
Replace filter.
Low refrigerant charge
Check for leaks, repair, and recharge.
Metering device or low side restricted
Remove source of restriction.
Insufficient evaporator airflow
Increase air quantity. Check filter— replace if necessary.
Temperature too low in conditioned area
Reset thermostat.
Outdoor ambient below 65°F
Install low-ambient kit.
Filter-drier restricted
Replace.
B. Lubrication
Fan and blower motors are prelubricated for 2 years of heavy
duty or 5 years of normal duty. When lubrication is neces
sary, send motor to an authorized motor repair shop.
C. Evaporator and Condenser Coils
CAUTION:
Be SSUJrfeiSp'hlectt^^^
OFF before cleaning coils.
The coils are easily cleaned when they are dry; therefore,
they should be checked and cleaned
before
each cooling
season. The coils should be inspected periodically during the
cooling season.
If the coils are coated with dirt or lint, they should be
vacuumed with a vacuum cleaner’s soft brush attachment.
Be careful not to bend the fins.
If the coils are coated with
oil or grease, they may be cleaned with a mild detergent and
water solution. Rinse coils with clear water. Be careful not
to splash water on motors, insulation, wiring, or filters.
D. Condensate Drain
The drain pan and condensate drain should be checked at the
same time the cooling coils are checked. Clean the drain pan
and condensate drain by removing any foreign matter from
the pan. Flush pan and drain tube with clear water. If the
drain tube is restricted, it can generally be cleared with
high-pressure water. If this does not work, try a “plumber’s
snake” or similar probe device.
E. Evaporator Blower
The blower should be inspected at least once each year. Re
move caked-on dirt from the blower wheel and housing with
brush; remove grease with mild solvent. Make sure blower is
centered in the blower housing.
F. Condenser Fan
The condenser fan should be kept free of all obstructions to
-14-
WARNING:
Do
:
nbt'i poke' .stitSss,
I
shhe^
i
¿ther
'i :i
;bliject::ihtp'frpvpl:^ihg!:i,fhhife^^
l i r e S u l t i ; ; ' ; ' : i i ' i V ; ' ;
i ; ' ’ i l i hi:';;
i ■V;i'' ':'iii i ¡'hi', ■;;
The required fan position is shown in Figure 3. Adjust fan
position by loosening setscrews and moving fan up or down.
G. Electrical Controls and Wiring
With power disconnected to unit, check all electrical connec
tions for tightness. Tighten all screws on connections. If any
smoky or burned connections are noticed, disassemble the
connection, clean all parts, strip wire, and reassemble prop
erly and securely. Electrical controls are difficult to check
without proper instrumentation; therefore, reconnect
electrical power to unit and observe unit through one com
plete operating cycle. If there are any discrepancies in the
operating cycle, contact your Dealer and request service.
H. Refrigerant Circuit
The refrigerant circuit is difficult to check for leaks without
proper equipment. Therefore, if low-cooling performance is
suspected, contact your local Dealer for service.
I. Cleaning the Heating Section
Soot, lint, or dirt on the .heating section components visible
in Figure 7 should be cleaned off before each heating season.
To insure dependable and efficient heating operation, the
heat exchanger should be checked by a qualified mainte
nance person before each heating season, and cleaned when
necessary. This checkout should not be attempted by anyone
not having the required expertise and equipment to do the
job properly. Checking and^r cleaning the heat exchanger
involves removing the unit top, disconnecting various motor
leads, and when completed, reinstalling the top properly to
maintain a proper seal. Contact your local Dealer for the re
quired periodic maintenance.