Assembly – Sears 917.254710 User Manual
Page 7
Attention! The text in this document has been recognized automatically. To view the original document, you can use the "Original mode".
To assemble and adjust your tractor you wU! need:
Ш г/W" wrenches
¡1) 9/16" wrench
11)
wrench
(1)ЗД"
wrench
(ÍJ 3/4” socket
Tire Pressure Gauge
Screwdriver
Utility Knife
Ratchet Wrench
NOTE; RIGHT HAND (R.H.l AND LEFT HAND (LH.) ARE
DETERMINED FROM OPERATOR'S POSITION WHILE
SEATED ON THE TRACTOR.
WEAR EYE AND FACE SHIELD.
WASH HANDS OR CLOTHING IM
MEDIATELY IF ACCIDENTALLY IN
CONTACT WITH
sa
TTERY ACID.
DO NOT SMOKE: FUMES FROM
CHARGED BATTERY ACID ARE
EXPLOSIVE.
READ THE INSTRUCTIONS INCLUD
ED WITH THE BATTERY VENT
CAPS IN THE BAG OF PARTS. AL
WAYS WEAR GLOVES, CLOTHING
AND GOGGLES TO PROTECT YOUR
HANDS, SKIN AND EYES.
1. Prepare Bettery
a. РШmd charge battery ibeiora instaWng). NOTE;
SEE DETAILED INSTRUCTIONS PACKAGED
IN BAG OF PARTS.
b Fill each ceil with battery acid. Add the acid un
til It reaches the bottom of the vent wells (Fig.
1). NOTE; DO NOT OVERFILL OVERFILLING
WILL RESULT IN DAMAGE TO TRACTOR.
c. Allow battery to stand and settle for at least thir
ty minutes, if the level of acid fells below the
point described in step (bj, add more acid until
the correct level Is reached, NOTE: UNEVEN
FILLING OF CELLS WILL AFFECT THE BATTERY
CAPACITY AND LIFE, Instell the battery caps to
cover the vent wells Wash tha tap of the bat
tery with water to remove any add, then wipe
dry.
d. Check battery case far leakage to make sure that
no damage has occurred in handling.
в- It is recommended that ihe battery be charged before
use. Use a 12 volt battery charger. Charge battery at a
rale of в amperes for 1 hour. NOTÉ: OBSERVE ALL
SAFÉTYPRÉCAUTIONSRÉaumED FOR BATTERY
CHARGING. Check the acid levs} after the battery is
charged. If the acid has (alien below the correct level,
add water.
f.
Neutralize excess battery add for disposal by
adding it to four Inches of water m a five
gallon plastic container. Stir with a wooden or
plastic paddle while adding baking soda until
the addition of more soda causes no more
foaming.
ASSEMBLY
CUT AWAY VIEW
mm CAP
к
I
B
attery
F re
CELL
fiGUHë 1
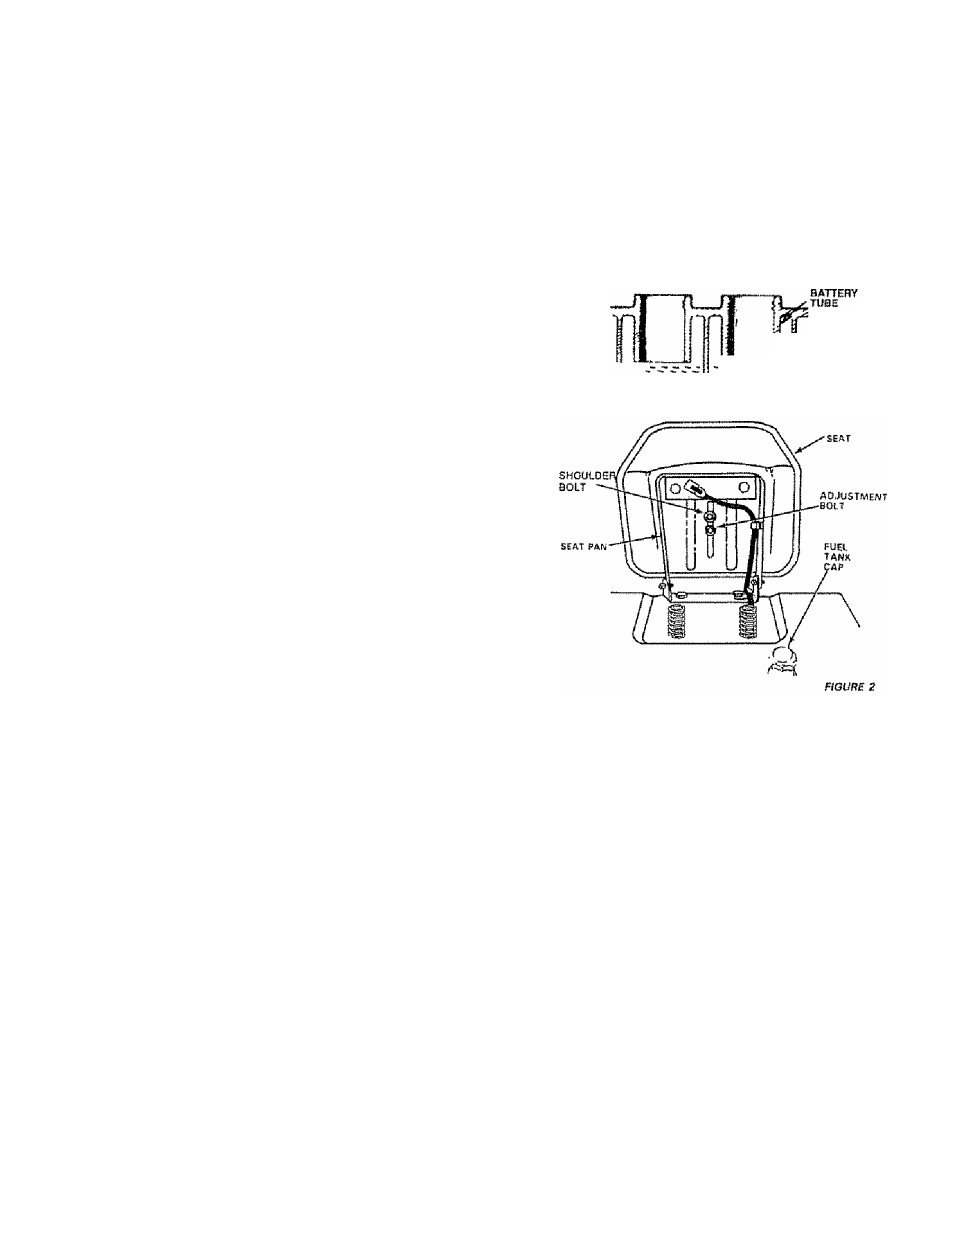
2. Install Seat
a. Place se at on seat pan. Screw adjustment bolt, shoul
der bolt, tackwasher and Hat washer Into seat (fig. 2).
Bolts, lúckwasherandflat washer found In bag ofparts.
Tighten shoulder bolt securely using a 1/2" wrench.
Tighten adjustment bolt finger tight. NOTE: THE
SHOULDER BOLT WiLL BE LOOSE IN THE SEAL
PAN SLOT
b. Place seat in operating position. Sit on the seat
and press ciutch/brake pedal all the way down,
if operating position is not comfortable, adjust
seat,
c. To adjust, raise seat Loosen adjustment bolt
(Fig. 2} and slide seat to a comfortable oper
ating position, Tighten adjustment boh securely
using a 3/4 " wrench.