Sears LIFESTULER SYSTEM 40 831.15931 User Manual
Page 5
Attention! The text in this document has been recognized automatically. To view the original document, you can use the "Original mode".
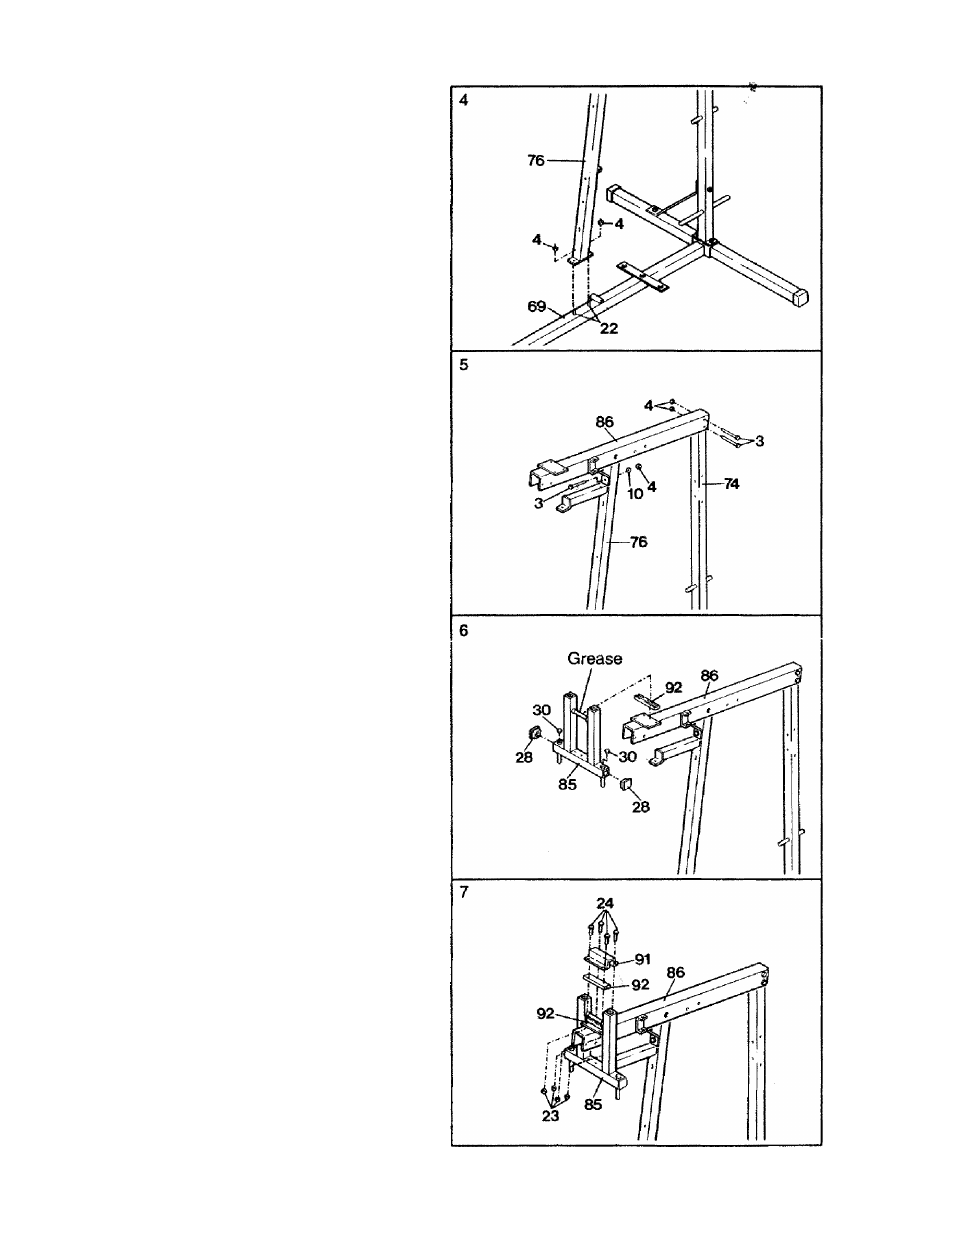
4. Slide the Front Upright (76) over the two
5/16* X 2 1/2* Carriage Bolts (22) In the Base
(69). Attach the Front Upright with two 5/16’
Nylock Nuts (4). Do not fully tighten the
Nylock Nuts until completeing step 24.
5. Place the Top Brace (86) on top of the Front
and Rear Uprights (76, 74). Attach the brack
et on the Top Brace to the Front Upright with
a 5/16* X 2 3/4* Bolt (3), 5/16* Washer (10)
and 5/16" Nylock Nut (4). Do not fully tight
en the Nylock Nuts until completeing step
24.
Attach the Top Brace (86) to the Rear Upright
(74) with two 5/16*
X
2 3/4* Bolts (3) and
5/16’ Nylock Nuts (4). Do not fully tighten
the Nylock Nuts until completeing step 24.
6. Press a 1 3/4" x 1 3/4* Inner Cap (28) into
CkCir*K CiiHia fHja A
/OC\
«
wo irl iw / tl r t i
V
I
U
3/4* Round Inner Cap (30) into each side of
the Arm Support.
Apply grease to the rod of №e Arm Support (85).
Turn an Arm Support Bushing (92) so the
rounded groove is on top. Place the Arm
Support Bushing on top of the plate on the
Top Brace (86). Rest the rod of the Arm
Support (85) in the rounded groove in the
Arm Support Bushing.
7, Place the other Arm Support Bushing (92) on
top of the rod of the Arm Support (85). Place
the Bushing Bracket (91) over the Arm
Support Bushings. Attach the Bushing
Bracket to the plate on the Top Brace (86)
with four 1/4* X 3/4* Screws (24) and 1/4*
Nylock Nuts (23).