Fan motor removal, Condenser, Lubrication – Carrier 38GS User Manual
Page 14
Attention! The text in this document has been recognized automatically. To view the original document, you can use the "Original mode".
Leaking Mechanical Connection
— Frontseat con
densing unit service valves and relieve refrigerant
pressure in tubing. Back locknut off Compatible
Fitting onto tube. Cut fitting between threads and
seal ring head as shown in Fig. 10. Remove tubing
section remaining in threaded portion of fitting.
Discard locknut.
Clean, flux, and insert new tube end into
remaining portion of Compatible Fitting. Wrap
valve base in wet rag. Heat and apply low tempera
ture (450 F) solder.
Leaking Sweat Connection
— Frontseat service
valves and relieve refrigerant pressure in tubing.
Clean and flux area around leak and apply low
temperature (450 F) solder.
Evacuate or purge evaporator coil and tubing
system. Add refrigerant charge (see charging
instructions).
COMPATIBLE FITTING REPAIR
Off íA&m
Fan Motor Removal
1. Shut off power to unit.
2. Remove unit top access cover and fan grille.
3. Disconnect fan motor wires from fan capacitor
and control relay or contactor. Pull wires out of
control box.
4.
Remove fan from motor shaft by pulling
upward on fan hub.
5.
Loosen bolt holding fan motor to motor
mounting bracket. Remove motor thru top of
unit. To replace motor, place motor on self
positioning motor mounting flanges and re
tighten bolt.
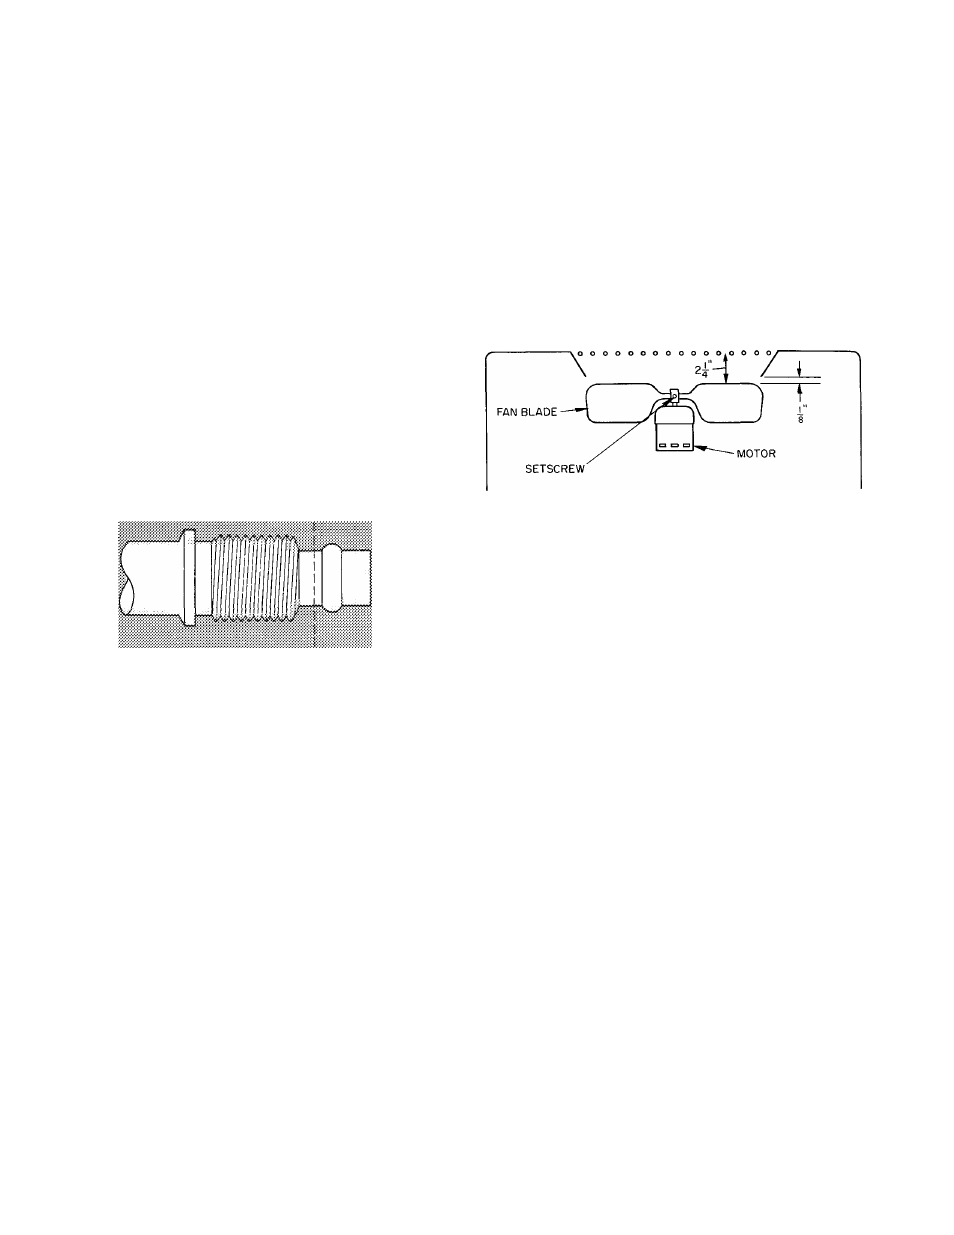
Fig. 11 — Condenser Fan Position
Fig. 10 — Repair of Mechanical Connection
CONDENSER
Coil Cleaning
— Ensure power to unit is shut off
Clean the condensing unit coil at the beginning of
every cooling season or more often if required. Use
ordinary garden hose at a pressure high enough to
clean efficiently. For best results, unscrew and
remove unit top cover (grille). Insert hose nozzle
between fan blades and spray coil fins from
inside-to-outside the unit. If unit has a double-row
coil, loosen screws to separate coils, and flush dirt
toward outside of both coils. Flush dirt from base
pan by spraying water thru top of unit. Avoid
splashing mud on coil or water on the fan motor.
Metal Fan
— Required fan position is shown in Fig.
11. Adjust fan by loosening setscrew and moving
fan blades up or down.
Plastic Fan
is correctly positioned in unit by
placing fan on motor shaft — align flat mark on top
of fan hub with flat on shaft. Press down evenly on
top of fan hub until shaft bottoms in fan hub.
LUBRICATION
Fan Motor Bearings
— Oiling holes are provided at
each end of current condenser fan motor. Remove
fan motor and lubricate motor with 32 drops (16
drops per hole) of SAE-10 nondetergent oil at
intervals described below:
a.
Annually, when environment is very dirty,
ambient temperature is higher than 105 F and
average unit operating time exceeds 15 hours a
day.
b. Every 3 years when environment is reasonably
clean, ambient temperature is less than 105 F
and unit operating time averages 8 to 15 hours
a day.
c.
Every 5 years when environment is clean,
ambient temperature is less than 105 F and unit
operating time averages less than 8 hours a day.
Compressor
contains factory oil charge. When oil is
lost, see Table 7 for oil charge and Carrier Standard
Service Techniques Manual, Chapter 1, page 1—21,
for instructions. Use Carrier PP33-1, Texaco
Capella B or Suniso 3G oil.
1 4