Top Flite KittiWake User Manual
Page 9
3. Use a sanding block to smooth each side of these
surfaces. Remove the two elevator halves and
rudder from their die-cut sheets. Lay the stabilizer
on your flat work surface and pin or weight in
place. Use a strip of clear protective material
(food wrap) to line the trailing edge of the stab.
Position the two elevator halves firmly against
the trailing edge of the stab and pin or weight in
place. From your parts bag, locate the 2-1/2" length
of 3/16"dia. dowel, this is the elevator joiner. Epoxy
this dowel in place in the slot provided in each
elevator half and allow to cure.
4. Remove the now joined elevators from your
bench. Lightly sand the leading edge of the
elevators smooth and flat. Now use masking tape
to accurately attach the elevators to the stab, on
one side only. Turn this assembly over and use a
sanding block to sand the leading edges, tips and
trailing edges to about halfway to the cross-
sections shown on the plans. Now tape the
elevators to the stab on the sanded side, turn the
assembly over, remove the tape and repeat the
sanding procedure just described. The fin and
rudder are match-sanded in the same manner.
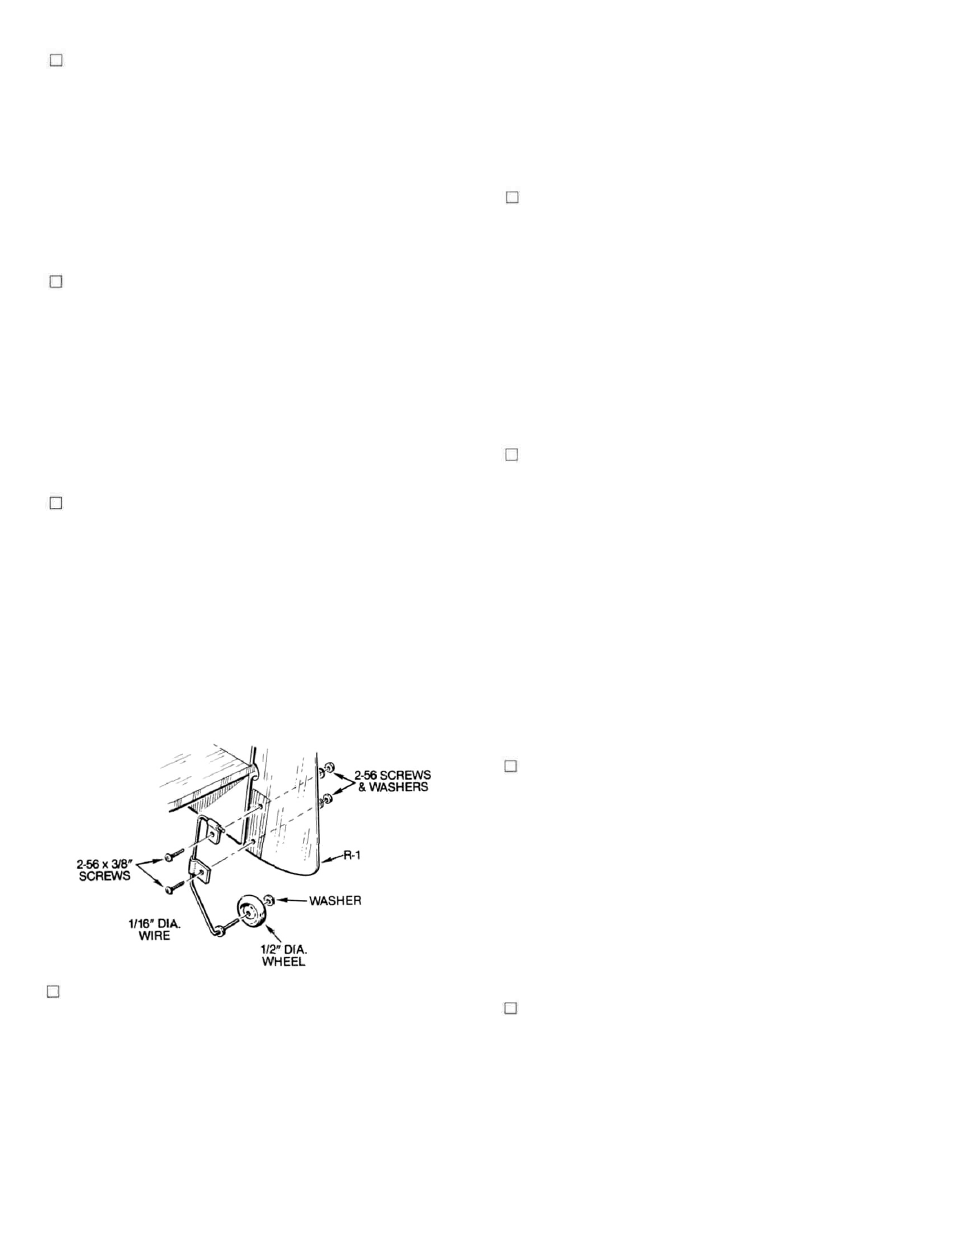
5. Locate and remove the two R-2 parts from their
die-cut sheet. As shown on the plans, these are
meant to provide a hard-point at the bottom,
leading edge of the rudder for mounting the water
rudder or tail wheel. Lightly sand the edges of
these parts smooth. Lay one of the R-2 parts in
place on the rudder and trace it's outline on the
rudder with a pencil. Use a single-edge razor
blade to now cut out a 1/16" deep inset location for
the R-2 part. Repeat this operation on the other
side of the rudder. Once satisfied with the fit,
epoxy the two R-2 parts in place. Weight or clamp
this assembly and allow to cure.
6. As shown on the plans, the leading edges of the
elevators and rudder are beveled to facilitate
movement. Use a sanding block to now bevel
these two parts. Now use the plans to locate and
mark the hinge locations on the elevators, stab,
fin and rudder. Carefully cut the hinge slots in
each of these surfaces and trial fit them
together—do not glue hinges in place yet. Once
satisfied with the fit of these parts to each other,
use a sanding block to match them to each other
while hinged in place.
1. From your kit, locate and remove from their die-
cut sheets, the following parts; F-1 (fuselage
sides, 2), F-3 (nose doublers,2), F-2 (fuselage
doublers, 2) and the light-ply fuselage formers,
F-5 and F-6. Tape or hold the two fuselage sides
together and use your sanding block to match
edges. Lay one of the fuselage sides directly over
the side view on the plans and carefuly mark the
locations (top and bottom) of the firewall, F-5, F-6
and the 1/4" sq. balsa bracing (@D-D). Use a
straight edge to now draw these locations direct-
ly on the fuselage side. Repeat this operation on
the other fuselage side (remember, you need a
RIGHT and LEFT side).
2. With the fuselage sides laying flat on your bench,
glue the F-3 nose doublers in place. Now lay the
F-2 fuselage doublers in place, being careful to
match the wing saddle area. Observe the fit in
relationship to the lines you drew earlier. If
necessary, trim the doublers to fit precisely. Once
satisfied, glue the F-2 part in place, weight or pin
and allow to dry. From your kit, locate the four re-
quired lengths of 1/4" triangle balsa stock. Cut, fit
and glue the triangular fuselage longerons in
place, top and bottom. Cut, fit and glue the four re-
quired lengths of triangular stock to the top and
bottom of the F-3 doublers and finally, glue
triangular stock in place, directly beneath the
stabilizer slots. With the fuselage sides still down
flat on the bench, cut, fit, and glue the 1/4 " sq.
balsa uprights in place (see D-D).
3. At this point, you may wish to start planning your
radio installation by placing one of the servos on
the fuselage side, marking its location on the
wood for later placement of servo rails or servo
rail braces.You may alsowishtoplotouttheeven-
tual location of the throttle pushrod. Next, make
sure that you can pass the fuel tank you're plann-
ing to use through the opening in former
F-5—route out as needed to accomplish this. The
last thing to do before joining the fuselage sides
is to bevel each side, at the tailpost, to provide a
nice fit when the sides are pulled together (see
top view of plans).
4. Trial-fit F-5 and F-6 in place on each of the
fuselage sides; dress them with the sanding
block if needed to achieve a nice fit. Lay the right
fuselage side down flat on the bench and glue F-5
in place using a triangle to make sure that it is
perpendicular. Repeat this process with F-6. App-
ly glue to the other side of these two formers and
position the left fuselage side to them. Turn the
structure upside down on your bench and pin or
weight in place—allow to dry.
FUSELAGE CONSTRUCTION
A review of the plans and cross-sections reveals that the
fuselage construction is basically the typical box-type
which, when completed, lends itself to rounding. Before
starting, you should have available to you the radio
system that you plan to use and the engine, tank and
motor-mount.
9