Top Flite KittiWake User Manual
Page 7
1. Locate and remove the two FL-1 main float sides
from their die-cut sheets. Tape or pin these ac-
curately together and use a sanding block to light-
ly sand their edges smooth. Now lay one of the
FL-1 parts directly over the side view of the main
float on the plans. Use a soft pencil to accurately
mark the position of each float former—top and
bottom. Use a straight edge to draw the former
locations directly onto the FL-1 part. Do the same
thing to the remaining FL-1 part.
2. Using the 1/4" sq. balsa stock provided in your kit,
glue the top and bottom longerons in place to
each FL-1 float side—REMEMBER, you want a
LEFT and a RIGHT float side!
3. Locate and carefully remove the seven required
float formers (FL-2 through FL-8) from their die-
cut sheets. Now trial-fit each former in place
against each of the FL-1 float sides. Use a single
edge razor blade to make any adjustments re-
quired to achieve a good fit to the float sides and
the 1/4" sq. longerons.
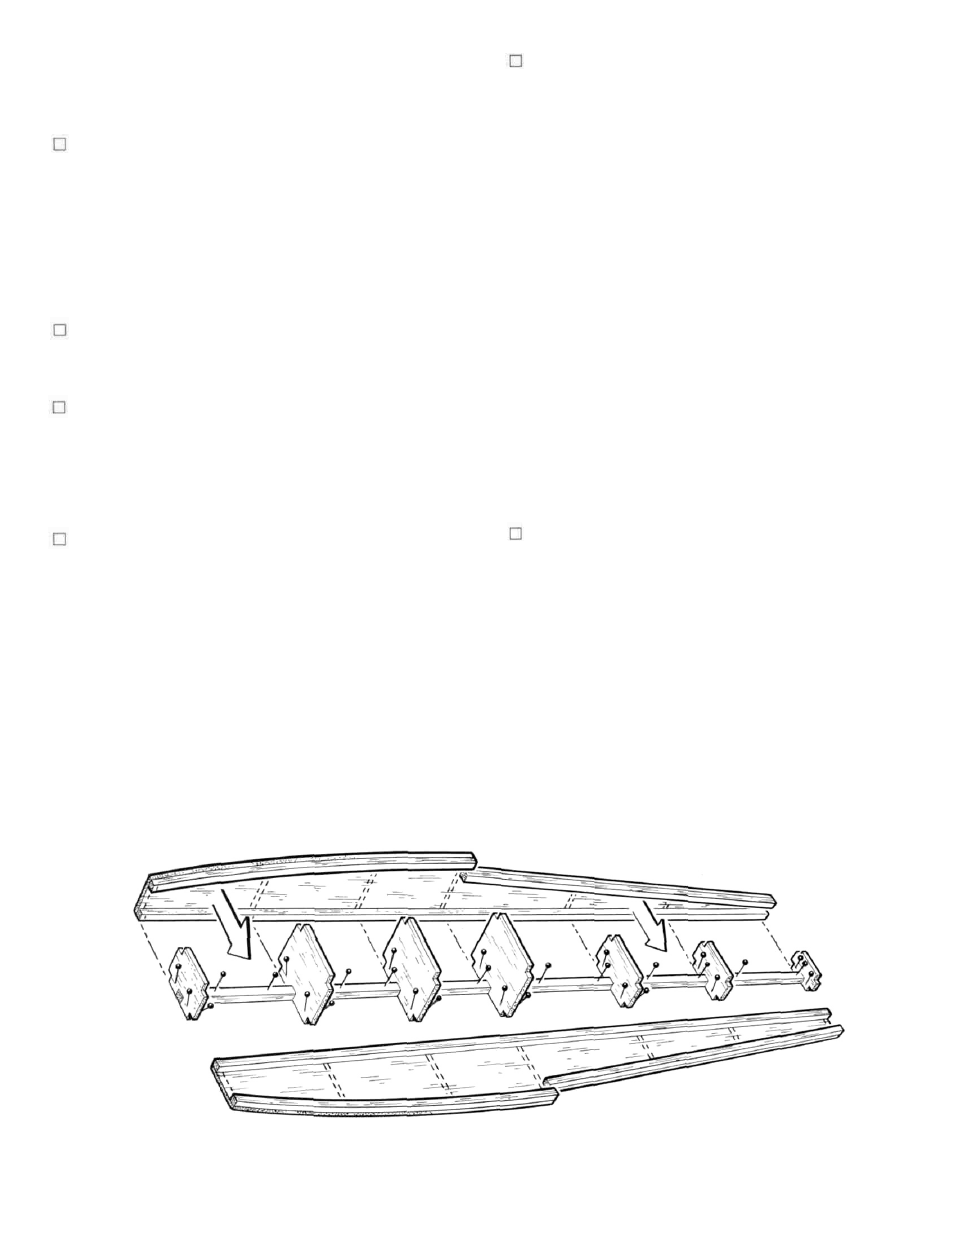
4. As shown, the main float is built upside down,
directly over the plans. Start by accurately posi-
tioning and pinning in place the 1/4 " sq. balsa
"former locator" directly over the centerline on
the top view of the main float. We'd suggest using
along straight edge to be certain that this piece is
straight. Starting with the forward FL-2 former, ac-
curately glue each former in place to the 1/4" sq.
former locator making sure that each former is 90°
upright from your work surface; a triangle is
helpful here. Securely pin each former in place.
5. In this step you are going to glue the float sides in
place to the formers (still pinned and positioned
overthe plans). You will need to use a slow-drying
adhesive to allow you time to work. We suggest
the slowest setting CA-type adhesive you can find
or something like 15-30 minute epoxy. Before
glueing, trial-fit the sides to the former assembly
to be sure that everything fits as it should. While
doing this, experiment with bending the float
sides to fit the formers at both ends to get some
idea of the amount of pressure required. If there
seems to be too much pressure needed to do this,
a little common household ammonia, wiped or
sprayed on the float sides, helps the wood to
bend. Assuming that you are satisfied with the fit,
you can start to glue the FL-1 sides in place. We
suggest starting by applying glue to the inside of
each FL-1 (using the pencil marks made earlier)at
the FL-5 through FL-8 former locations. Working
quickly, position each FL-1 side in place to each
former; securely pin and/or weight as needed.
Now apply glue to the FL-4 through FL-2 former
locations drawn on the FL-1 sides and bend the
sides around these three forward formers. Again,
securely pin and/or weight as needed. Allow this
assembly to dry completely.
6. Carefully unpin and remove the float assembly
from your work surface. Use a sanding block to
now smooth the top and bottom. You can also
make a few passes with the sanding block on
each of the sides. Now carefully sand the front of
former FL-2 to render it flush with the sides. Do
the same thing to the rear FL-8 former. Once
satisfied, the front and rear balsa blocks can be
glued in place. These two blocks are now shaped
to conform to the top and side views, shown on
the plans, with the exception of the tops of each
block, leave these flush with the float sides for
now.
painted with a variety of available paints,
preferably sprayed. Our choice is K&B epoxy.
MAIN FLOAT CONSTRUCTION
7