Top Flite TOPA0140 User Manual
Page 52
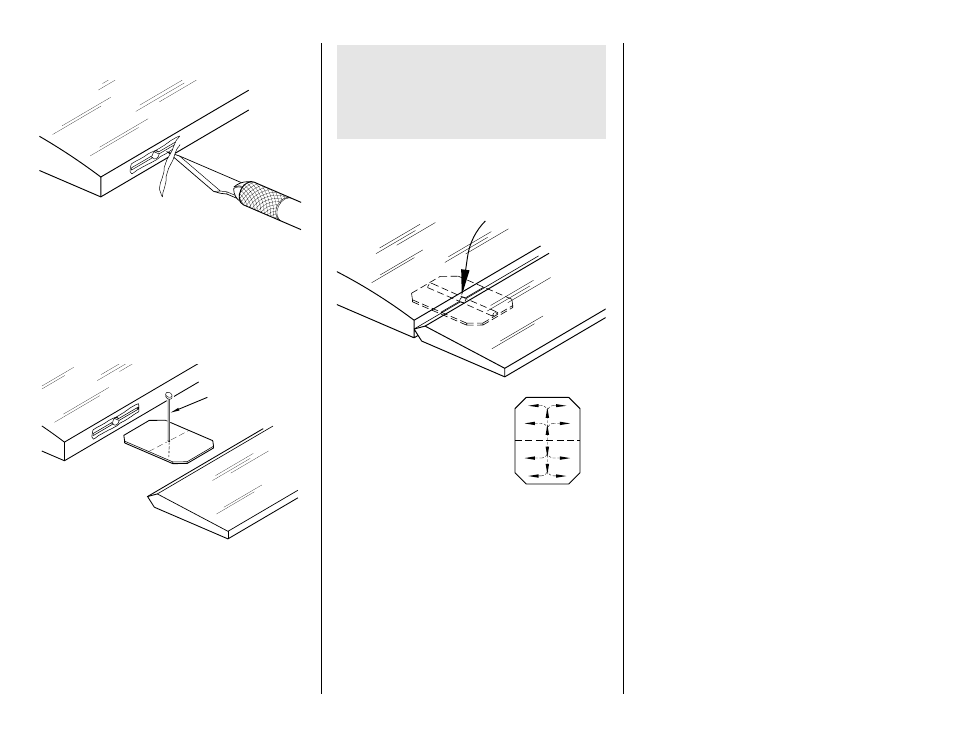
JOIN THE CONTROL SURFACES
❏
1. Start with the stab and elevators. Remove a
small strip of covering from the hinge slots.
❏
2. Fit the hinges in only the stab or elevators
(without glue). Fill the torque rod holes in the
elevators with 30-minute epoxy. Immediately
proceed to the next step.
❏
3. Join the elevators to the stab with the hinges,
simultaneously installing the joiner wire in the
elevators. Wipe away excess epoxy with a tissue
dampened with alcohol. If the hinges don’t remain
centered as you join the elevators to the stab,
remove the stab and insert a pin in the center of
the hinges to keep them centered. Make sure
there is approximately a 1/64" [.5mm] gap
between the elevators and the stab so you do not
glue them together.
❏
4. Cut a paper towel into 2" [50mm] squares.
Add six drops of thin CA to the center of the hinges
on both the top and bottom. The
tunnels you
drilled will
wick the CA into the entire hinge
surface. Use the paper towel squares to absorb
excess CA from the hinge gap before it cures.
❏
5. Use the same hinging method to join the
rudder to the fin and the ailerons to the wing.
❏
6. If you’ve built working flaps, use a toothpick
to apply a small amount of petroleum jelly to the
pivot points of the hinges to keep epoxy out.
❏ ❏
7. Mix enough 30-minute epoxy to do one
flap at a time. Use a piece of wire or a toothpick to
thoroughly coat the holes in one of the flaps and
the holes in the wing with the epoxy. Coat one side
of the flap hinges with epoxy and insert them into
the wing. Coat the other side of the hinges with
epoxy and join the flap. Wipe away excess epoxy
before it cures.
❏ ❏
8. Position the flap and the hinges so the
flap is centered and fits the wing. Tape the flap in
place until the epoxy has fully cured.
❏
9. Join the other flap to the wing the same way.
❏
10. Reinstall the pushrods you disconnected
before covering and mount the control horns to the
ailerons, flaps, elevator and rudder. Reinstall any
hardware and other components you may not
already have in place such as the fuel tank and
fuel lines, servos, on/off switch, air tank, engine,
muffler, fuel filler valve, air filler valve, etc.
SCALE DETAILS
❏
1. If you will not be installing the Top Flite
Spitfire Scale Cockpit Interior kit
, add whatever
scale details you like to the cockpit. Use leftover
balsa or thin cardboard (from a cereal box) to
make an instrument panel, seat back, seat, etc.
❏
2. Glue your pilot in place. We trimmed the
shoulders from a Williams Brothers 1/6-scale
Standard pilot and glued him directly to the scale
cockpit sides.
THE CA WICKS
ALONG THE "TUNNELS"
TO THE ENTIRE
HINGE SURFACE
ASSEMBLE, THEN APPLY 6 DROPS
OF THIN CA TO CENTER
OF HINGE, ON BOTH SIDES
Do not use CA accelerator on any of the
hinges and do not glue the hinges with
anything but thin CA. Do not attempt to glue
one half of the hinge at a time. The hinges
will not be properly secured and could come
out while the model is in flight.
TEMPORARY PIN
TO KEEP HINGE
CENTERED
AWAY FROM THE SLOT
CUT THE COVERING
- 52 -