Installation – SeaLand 976 Portable Toilets User Manual
Page 4
4
Dometic marine toilet systems must be in-
stalled according to Dometic’s recommended
procedures . Equipment damage, injury to
personnel or death could result from im-
proper installation . DOMETIC CORPORATION
ACCEPTS NO RESPONSIBILITY OR LIABILITY
FOR DAMAGE TO EQUIPMENT, OR INJURY OR
DEATH TO PERSONNEL THAT MAY RESULT
FROM IMPROPER INSTALLATION, SERVICE OR
OPERATION OF THIS PRODUCT .
WARNING!
HAZARD OF FLOODING – If the toilet
system is connected to ANY through-the-hull
fittings, properly installed seacocks MUST be
installed in all piping connected to through-the-
hull fittings . Seacocks MUST be easily accessible
to all users of the toilet system or secondary
valves fitted in hoses where they are easily
accessible . ALWAYS close seacocks when toilet
system is not in use (even if boat is unattended
for a brief period . All valves MUST be full bore
valves and marine quality . Screw-to-close gate
valves are not recommended . Failure to comply
can result in flooding which can cause loss of
property and life .
WARNING!
HAZARD OF FLOODING – If toilet is
connected to ANY through-the-hull fittings, ALL
flexible hoses must be of marine sanitation qual-
ity and must be secured to ANY fittings (such as
those at seacock, vented loop or toilet) with two
stainless steel, worm-drive hose band clamps at
each connection . Connections MUST be checked
frequently for integrity . Failure to comply can
result in flooding which can cause loss of prop-
erty and life .
WARNING!
HAZARD OF FLOODING – If toilet
rim is below the waterline at ANY time (during
any conditions of heel, load or trim) and is con-
nected to ANY through-the-hull fittings, properly
positioned ventilated (vented) loops MUST be
installed in discharge piping to prevent potential
back siphonage of seawater into the boat . Failure
to do so can result in flooding which can cause
loss of property and life .
iNStallatioN
Models 974, 975
Models 974MSD, 975MSD
WarNiNGS
BE SURE TO READ INSTRUCTIONS COMPLETELY BEFORE INSTALLING PORTABLE TOILET .
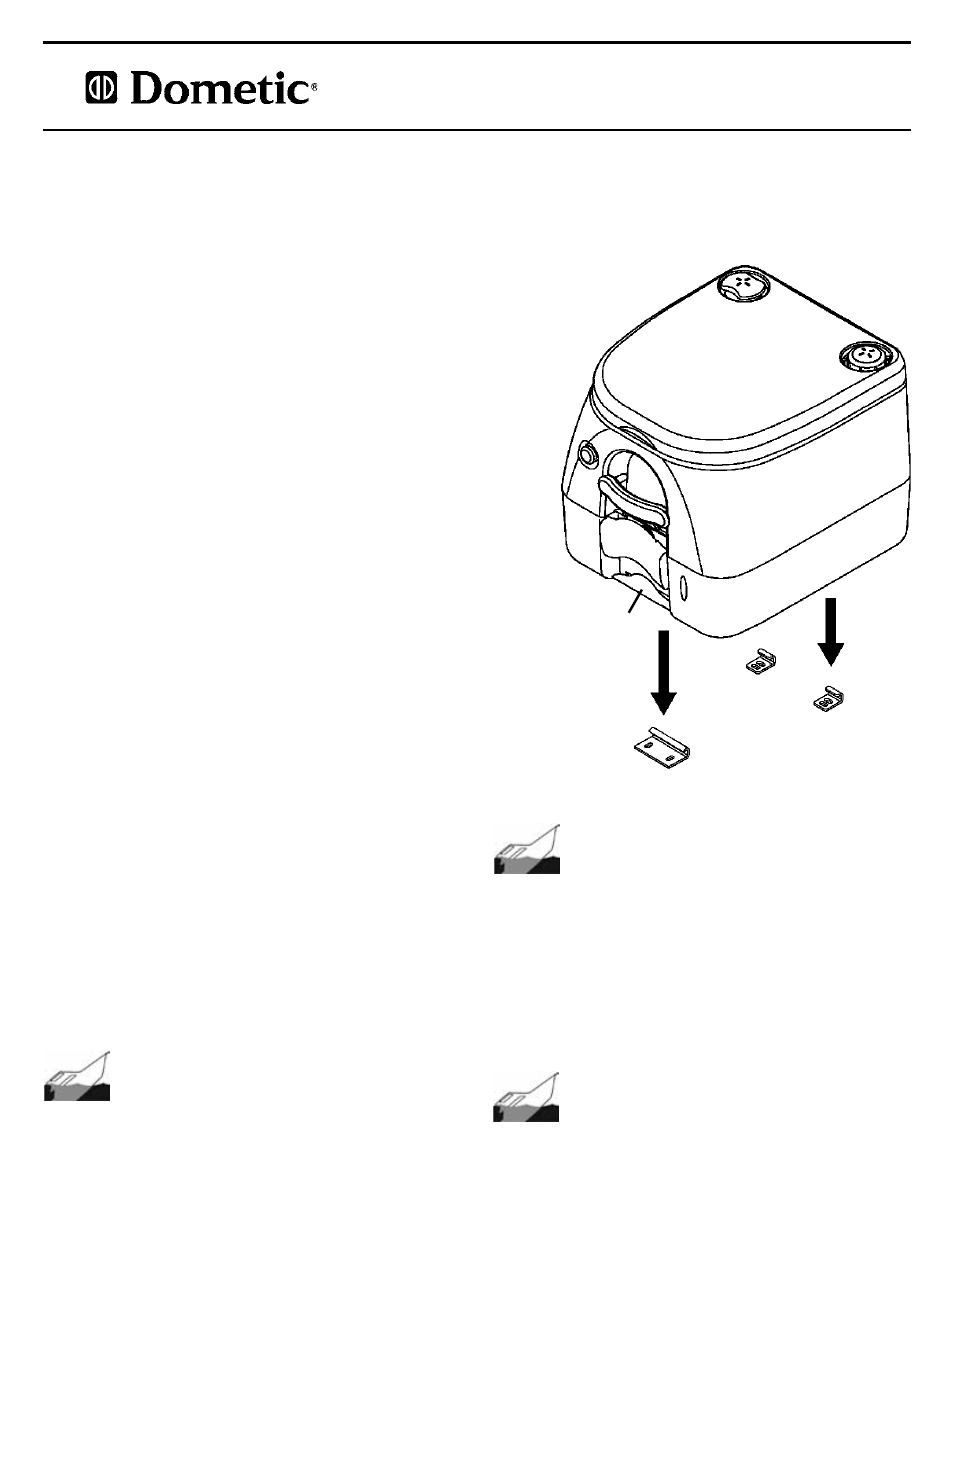
970 SERIES
TOILET
MOUNTING BRACKETS
970 SERIES PORTABLE TOILETS
1 . Place toilet on level floor in desired location . Mark
floor at front of toilet, then set toilet aside . Pull locking
handle out of toilet (located at bottom front of toilet) .
2 . Align mounting template with mark on floor .
3 . Use center punch to mark fastener hole locations for
brackets . Set template aside .
4 . Drill pilot holes with 3/32-in . (2 .4 mm) drill bit . Align
centers of bracket slots with the drilled holes . With
supplied fasteners, attach brackets to floor so that
they can be slid with little effort .
5 . Position toilet into the mounting brackets and insert
the locking handle into front of toilet . The toilet should
be securely held in position by the brackets . If toilet is
not secure, adjust back brackets and/or front bracket
until toilet is secure .
6 . Once the brackets are properly positioned, remove
locking handle and set toilet aside . Firmly tighten
fasteners to secure the brackets in place .
7 . Position toilet into mounting brackets and reinsert the
locking handle .
LOCKING
HANDLE