Top/bottom clearance adjustment – Rev-A-Shelf 4WLS942-XXX User Manual
Page 2
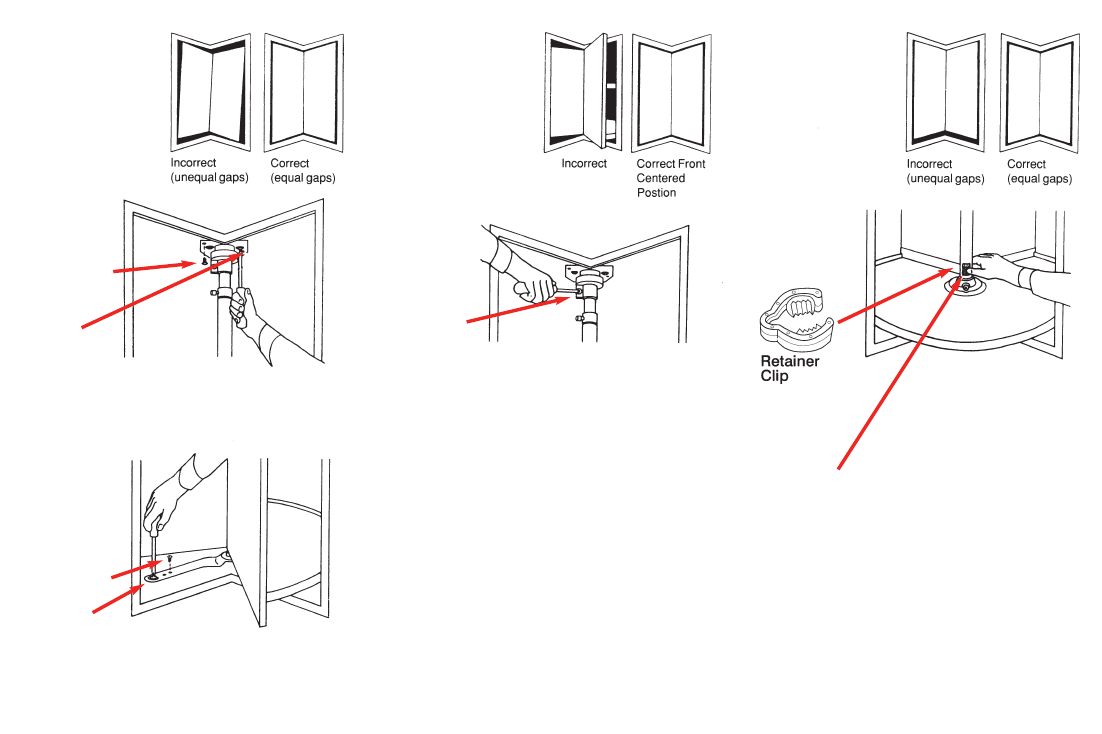
INSUFFICIENT
SIDE
CLEARANCE
ADJUSTMENT
UNEVEN OR
INCOMPLETE
DOOR CLOSING
ADJUSTMENT
(To center the doors
correctly in the frame
for proper clearance)
TOP/BOTTOM
CLEARANCE
ADJUSTMENT
Step 1
Top Adjustment
Remove
and save
lockdown screws.
Loosen
star washer
screws
to re-center
pivot.
Tighten, check
and repeat if
necessary.
Step 2
Bottom Adjustment
Rotate door to
expose screws on
bottom bracket
Remove and
save lock down
screws.
Loosen
star washer screws
to re-center pivot cam
base (both sides).
Tighten, check and
repeat if necessary.
Step 1
Loosen clamp
screw in white
plastic housing
(approx. 1 turn)
to prepare for
positioning
adjustment.
Step 2
Rotate door counter-clockwise until white plastic housing has
been latched into position with spring. A resistance to turning
will be felt when the housing reaches the latched position and
may be accompanied at a click or latching sound.
Step 3
Rotate door slowly clockwise to exact front centered position
but not pass it. Release door to check alignment. You may
need to rotate door a little past center to allow for slight spring-
back. If you rotate too far, go back to step 2 and repeat.
Step 4
SLOWLY rotate door counter-clockwise far enough so that
clamp screw faces you again. Tighten clamp screw securely,
being careful not to rotate white plastic housing out of position.
Step 1
Remove polymer
retainer clip.
Step 2
Turn adjustment wheel (located inside cut out portion of shaft)
clockwise to raise shelf/door unit. One full turn raises door
1/32”. After adjustment, be sure to replace retainer clip.
Note: If shelves are heavily loaded, lift lower shelf slight-
ly to aid adjustment. Total adjustment 1/2”.
Note: When adjustments are completed, be sure to
securely tighten all adjustment screws in housing, shaft
bushing and tray adjustment screws. If bracket lock down
screws were removed, please re-install after all adjust-
ments are made.
Tools required
for adjustments:
Phillips Screwdriver