Installation instructions – Rev-A-Shelf LD-4NW-0436-1 User Manual
Page 2
IMPORTANT
See other side for installation instructions required when mounting the 6070 SERIES UPPER
PANTRY SHELF SYSTEM directly above the 6060 SERIES LOWER PANTRY SHELF SYSTEM.
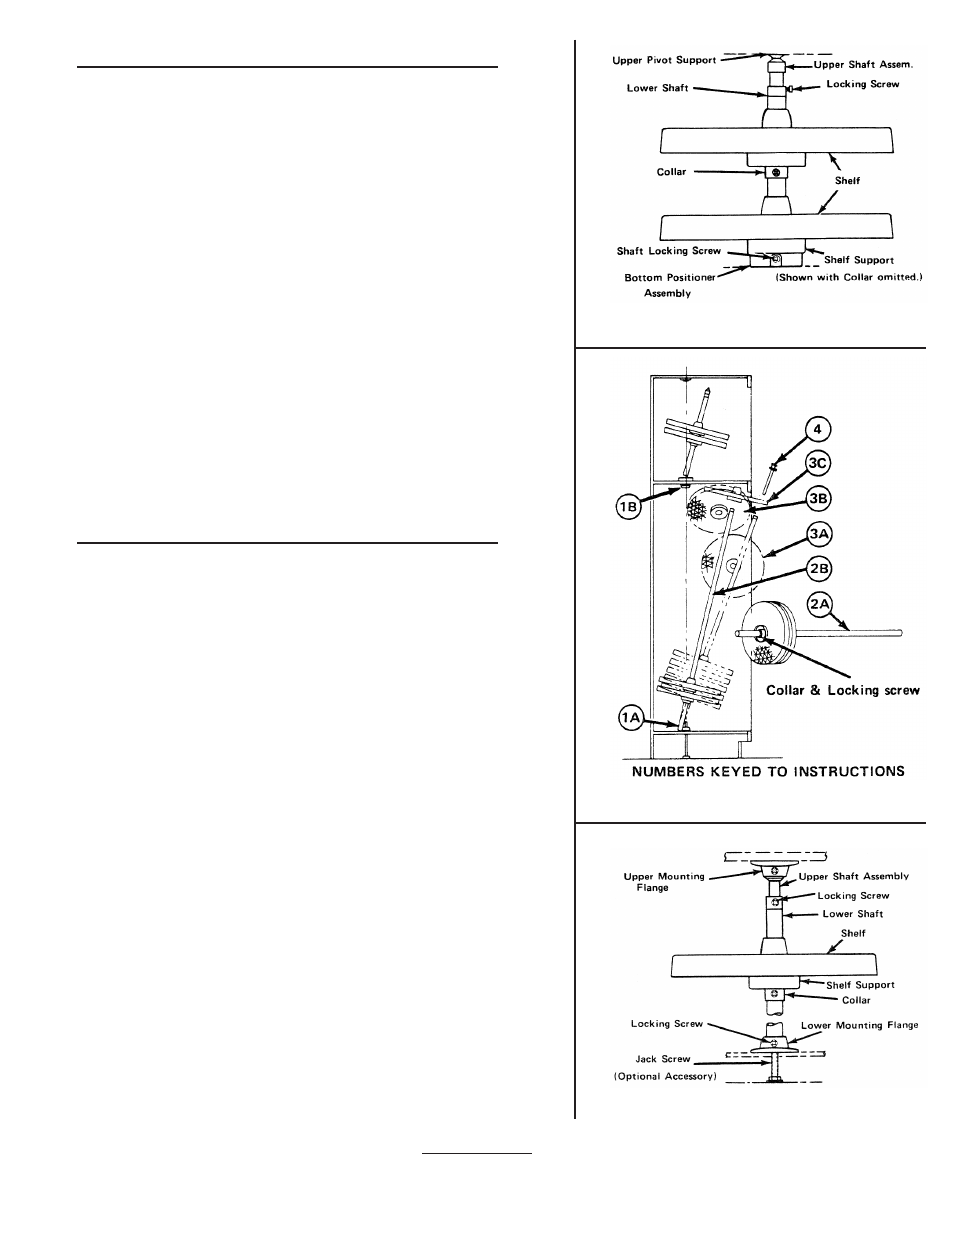
INSTALLATION INSTRUCTIONS
INDEPENDENTLY ROTATING 16" FULL ROUND
6070 SERIES UPPER PANTRY SHELF SYSTEM
1. Locate screw holes with template provided to install bottom positioner on
cabinet floor with four (4) each 3/4" by 8 oval head screws.
2. Locate screw holes with template provided to install upper pivot support with
four (4) each 3/4" by 8 truss head screws.
3. Insert bottom end of shaft thru upper shelf and assemble collar. Repeat for
bottom shelf.
4. Tilt the shaft to a horizontal position and ease the shelves thru the cabinet
opening. Raise the shaft to an upright position and engage the lower end in
the bottom positioner. Engage and seat the upper shaft assembly in the upper
pivot support. Tighten the shaft locking screw and the locking screw in the
bottom positioner.
5. Space the upper shelf as desired and tighten the collar with the locking screw.
INSTALLATION INSTRUCTIONS
INDEPENDENTLY ROTATING 16" FULL ROUND
6060 SERIES LOWER PANTRY SHELF SYSTEM
1. Locate screw holes with template provided to install upper and lower mounting
flanges with four (4) each 3/4" by 8 oval head screws.
2. With upper shaft assembly and locking screw removed from lower shaft
assembly, slide collar on to shaft and lock it in place 6-10 inches from the
bottom end of the shaft. Slide shelf up shaft from bottom. Note: This shelf will
ride on the lower mounting flange not a shelf support. Slide next shelf down
shaft against collar and continue with next collar and shelf.
2A. Tilt the shaft to a horizontal position and ease the shelves thru the cabinet
opening. (see illustration)
2B. Raise the shaft to an upright position and rest the bottom end of the shaft
on the cabinet floor behind the mounting flange.
3. Slide another collar onto the shaft.
3A. With the shaft tilted forward, insert the next shelf thru the opening and
raise and tilt it to a horizontal position at the top of (and extending out of)
the front of the opening as shown at 3C. Position shaft under shelf and
slide shelf onto shaft. Repeat for the remaining collars and shelves.
4. Assemble upper shaft assembly and locking screw into lower shaft assembly.
Lift the lower shaft and engage it in the lower mounting flange. Engage and
seat the upper shaft assembly in the upper mounting flange and tighten the
locking screw. Tighten the locking screw on the shaft and the locking screw in
the lower mounting flange.
5. Space the shelves as desired and tighten the collar(s) with the locking screws
* Mounting flanges are tapped for jack screw accessory. If used, drill 1" diameter
hole through bottom floor only.