Alternative “easy install, Door mounting brackets tape, Door – Rev-A-Shelf 4WH-RM-15DM-1 User Manual
Page 2: Step 7, Step 8, Step 9, Step 6, Step 10, Step 11, Step 12
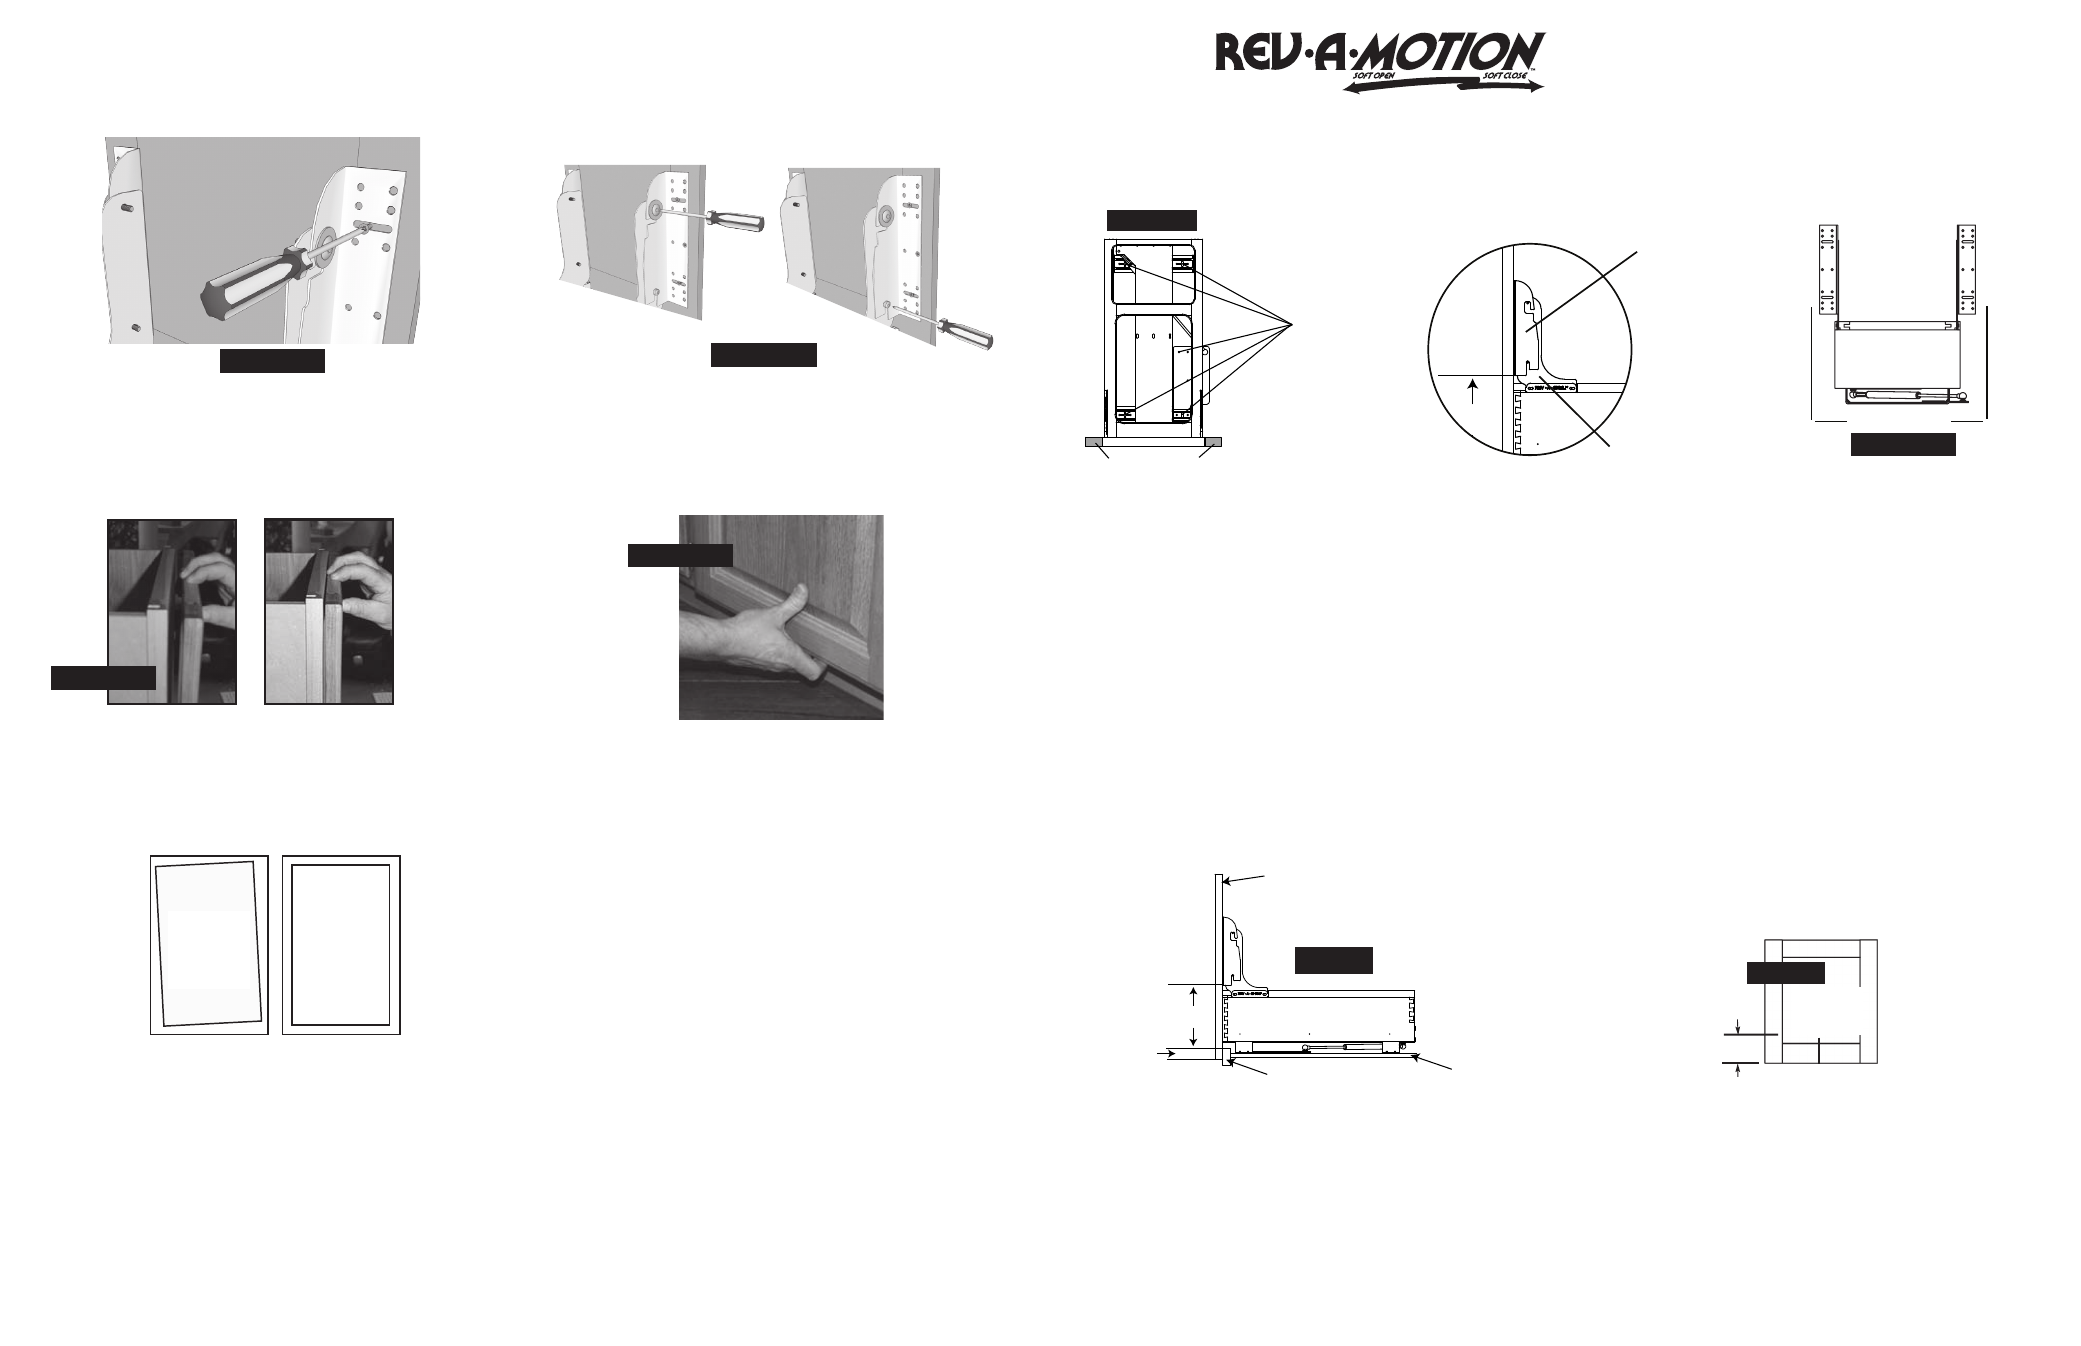
Step 7
Take Dimension C (from Step 4)
and divide it by two. Measure this
distance to the left of the center point
on the inside of the cabinet door and make a
vertical line. Measure this
distance to the right of the center
point on the inside of the cabinet
door and make another vertical line
(See illustration 6)
Step 8
Remove Door Brackets from product
members and screw to inside of cabinet
door with #6 x 1/2'' flat head screws.
NOTE: Line up door bracket to cabinet door
by aligning door bracket with the vertical and
horizontal lines you have marked in Steps 6
& 7.
(See illustration7)
Step 9
Hang door with brackets attached on
the mounting screws on to the product
members. Tighten bottom screws
securly. Tighten top screws (with
washer) snugly allowing for future
adjustment.
(See illustration 8)
Step 6
Add Dimension A and Dimension B
together. Measure this distance from
bottom of the inside of your cabinet
door and mark a horizontal line.
(See illustration 5). Measure center
point on inside of cabinet door and mark
this point as well.
A+B
Center
Dimension C
Equal
Equal
Step 10.
Be sure bumper pads are installed to all four
corners of door. Push door closed and apply
pressure to all four
corners making sure
door is flush with cabinet.
(See illustration 9).
Step 11.
Pulling from bottom,
pull door open.
(See illustration 10).
Securly tighten
top screws.
Step 12.
If your cabinet door is not straight
(even all around) you can adjust it
by loosing the screws on one of the
sides, properly align the cabinet
door and re-tighten the screws.
Helpful Hints:
There are several different
ways to mount the Door
Brackets to your cabinet
door ensuring that you
are mounting to the
thick portion of the door.
For instance, spacers can
be used when mounting Door Brackets to the
Product Members (spacer kit included). The Door
Bracket can also be installed on the inner side of the
Product Member.
Illustration 5
illustration 8
illustration 6
ilustration 7
If your door is parallel but slightly
off center. Loosen screws
that attach the slide mounting feet
to the cabinet floor, slide assembly
sideways as needed and re-tighten
screws.
2409 Plantside Drive
Jeffersontown, KY 40299
800-626-1126
502-491-2215 fax
illustration 9
illustration 10
Door...
off left
to right
Door...
crooked
all around
Door...
straight
after
ajustment
Door...
straight
after
ajustment
Door
Door
Door
I-RV-DM KIT
Step 11. Pull door open, from the bottom. (See figure 9) Securely tighten
top screws.
Step 12. If your cabinet door is not straight (even all around) you can
adjust it by loosening the screws on one of the sides, properly align the
cabinet door and re-tighten the screws.
If your door is parallel but slightly off center. Loosen screws from step 9,
re-position assembly as needed and re-tighten screws.
Step 9. Hang door with brackets attached on the mounting screws on the
product member. Tighten bottom screws securely. Tighten top screws
(with washer) snugly allowing for future adjustment. (See figure 7)
Step 7
Take Dimension C (from Step 4)
and divide it by two. Measure this
distance to the left of the center point
on the inside of the cabinet door and make a
vertical line. Measure this
distance to the right of the center
point on the inside of the cabinet
door and make another vertical line
(See illustration 6)
Step 8
Remove Door Brackets from product
members and screw to inside of cabinet
door with #6 x 1/2'' flat head screws.
NOTE: Line up door bracket to cabinet door
by aligning door bracket with the vertical and
horizontal lines you have marked in Steps 6
& 7.
(See illustration7)
Step 9
Hang door with brackets attached on
the mounting screws on to the product
members. Tighten bottom screws
securly. Tighten top screws (with
washer) snugly allowing for future
adjustment.
(See illustration 8)
Step 6
Add Dimension A and Dimension B
together. Measure this distance from
bottom of the inside of your cabinet
door and mark a horizontal line.
(See illustration 5). Measure center
point on inside of cabinet door and mark
this point as well.
A+B
Center
Dimension C
Equal
Equal
Step 10.
Be sure bumper pads are installed to all four
corners of door. Push door closed and apply
pressure to all four
corners making sure
door is flush with cabinet.
(See illustration 9).
Step 11.
Pulling from bottom,
pull door open.
(See illustration 10).
Securly tighten
top screws.
Step 12.
If your cabinet door is not straight
(even all around) you can adjust it
by loosing the screws on one of the
sides, properly align the cabinet
door and re-tighten the screws.
Helpful Hints:
There are several different
ways to mount the Door
Brackets to your cabinet
door ensuring that you
are mounting to the
thick portion of the door.
For instance, spacers can
be used when mounting Door Brackets to the
Product Members (spacer kit included). The Door
Bracket can also be installed on the inner side of the
Product Member.
Illustration 5
illustration 8
illustration 6
ilustration 7
If your door is parallel but slightly
off center. Loosen screws
that attach the slide mounting feet
to the cabinet floor, slide assembly
sideways as needed and re-tighten
screws.
2409 Plantside Drive
Jeffersontown, KY 40299
800-626-1126
502-491-2215 fax
illustration 9
illustration 10
Door...
off left
to right
Door...
crooked
all around
Door...
straight
after
ajustment
Door...
straight
after
ajustment
Door
Door
Door
I-RV-DM KIT
STEP 5:
Peel off the exterior layer of tape.
Now carefully line up your desired
door position by eyesight using
the drawer above and any cabinets
to your left or right as a gauge for
correct alignment.
STEP 6:
Press the door firmly onto the
door brackets with the two sided
tape. Put pressure directly on the
lower left and right edge to allow
for good adhesion.
ALTERNATIVE “EASY INSTALL”
for RV Series Pull-Out Waste Containers WITH
Door Mounting Brackets Tape
Your Door Mount Kit also includes two pieces of specially designed two-sided tape. Follow the directions below for quick and easy installation
method that is usually much faster for “In-Home” retro-fitting:
STEP 1:
Follow steps one through four on “Installation
Instructions” (Seperate Sheet).
STEP 3:
Peel off one side of each of the (4) tape squares provided and
carefully place over the door bracket flanges
STEP 2:
Make sure you have correctly
selected the correct positioning of
our Door Bracket Flanges so that
the mounting holes will be located
in a position to insert the fastners
(screws) in the thick, outside
section of the door panel.
STEP 4:
Loosen the 4 bolts (2 each side) that connect the door brackets to
the product member bracket. Pull them forward (towards you) and
tighten them. This will insure that the face of the door bracket
extends slightly outside of the front frame of your cabinet.
STEP 9:
• Final adjustment
• Loosen the four bolts and make adjustments if necessary.
(See Step 12 on installation instructions)
STEP 7:
Carefully pull out door from bottom edge and mark
several holes on each side through the brackets.
STEP 8:
Fasten the brackets to the door
using the tape as a temporary hold
while you insert your #6 x 1/2"
wood screws.
2409 Plantside Drive • Jeffersontown, KY 40299
800-626-1126 • 502-491-2215 fax
www.rev-a-shelf.com
I-RV-DM-KIT-E 4-02
Step 10. Be sure bumper pad are installed to all four corners of the door.
Push door closed and apply pressure to all four corners making sure door
is flush with cabinet. (See figure 8)
Step 8. Remove door mount brackets again and screw to inside of cabinet
door with #6 x ½” flat head screws. NOTE: Line up door mount bracket to
cabinet door by aligning door mount bracket with the vertical and
horizontal lines you marked in steps 6 and 7. (See figure 6)
fig. 6
fig. 7
fig. 8
fig. 9
Paso 5: Mida la distancia del inferior de la cara del marco hacia el inferior del
soporte de la puerta. Nótese esto como Dimensión A. Mida empalme de la puerta.
Nótese esto como Dimensión B como se muestra en la figura 3. NOTA: En los
gabinetes sin marcos hay que medir del piso del gabinete a la parte inferior del
soporte de la puerta.
Étape 5. Mesurer la distance entre le cadrage avant du bas et le dessous du
support de porte. Noter la dimension comme étant la dimension A. Mesurez votre
chevauchement de porte. Notez-le comme étant la dimension B suivant les
indications de la figure 3. NOTE: Sur les caissons sans cadre, mesurez à partir du
plancher du caisson jusqu’au bas du support de porte.
Paso 6: Añada juntas las Dimensiones A y B. Mida esta distancia desde la parte inferior
por dentro de la puerta del gabinete y marque una línea horizontal. (Ver figura 4)
Étape 6. Additionner les dimensions A et B. Mesurer cette distance à partir du bas
de l’intérieur de la porte du caisson et marquer un trait horizontal. (Voir la figure 4)
Instalación de los soportes del montaje en puertas de gabinete
Installation des parenthèses de bâti de porte sur la porte de Cabinet
Paso 1: Quite los soportes de montaje del lado derecho e izquierdo de la puerta.
Deje sujeto el soporte vertical.
Étape 1. Retirer les supports gauche et droit de montage de porte. Laisser le
support vertical en place.
Paso 2: Quite el gabinete de la puerta y las bisagras. Coloque el producto dentro
del gabinete. NOTA: Si se incluye un compartimiento posterior de madera, quítelo
para su instalación.
Étape 2. Enlever les portes et charnières du caisson. Placer le produit à l’intérieur
du caisson. Note : Si un casier arrière en bois est inclus, enlevez le pour l’installation.
Paso 3: Centre el marco de madera de izquierda a derecha en la abertura. Coloque
el frente del bastidor de madera al mismo nivel con el frente de la cara como se
muestra en la figura 1. Ajuste a la parte inferior del gabinete utilizando (5) #8 x 5/8”
tornillos de cabeza redonda (incluidos). (en la figura 1)
Étape 3. Centrez le cadre en bois de gauche à droite dans l’ouverture. Placez l’avant
du cadre en bois à ras avec l’avant du cadrage avant suivant les indications de la
figure 1. Attacher le plancher du caisson en utilisant les 5 vis pan head #8 X 5/8”
fournies. (Voir figure 1)
Paso 4: Reinstale los soportes de montaje de la puerta como se muestra en la figura
2. Mida del exterior a la dimensión exterior de los soportes de la puerta. Esta es la
Dimensión C.
Étape 4. Réinstaller les supports de montage de porte suivant les indications de la
figure 2. Mesurer la dimension entre le bord extérieur des supports de porte. C’est
la dimension C.
Marco de la cara
Armature de
visage
Localizaciones del agujero
de montaje
Endroits de trou de
montage
Dimensión C
fig. 4
fig. 1
fig. 2
fig. 3
Puerta
Porte
Piso del gabinete
Étage du cabinet
Dimensión A
Dimensión B
Marco de la cara
Armature de visage
Debido a los diferentes estilos de puertas, recubrimientos y construcciones de gabinetes, los soportes del montaje de la puerta de Rev-A-Shelf ofrecen lo último en
flexibilidad para asegurar que la colocación del diseño del orificio en el soporte de la puerta se ajuste al grosor de cualquier marco de la puerta del gabinete. De esta manera,
se elimina cualquier necesidad de añadir un panel adicional a la puerta.
A cause des nombreux styles de portes, d’appliqués et de fabrication d’armoire, les supports de montage de porte de Rev-A-Shelf fournissent une flexibilité optimale en
assurant que le positionnement des trous sur le support de la porte se fasse avec la partie épaisse de tout cadre de porte de caisson. Il n’est donc pas nécessaire d’ajouter un
sous-panneau de porte.
Puerta
Porte
Centro Centre
Soporte de la puerta
del montaje
Parenthèse de bâti
de porte
Miembro del
producto
Membre de produit
Instrucciones del montaje
Instructions de montage