EVCO EVK614N9 User Manual
Page 2
Evco S.p.A. • Code 104K614E00 • page 2/7
• press
or
within 9 s to select “PHA2” (it is the label of the
storing phase): the LED
will switch on.
Alternatively:
• press
during the modification of the percentage of relative
humidity during the retarding-provering phase.
Successively:
• press
within 15 s: the display will show “SEt” for 1 s after which
the value is shown
• press
or
within 15 s; parameters P8, rC1and rC2 are also
seen.
It is also possible to set the storing phase work set-point via the SEt1
parameter.
To set the percentage of relative humidity during the storing phase
(only if parameter rU4 is set at 1):
• press
during the modification of the work set-point during the
storing phase: the display will show “Ur” for 1 s after which
the value is shown
• press
or
within 15 s; parameters P8, rU3, rU5 and rU6
are also seen.
• press
within 15 s: the display will show “PHA3” (it is the label
of the awakening phase), the LED
will switch off and
the LED will switch on.
It is also possible to set the percentage of relative humidity during the
storing phase via the Ur1 parameter.
To go back to previous levels:
• press
during modification of the values.
To exit the procedure:
• do not operate for 15 s (any modifications will be saved).
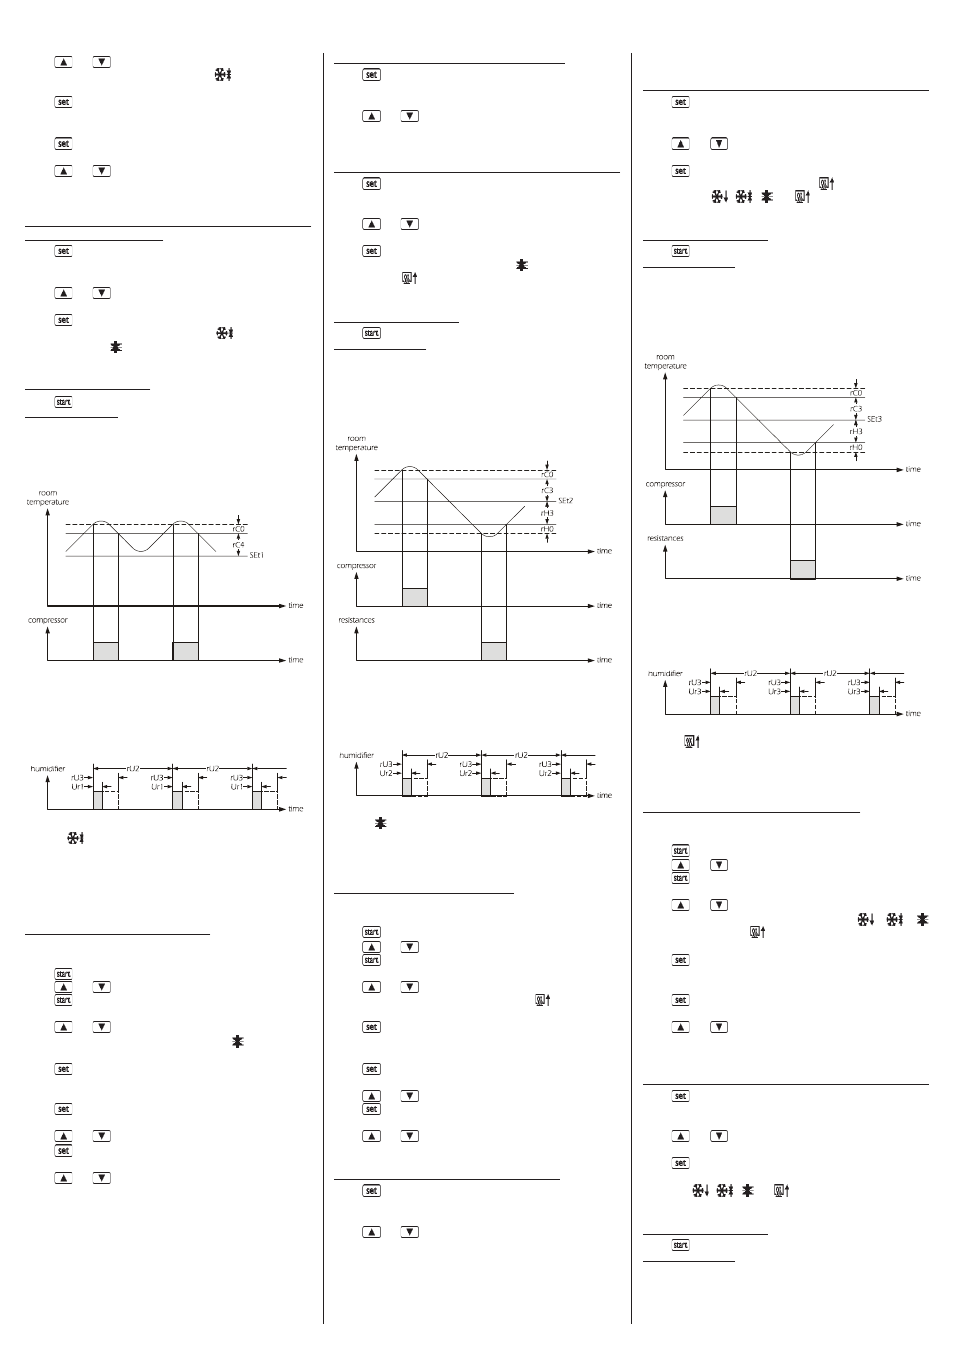
5.4.2
The storing phase
During the storing phase:
• the activity of the compressor depends mainly on parameters SEt1,
rC0 and rC4
• the resistances remain off
• the evaporator fan activity depends mainly on parameter F1
• the activity of the humidifier mainly depends on parameters Ur1,
rU2 and rU3 (the rU3 parameter establishes the duration of humidi-
fier switch-on, in the course of time rU2, such to cause 100% relative
humidity). If the temperature of the room falls below that established
with parameter rU1, humidification will not be available
• defrosting can be activated
• the LED
is on.
The duration of the storing phase adapts itself automatically to that of
the retarding-provering phase, to that of the awakening phase, to that
of the provering phase and the end time and date of the provering
phase. At the end of the storing phase, the instrument passes automati-
cally to the awakening phase.
5.5.1
Modifying the settings of the awakening phase
To set the duration of the awakening phase:
• make sure that the instrument is in stand-by and that there is no
procedure in progress
• press
: the display will show the first label available
• press
or
within 15 s to select “Auto”
• press
within 15 s: the display will show the end time and date
of the provering phase in succession
• press
or
within 9 s to select “PHA3” (it is the label of the
awakening phase): the LED will switch on.
Alternatively:
• press
during the modification of the percentage of relative
humidity during the storing phase
Successively:
• press
within 15 s: the display will show “hh” followed by the
two numbers regarding the hours
• press
or
within 15 s; parameter P8 is also seen
• press
within 15 s: the display will show “nn” followed by the
two numbers regarding the minutes
• press
or
within 15 s; parameter P8 is also seen.
It is also possible to set the duration of the awakening phase via the
dur2 parameter.
To set the work set-point during the awakening phase:
• press
during the modification of the duration of the awakening
phase (i.e. during modification of the minutes): the dis-
play will show “SEt” for 1 s after which the value is shown
• press
or
within 15 s; parameters P8, rH1and rH2 are also
seen.
It is also possible to set the awakening phase work set-point via the SEt2
parameter.
To set the percentage of relative humidity during the awakening phase:
• press
during the modification of the work set-point during the
awakening phase: the display will show “Ur” for 1 s after
which the value is shown
• press
or
within 15 s; parameters P8, rU3, rU5 and rU6 are
also seen.
• press
within 15 s: the display will show “PHA4” (it is the label
of the provering phase), the LED will switch off and the
LED
will switch on.
It is also possible to set the percentage of relative humidity during the
awakening phase via the Ur2 parameter.
To go back to previous levels:
• press
during modification of the values.
To exit the procedure:
• do not operate for 15 s (any modifications will be saved).
5.5.2
The awakening phase
During the awakening phase:
• compressor activity mainly depends on the SEt2, rC0 and rC3 pa-
rameters and that of the resistances from the SEt2, rH0 and rH3 pa-
rameters; see also parameter rn1
• the evaporator fan activity depends mainly on parameter F2
• the activity of the humidifier mainly depends on parameters Ur2,
rU2 and rU3 (the rU3 parameter establishes the duration of humidi-
fier switch-on, in the course of time rU2, such to cause 100% relative
humidity). If the temperature of the room falls below that established
with parameter rU1, humidification will not be available.
• defrosting is never activated
• the LED is on.
The awakening phase has duration of the time established via param-
eter dur2. When this time has expired, the instrument passes automati-
cally to the provering phase.
5.6.1
Modifying the settings of the provering phase
To set the duration of the provering phase:
• make sure that the instrument is in stand-by and that there is no
procedure in progress
• press
: the display will show the first label available
• press
or
within 15 s to select “Auto”
• press
within 15 s: the display will show the end time and date
of the provering phase in succession
• press
or
within 9 s to select “PHA4” (it is the label of the
provering phase): the LED
will switch on.
Alternatively:
• press
during the modification of the percentage of relative
humidity during the awakening phase.
Successively:
• press
within 15 s: the display will show “hh” followed by the
two numbers regarding the hours
• press
or
within 15 s; parameter P8 is also seen
• press
within 15 s: the display will show “nn” followed by the
two numbers regarding the minutes
• press
or
within 15 s; parameter P8 is also seen.
It is also possible to set the duration of the provering phase via the dur3
parameter.
To set the work set-point during the provering phase:
• press
during the modification of the duration of the provering
phase (i.e. during modification of the minutes): the dis-
play will show “SEt” for 1 s after which the value is shown
• press
or
within 15 s; parameters P8, rH1and rH2 are also
seen.
It is also possible to set the provering phase work set-point via the SEt3
parameter.
To set the percentage of relative humidity during the provering phase:
• press
during the modification of the work set-point during the
provering phase: the display will show “Ur” for 1 s after
which the value is shown
• press
or
within 15 s; parameters P8, rU3, rU5 and rU6 are
also seen.
• press
within 15 s: the display will show “PHA5” (it is the label
of the slowing phase), the LED
will switch off and the
LED
,
, and
will switch on.
It is also possible to set the percentage of relative humidity during the
provering phase via the Ur3 parameter.
To go back to previous levels:
• press
during modification of the values.
To exit the procedure:
• do not operate for 15 s (any modifications will be saved).
5.6.2
The provering phase
During the provering phase:
• compressor activity mainly depends on the SEt3, rC0 and rC3 pa-
rameters and that of the resistances from the SEt3, rH0 and rH3 pa-
rameters; see also parameter rn2
• the evaporator fan activity depends mainly on parameter F3
• the activity of the humidifier mainly depends on parameters Ur3,
rU2 and rU3 (the rU3 parameter establishes the duration of humidi-
fier switch-on, in the course of time rU2, such to cause 100% relative
humidity). If the temperature of the room falls below that established
with parameter rU1, humidification will not be available
• defrosting is never activated
• the LED
is on.
The provering phase has duration of the time established via param-
eter dur3. When this time has expired, the instrument passes automati-
cally to the slowing phase.
5.7.1
Modifying the settings of the slowing phase
To set the work set-point during the slowing phase:
• make sure that the instrument is in stand-by and that there is no
procedure in progress
• press
: the display will show the first label available
• press
or
within 15 s to select “Auto”
• press
within 15 s: the display will show the end time and date
of the provering phase in succession
• press
or
within 9 s to select “PHA5” (it is the label of the
slowing phase): the LEDs
,
,
and
will switch on.
Alternatively:
• press
during the modification of the percentage of relative
humidity during the provering phase.
Successively:
• press
within 15 s: the display will show “SEt” for 1 s after which
the value is shown
• press
or
within 15 s; parameters P8, rH1and rH2 are also
seen.
It is also possible to set the slowing phase work set-point via the SEt4
parameter.
To set the percentage of relative humidity during the slowing phase:
• press
during the modification of the work set-point during the
slowing phase: the display will show “Ur” for 1 s after
which the value is shown
• press
or
within 15 s; parameters P8, rU3, rU5 and rU6 are
also seen.
• press
within 15 s: the display will show the end time and date
of the provering phase in succession again and the LEDs
,
, and
will switch off.
It is also possible to set the percentage of relative humidity during the
slowing phase via the Ur4 parameter.
To go back to previous levels:
• press
during modification of the values.
To exit the procedure:
• do not operate for 15 s (any modifications will be saved).