À caution, Poor storage, Milk savor™ (some models) – Kenmore 596.50003100 User Manual
Page 11: Dairy center, Tilt»out door buckets (some models), Door buckets, Shelves, Spiilproof shelves, Drawers, Can rack (some models)
Attention! The text in this document has been recognized automatically. To view the original document, you can use the "Original mode".
Refrigerator Features
À CAUTION
To avoid pKjpefty damage or injury, observe the following;
• Confirm shelf is secure before placing items on shelf.
> Handle tempered glass shelves carefuliy. Shelves may
break suddenly if nicked, scratched, or exposed to sudden
temperature change
Poor storage
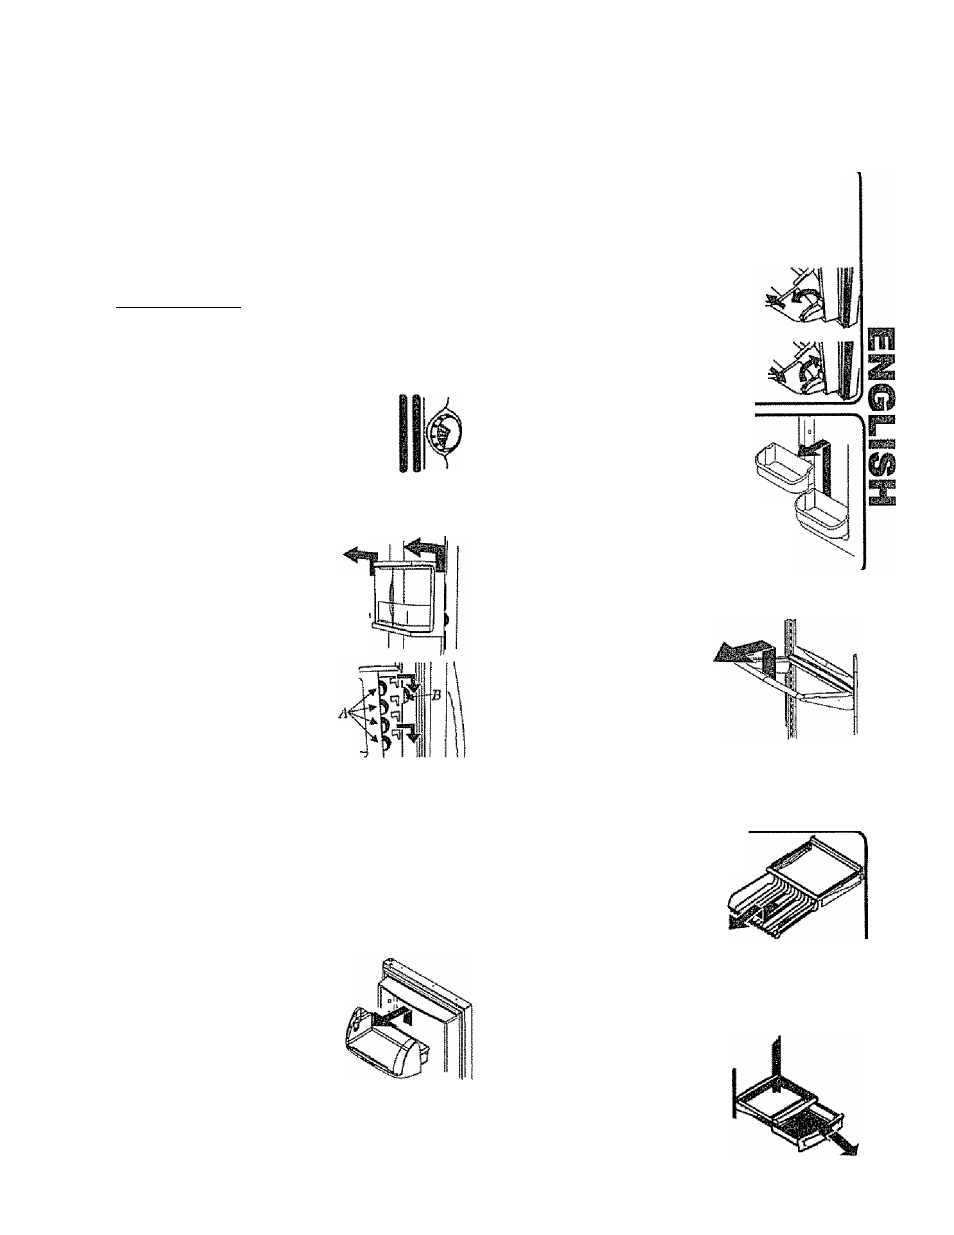
Milk Savor™ (some models)
The temperature-controlled Milk Savor™
keeps beverages and other items up to 5* F
(3° C) colder than the rest of the fresh food
section Air inlet allows air from the freezer
section to pass to Milk Savor™,
The Milk Savor™ control is located
on the left wall of fresh food section
Control adjusts amount of air circulating in
Milk Savor™. Turn control clockwise for colder
temperature
To remove and install Miik Savor™
■ if located directly above Miik
Savor™, dairy center or door
bucket may need to be removed
Refer to appropriate instnjcUons
and remove item. Slide Miik Savor'^'-
assembly up and puil straight out,
• To install, aitgn one of the
Miik Savor™ cold air intake
holes
(A)
with one of the two
air Inlets
(B)
in door liner.
Push assembly down onto
door liner retainer until it stops
IMPORTANT: Milk Savor™ will not operate properly if
air intake holes are not aligned with air Intet in door
liner.
Dairy Center
The dairy center provides convenient storage for items
such as butter, yogurt, cheese, etc.
This compartment is an adjustabie feature located in
the door. It can be moved to several different locations
to accommodate storage needs
To remove and install bin:
• To remove, slide dairy center up
and puil out
• To install, slide assembly in
above desired door liner
retainer and push down until it
stops
To remove and install dairy door;
• To remove, press In sides of dairy door and pull out,
• To install, slide sides of dairy door inside dairy
center until hinge points snap into place
Door Storage
{Oiitiiiiied
Tilt»Out Door Buckets (some models)
The Tilt-Out Bucket assembly consists of a bucket and frame,
providing adjustable, convenient storage for food items in door
The bucket assembly tiSts forward for easy access of items, and
lifts out for ease in cleaning and adjusiing.
To remove and install bucket:
• To remove bucket, Up bucket forward
and puil straight out to remove,
■ To install bucket, side bucket into bucket
frame and push bucket upright
To adjust bucket frame:
• Remove bucket per above instactions
• Ut IramB off door support and place in
desired door location.
Door Buckets
Door buckets adjust to meet Individual
storage needs
To remove and Install buckets: retainers on the door liner, then puil the door • To install, slide bucket in above desired door liner retainer and push down uni bucket stops Shelves Spiilproof Shelves Spillproof stationary shelves hold To removeatid instai! shelves: release shelf hooks from metal track • To install shelves, select point in malat tradì for replacement and insert shelf hooks. Raise front of shelf uni hroks lock Drawers Can Rack (some models) The Can rack slides out from To remove and instail can rack: forward to full extension and lift front to release • To instali, reverse above procedure. Snack Drawer This drawer can be used for storage of To remove and install snack drawer; • To remove, pull drawer out to fuil extension. Tilt up font of dravrer and • To instali, reverse above procedure. 11
• Lift the dcrer bud
bucket straight out-
simple spills for easier deaning
' To remove shelves, lift front of sheif to
and pull out to remove
into place. Lower sheif front
underneath the spillproof stationary
shelf. The can rack holds up to
twelve 12-ounce beverage cans
• To remove, empty contents of can rack - Pull can rack
from shelf rail. Pull straight out to remove.
food items or erdra produce
puil straight out