Fluid change procedure – Cub Cadet ZT-3400 User Manual
Page 13
ZT-2800
®
/ZT-3100/ZT-3400™
11
ZT-2800
®
11
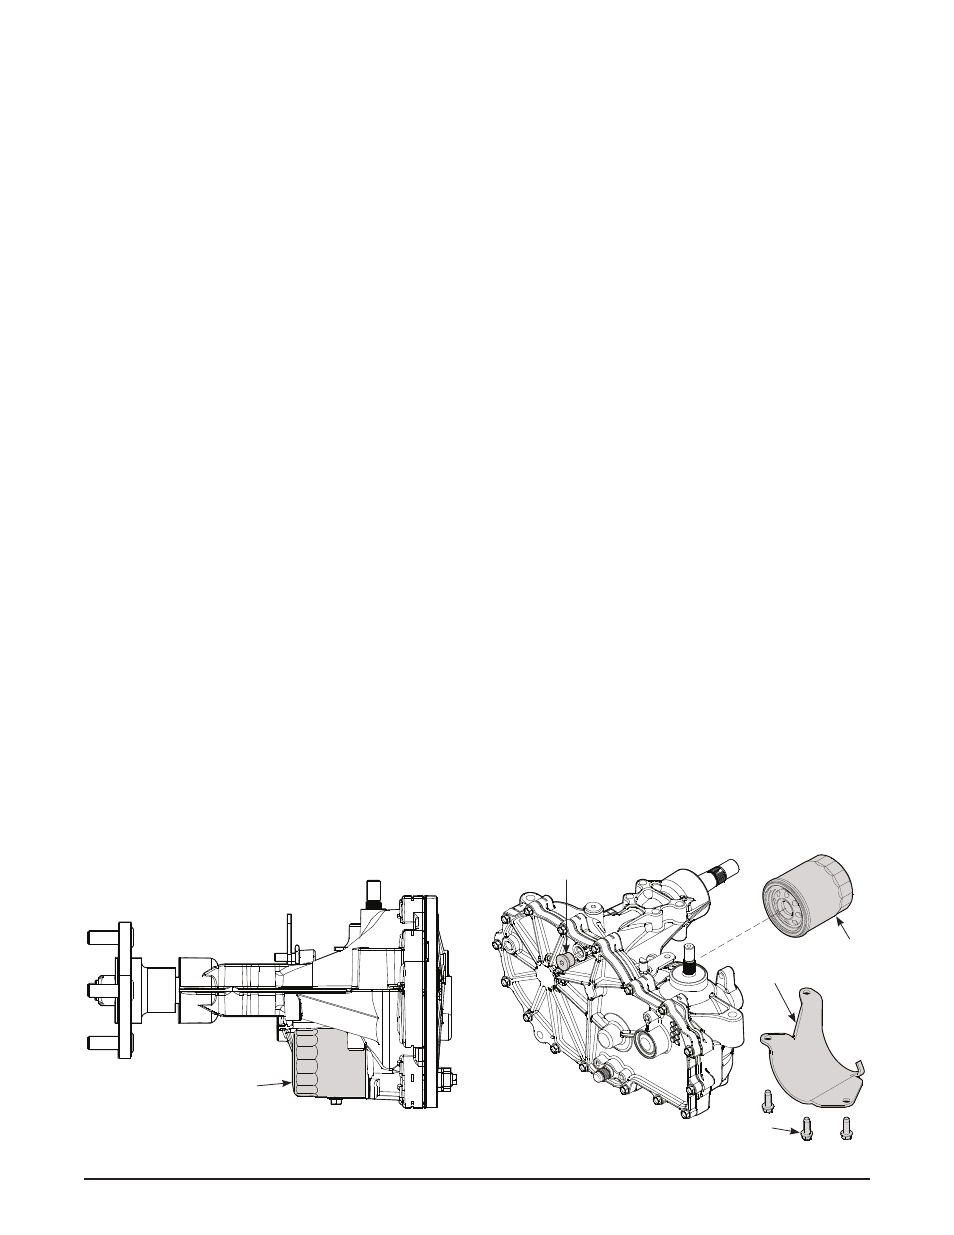
This transaxle is designed with an external filter
for ease of maintenance. To ensure constant
fluid quality levels and longer life, an initial oil
and filter change at 75-100 hours, then every
400 hours thereafter is recommended.
The following procedure can be performed
with the transaxles installed in the vehicle, and
the vehicle on level ground. Apply the bypass
valve for each transaxle and lock the vehicle
parking brake.
1. Remove the three 1/4” filter guard screws
and filter guard. Clean any loose debris from
around the perimeter of the filter. See figures
4 and 5.
2. Place an oil drain pan (12” or more diam-
eter and 8 qt. capacity is optimal) beneath
the oil filter. Remove the oil filter from the
transaxle.
3. After the oil has drained, wipe the filter base
surface off and apply a film of new oil to the
gasket of the new replacement filter (Hydro-
Gear part number 52114).
4. Install the new filter by hand, turn 3/4 to one
full turn after the filter gasket contacts the
filter base surface.
5. Re-install the filter guard with three 1/4”
screws. Torque screws to 65 in. lbs.
(7.3 Nm) each.
6. Repeat steps 1-5 on the opposite side
transaxle drive.
7. Drain old oil filters of all free flowing oil prior
to disposal. Place used oil in appropriate
containers and deliver to an approved re-
cycling collection facility.
8. Remove the top port plug (figure 6) from the
left side and right side transaxles prior to
filling with oil. This will allow the transaxles
to vent during oil fill.
9. Remove the cap from the transaxle’s expan-
sion tank located on the vehicle frame.
10. Fill with 20W50 motor oil until oil just ap-
pears at the bottom of each transaxle’s top
port (approximately 2 qts. per transaxle, 4
qts. total). Install the top port plug into each
transaxle as the oil level reaches this port.
11. Install and torque the top port plugs to 180
in. lbs. (20.3 Nm).
12. Continue to fill the transaxles through the
expansion tank until the “Full Cold” line is
reached on the Hydro-Gear expansion tank
(refer to vehicle owner’s manual for specific
volumes).
13. Re-install the expansion tank cap by hand.
Be careful to not overtighten.
14. Proceed to the purge procedure.
fLUid CHange prOCedUre
figure 5, filter Location
figure 6, filter and filter guard
(Guard Removed For Visual Clarity)
Filter
Filter
Filter Guard
Screws
Top Port Plug