Yamaha PSS-390 User Manual
Page 9
Attention! The text in this document has been recognized automatically. To view the original document, you can use the "Original mode".
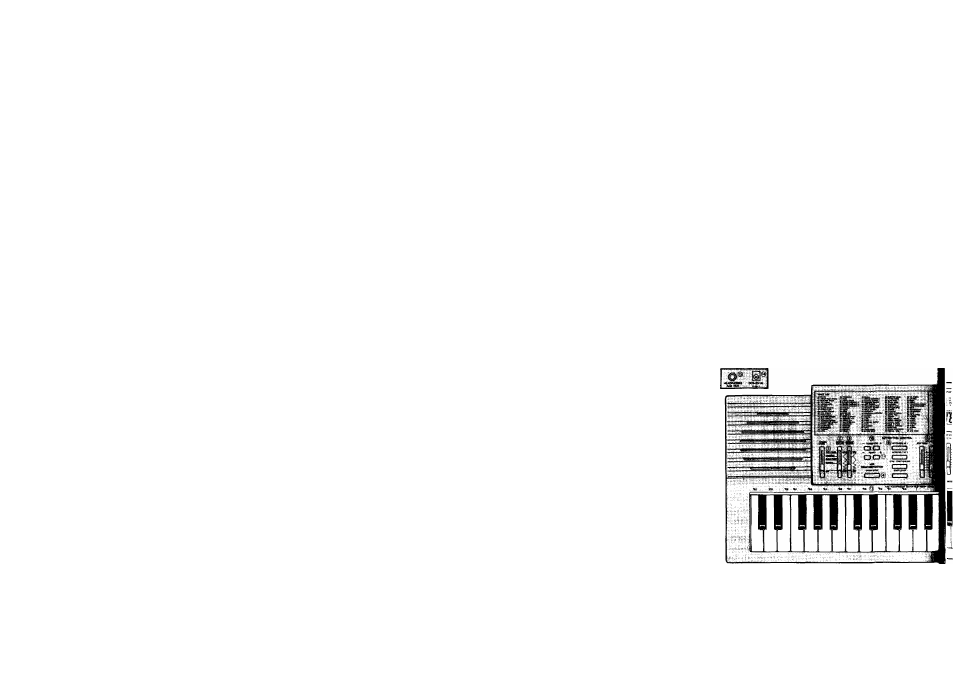
(T)POWER/MODE lever
Selects an accompaniment mode or turns off the PortaSound.
©MASTER VOLUME lever
Adjusts the overall volume.
©ACCOMP. VOLUME lever
Adjusts the volume of the Automatic Accompaniment.
©DEMONSTRATION section
Press this START/STOP button to start or stop playback of the
preset demo song.
©MULTI DISPLAY
A digital display that shows the currently selected voice, style,
tempo. Transpose value or the current beat.
©RHYTHM CONTROL section
Use these buttons to start, stop or add variation to the rhythm
or Automatic Accompaniment.
©VOICE/STYLE SELECT section
Use these buttons to select the desired voice or style.
©DIGITAL SYNTHESIZER section
These levers let you alter the parameters of a voice to create
your own original sound.
©DUAL VOICE section
Turn on the ON/OFF button when you want to create a richer,
layered sound consisting of two voices.
©TRANSPOSE buttons
Use these buttons to transpose the overall key of the PortaSound.
©TEMPO buttons
Use these buttons to adjust the tempo of the rhythm.
©SONG MEMORY section
These buttons are used to record and play back your
performance.
©Auto Accompaniment section of the keyboard
During automatic accompaniment, this section of the keyboard
is used for playing chords with your left hand. In NORMAL
mode, it functions as an ordinary keyboard.
©DC9-12V IN jack
Connect the AC power adaptor to this jack.
©HEADPHONES/AUX. OUT jack
The sound of the PortaSound is output from this jack, which can
be connected to headphones, a keyboard amplifier, or a stereo
system.
DESCRIPTION OF PARTS
BESCHREIBUNG DER FUNKTIONSTASTEN UND REGLER
©POWER/MODE-Wahlschalter
Dient zum Wählen eines Begleitmodus bzw. zum Ausschalten
des Instruments.
©MASTER VOLUME-Schalter
Dient zum Einstellen der Gesamtlautstärke.
©ACCOMP. VOLUME-Schalter
Dient zum Einstellen des automatischen Begleitspiels.
@ DEMONSTRATION-Sektion
Drücken Sie die START/STOP-Taste zum Ein- bzw. Ausschalten
der Wiedergabe des Preset-Demonstrationstitels.
©MULTI DISPLAY
Eine Digitalanzeige, die die jeweils gewählte Stimme, den
Musikstil, das Tempo, den Transpositionswert und die eingestellte
Taktlänge anzeigt.
©RHYTHM CONTROL-Sektion
Verwenden Sie diese Tasten zum Ein- bzw, Ausschalten, oder
um dem Rhythmus bzw. der automatischen Begleitung eine
Spielfolge hinzuzufügen.
©VOICE/STYLE SELECT-Sektion
Verwenden Sie diese Tasten zur Wahl der gewünschten Stimme
oder des gewünschten Stils.
©DIGITAL SYNTHESIZER-Sektion
Diese Schalter dienen zum Ändern der Parametereinstellung
einer Stimme, um deren Klang wie gewünscht zu ändern.
©DUAL VOICE-Sektion
Die Taste ON/OFF dient zum Ein-/Ausschalten der Doppel
stimmenfunktion zur Erzeugung eines reicheren, überlagerten
Klangs, bestehend aus zwei Stimmen.
©TRANSPOSE-Taste
Verwenden Sie diese Tasten, um die Gesamttonart des
Instruments zu transponieren.
©TEMPO-Tasten
Verwenden Sie diese Tasten zum Einstellen des Rhythmustempos.
©SONG MEMORY-Sektion
Diese Tasten dienen zur Aufnahme und Wiedergabe Ihres Spiels.
©Automatikbegleitsektion der Tastatur
Beim Spiel mit automatischer Begleitung dient dieser Abschnitt
der Tastatur zum Spielen von Akkorden mit der linken Hand.
Im NORMAL-Modus funktioniert dieser Tastaturabschnitt mit
normaler Tastenfunktion.
@DC 9-12 V IN-Buchse
Schließen Sie das Netzteil an diese Buchse an.
©HEADPHONES/AUX. OUT-Buchse
Der Klangausgang des Instruments liegt an dieser
Ausgangsbuchse an. Die Buchse dient für den Anschluß von
Kopfhörern, Keyboardverstärker oder Stereoanlage.