Talkaphone ETP-UPS Back-up Power Supply User Manual
Back-ups, Rs 700 installation & operation, Overview connect the battery inventory safety
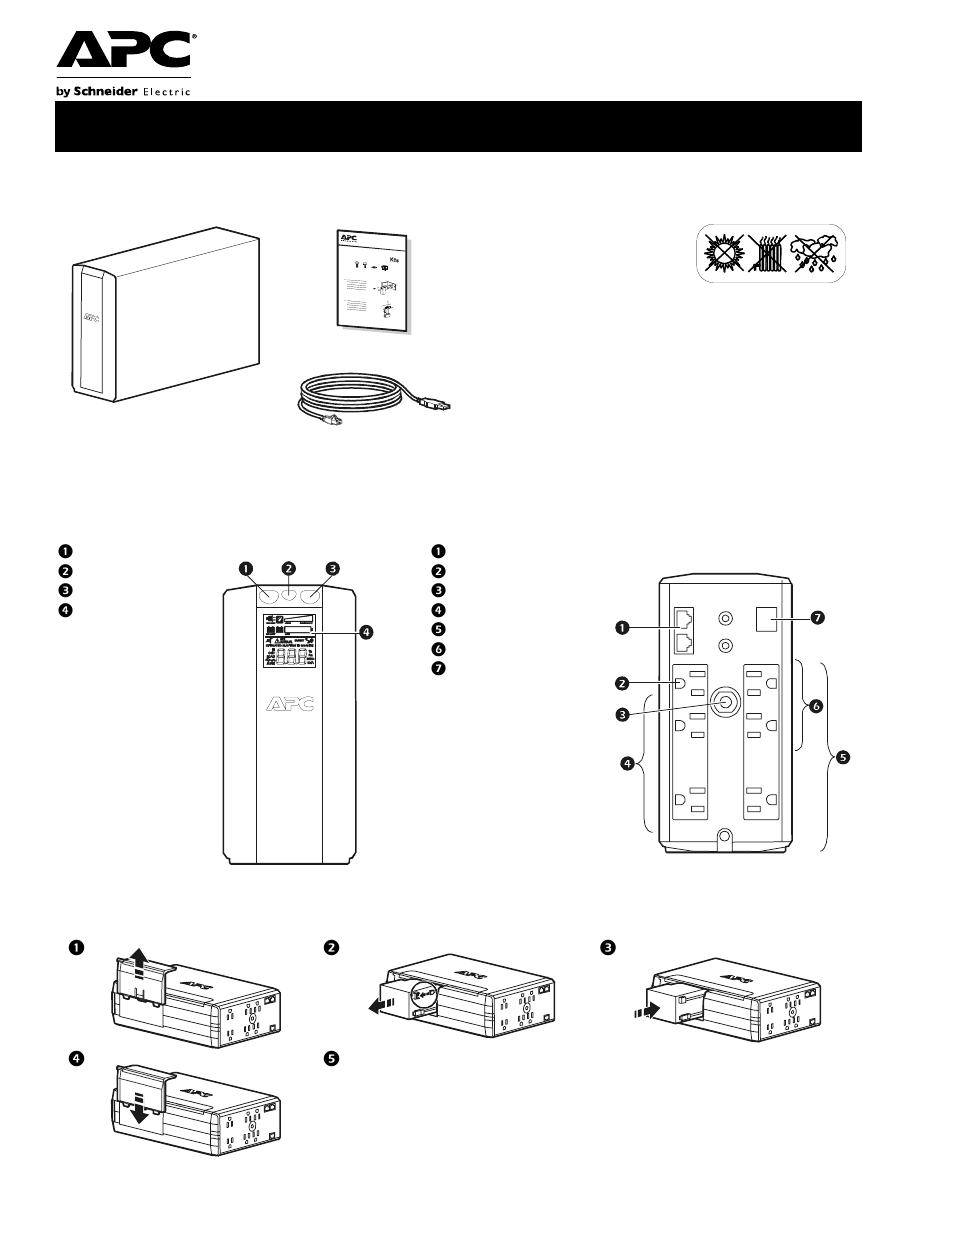
Table of contents
Document Outline
- Inventory
- Safety
- Overview
- Connect the battery
- Connect the equipment
- 1 . Connect equipment to the Battery Backup and Surge Protection outlets. When the Back-UPS is re...
- 2 . Use the AC power cord to connect the Back-UPS directly to a utility power outlet.
- 3 . Connect a router or cable modem to the corresponding ports.
- 1 . Connect the supplied USB software interface cable to the data port, and the other end to a co...
- 2 . Go to www.apc.com/tools/download.
- 3 . Select PowerChute Personal Edition. Then select the appropriate operating system and follow t...
- Operation
- On Line—The UPS is supplying utility power to connected equipment
- Power-Saving—Master and controlled outlets are enabled, saving power when the master device goes ...
- Load Capacity—The load is indicated by the number of sections illuminated, one to five. If the lo...
- Battery Charge—The battery charge level is indicated by the number of sections illuminated. When ...
- Overload—The power demand from the load has exceeded the capacity of the Back-UPS.
- Event—An event has occurred and the unit needs attention.
- Automatic Voltage Regulation—The unit is compensating for extremely low input voltage, but is not...
- In—Input voltage. Out—Output voltage.
- System Faults—The system has a fault. The fault number will illuminate on the display interface. ...
- Mute—The audible alarm has been turned off.
- Replace Battery—The battery is not connected or is nearing the end of its useful life. Replace th...
- On Battery—The unit is supplying battery backup power to the connected equipment, it will beep fo...
- Press Display to scroll through the display screens.
- Input Voltage
- Estimated runtime in minutes
- Counter
- Power Event Counter
- Estimated run time
- Output Voltage
- Load in Watts
- Input Voltage
- Load in %
- Load in Watts
- Output Voltage
- Load in %
- Output Frequency
- Output Frequency
- AVR: The Automatic Voltage Regulation (AVR) feature will compensate for excessively low input vol...
- Configuration
- To conserve electricity, configure the Back-UPS to recognize a Master device, such as a desktop c...
- Enable the Power-Saving feature
- Disable the Power-Saving feature.
- Setting the threshold
- The amount of power used by a device in Sleep or Standby mode varies between devices. It may be n...
- 1 . Ensure a master device is connected to the Master outlet. Put that device into Sleep or Stand...
- 2 . Press Display and Mute simultaneously and hold for six seconds, until the leaf icon flashes t...
- 3 . The Back-UPS unit will now recognize the threshold level of the Master device and save it as ...
- When unit power is On, the LCD may remain illuminated or be darkened for energy savings.
- 1 . Full Time LCD Mode: Press and hold DISPLAY for two seconds. The LCD will illuminate and the u...
- 2 . Power-Saving Mode: Press and hold DISPLAY for two seconds. The LCD will darken and the unit w...
- Adjust the sensitivity of the UPS to control when it will switch to battery power; the higher the...
- 1 . Ensure the unit is connected to utility power, but is OFF.
- 2 . Press and hold the Power button for six seconds. The Load Capacity bar will flash on and off,...
- 3 . Press Power again to rotate through the menu options. Stop at selected sensitivity. The unit ...
- 78-144 Vac
- 88-141 Vac
- 88-137 Vac
- Input voltage is extremely low or high. (Not recommended for computer loads.)
- The Back-UPS frequently switches to battery power.
- The connected equipment is sensitive to voltage fluctuations.
- Warnings and System Faults
- Press Display to scroll through the display screens.
- ON LINE overload condition, indicated by the illuminated ON LINE icon, and the flashing overload ...
- In ON LINE mode, and there is a bad battery, indicated by the flashing icon.
- Backup battery (ON BATT) overload condition. This is indicated by the flashing overload icon.
- The battery charge is low, and the Battery Charge indicator bar is flashing.
- The unit will display the fault messages. Contact APC Technical Support for additional support.
- Press Display to scroll through the display screens.
- Function Button Quick-Reference
- 0.2
- Off
- 2
- On
- 0.2
- On
- 2
- On
- 0.2
- On
- 2
- On
- 6
- Off
- 2
- On
- 6
- On
- 6
- On
- 0.2
- On
- 2
- Fault
- After a fault has been identified, press Power to remove the visual indication and return to stan...
- Troubleshooting
- Specifications
- General
- Topology
- Line-Interactive
- Input
- Rated input voltage
- 120 Vac
- Phase
- Single phase 2+ ground
- Frequency
- 50/60 Hz (autosensing)
- Input voltage range
- (on AVR operation)
- Default setting: 88 V-141 V
- Lower Limit Voltage Range: 78 V- 144 V
- Upper Limit Voltage Range: 88 V- 137 V
- Power cable length
- 6 ft
- Input plug type
- NEMA5-15
- Output
- Output plug type
- NEMA5-15R
- Output outlet
- Back-up outlets (3)
- Surge outlets (3)
- Maximum load
- 700 VA/420 W
- Output voltage
- 115 Vac + 8%
- Frequency
- 50/60 Hz +1
- On-battery waveform
- Stepped sine wave
- Transfer time
- Maximum 8 ms
- Surge Protection/Noise
- Surge protection
- Yes
- Noise filter
- Yes
- Data line protection
- ADSL, ISDN, 10/100Base-T
- Interface
- Interface
- USB v1.1
- If the Back-UPS arrived damaged, notify the carrier.
- If the Back-UPS requires service, do not return it to the dealer.
- 1 . Consult the Troubleshooting section to eliminate common problems.
- 2 . If the problem persists, go to http://www.apc.com/support/.
- 3 . If the problem still persists, contact APC Technical Support.