Arretierbolzen (nur psen b4 und psen b4.1), Montage, Locking pin (psen b4 and psen b4.1 only) – Pilz PSEN b5 User Manual
Page 3: Installing, Targette (seulement psen b4 et psen b4.1)
Arretierbolzen (nur PSEN b4 und
PSEN b4.1)
Der Arretierbolzen schützt vor unbeabsich-
tigtem Schließen des Riegels.
ACHTUNG
Bei PSEN b4 kann der Arretier-
bolzen deaktiviert werden.
WARNUNG!
Arretierbolzen darf im Gefahrenbe-
reich nicht bedienbar sein, sonst
Gefahr von schwersten Körperver-
letzungen und Tod!
Schützen Sie den Arretierbolzen vor
Zugriffen z. B. durch ein ein
umlaufendes Blech (ca. 200 mm).
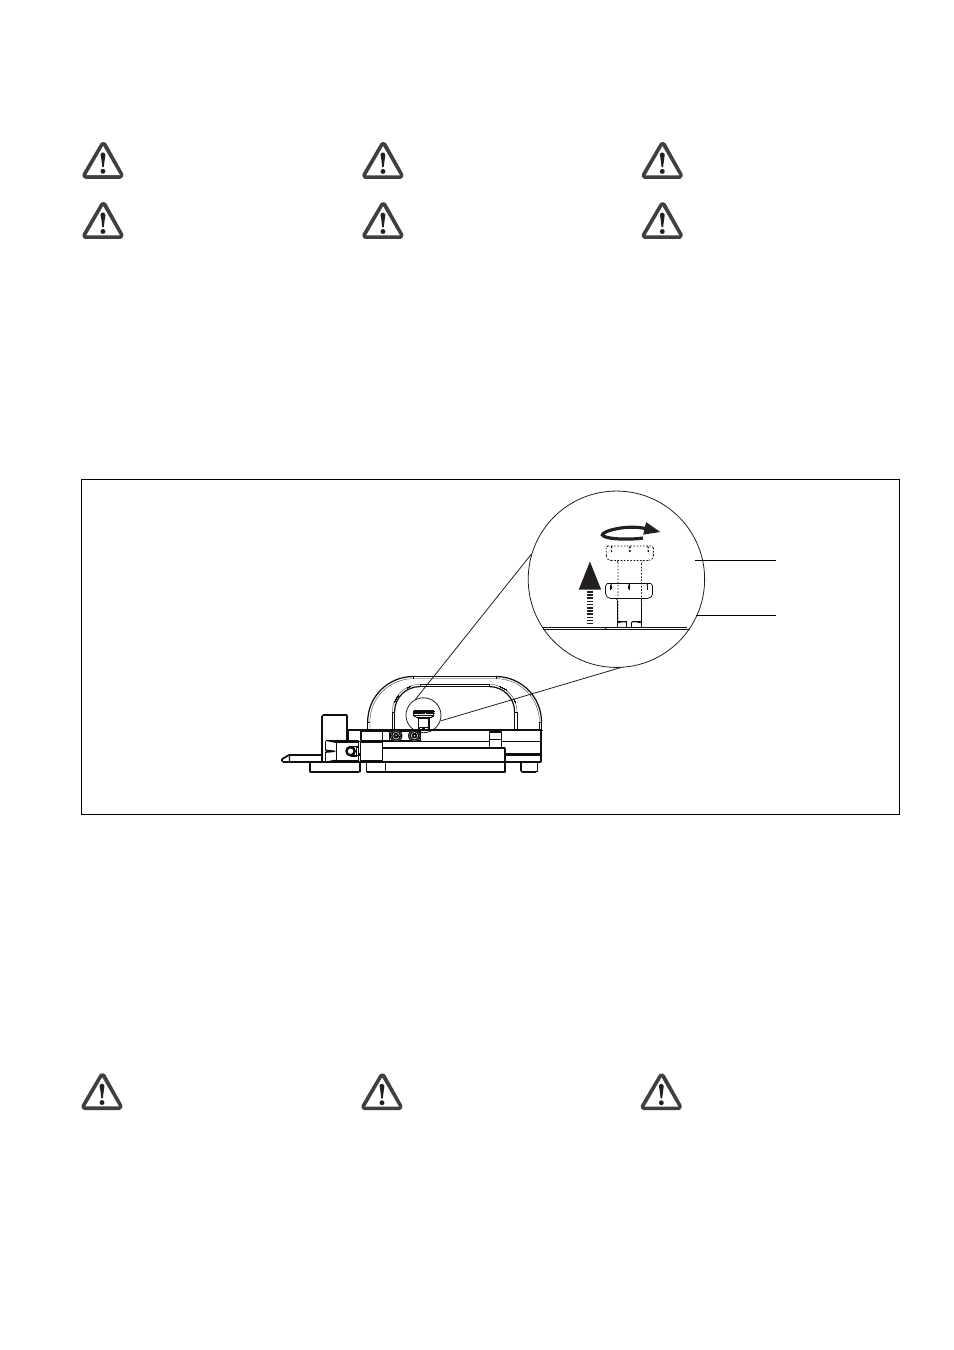
Bei PSEN b4 kann der Arretierbolzen in
zwei verschiedene Positionen gebracht
werden (siehe Fig. 3).
• Position 1: Der Arretierbolzen ist außer
Funktion.
• Position 2: Der Arretierbolzen arretiert
den Riegel im geöffneten Zustand, der
Riegel lässt sich nicht schließen.
Fig. 3: Türplatte mit Arretierbolzen/Gate mounting plate with locking pin/Plaque de porte avec targette
Position 1
Position 2
Arretierung deaktivieren (Position 1)
• Arretierbolzen aus Position 2 nach oben
ziehen, gleichzeitig um 90
O
drehen bis
Arretierbolzen in Position 1 einrastet. Die
Arretierung ist deaktiviert.
Arretierung aktivieren (Position 2)
• Arretierbolzen aus Position 1 nach oben
ziehen, gleichzeitig um 90
O
drehen und
loslassen. Der Arretierbolzen muss in
Position 2 einrasten. Die Arretierung ist
aktiviert.
Montage
ACHTUNG
Montieren Sie den Riegel nur, wenn
Sie zuvor die Betriebsanleitung der
Sicherheitschalter PSENcode oder
PSENmag gelesen und verstanden
haben! Achten Sie besonders auf
die Angaben zu Schaltabständen
und Montage. Halten Sie unbedingt
die technischen Daten ein!
Locking pin (PSEN b4 and
PSEN b4.1 only)
The locking pin is used to protect the bolt
from closing unintentionally.
CAUTION
On the PSEN b4, the locking pin
can be deactivated.
WARNING!
The locking pin must not be
operable in the danger zone,
otherwise there is a risk of serious
injury and death!
Protect the locking pin against
access, e.g. by means of a plate
circling it (approx. 200 mm).
On the PSEN b4, the locking pin can be
located in two different positions
(see fig. 3).
• Position 1: The locking pin is without
function.
• Position 2: The locking pin locks the bolt
in an open condition; the bolt cannot be
closed.
Deactivate locking (Position 1)
• From Position 2, pull the locking pin
upwards while turning it 90°, until the
locking pin clicks into Position 1. Locking
is deactivated.
Activate locking (Position 2)
• From Position 1, pull the locking pin
upwards while turning it 90°,
then release
it. The locking pin should click into
Position 2. Locking is activated.
Installing
CAUTION
Do not install the bolt until you have
read and understood the operating
instructions for the safety switches
PSENcode or PSENmag! Pay
particular attention to the information
on operating distances and installa-
tion. Make sure that you comply
with the technical details!
Targette (seulement PSEN b4 et
PSEN b4.1)
La targette protège contre une fermeture
involontaire du verrou.
ATTENTION
La targette du PSEN b4 peut être
désactivée.
AVERTISSEMENT !
Ne pas utiliser la targette dans la
zone dangereuse sinon il y a risque
de blessures corporelles graves et
mortelles !
Protégez la targette pour qu’elle
soit hors d’atteinte, par exemple,
en posant une tôle d’env. 200 mm
autour.
La targette du PSEN b4 peut être placée
dans deux positions différentes (voir fig. 3).
• Position 1 : la targette est hors service.
• Position 2 : la targette bloque le verrou en
position ouverte, le verrou ne peut pas
être fermé.
Désactiver le blocage (position 1)
• Tirer la targette vers le haut à partir de la
position 2, tourner simultanément sur 90
O
jusqu’à ce que la targette s’enclenche en
position 1. Le blocage est désactivé.
Activer le blocage (position 2)
• Tirer la targette vers le haut à partir de la
position 1, tourner simultanément sur 90
O
et relâcher. La targette doit s’enclencher
en position 2. Le blocage est activé.
Montage
ATTENTION
Vous ne monterez le verrou qu’après
avoir préalablement pris connais-
sance et compris le manuel d’utilisa-
tion des capteurs de sécurité
PSENcode ou PSENmag ! Tenez
absolument compte des données sur
les distances de commutation et le
montage. Respectez impérativement
les caractéristiques techniques !