Pilz PSEN ma1.4p-57/PSEN ma1.4-03mm/ 1unit User Manual
Page 7
- 7 -
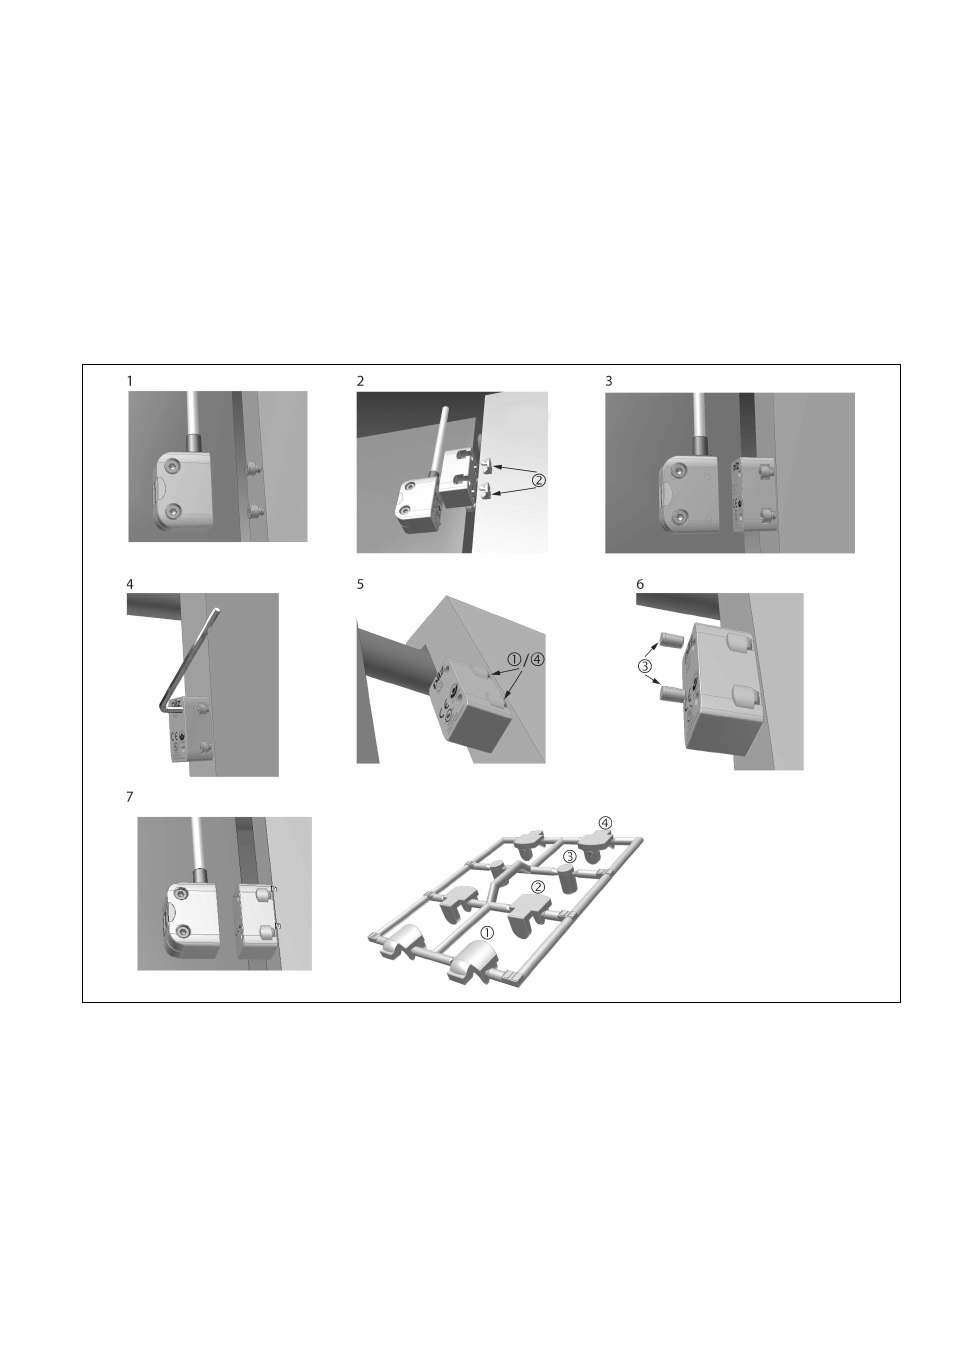
Montage Variante 2
1086273035
Montieren Sie den Sensor wie bei Montage Va-
riante 1
`
1. Schrauben für Betätiger eindrehen, dabei
den Abstand Schraubenkopf zur Auflage be-
achten: ca. 3 ... 6 mm.
`
2. Nicht verwendete Montageöffnungen, die
auf der Auflagefläche aufliegen, mit Ver-
schluss (2) schließen.
`
3. Betätiger auf die Schrauben schieben.
`
4. Betätiger ausrichten und die Schrauben
mit max. 0,8 Nm anziehen.
`
5. Verwendete Montageöffnungen mit Ver-
schluss (1) oder (4) schließen.
`
6. Montageöffnungen auf aktiver Fläche mit
Verschluss (3) schließen.
`
7. Sensor und Betätiger sind fertig montiert.
Installation type 2
Install the sensor as shown for installation type
1
`
1. Attach the screws for the actuator, main-
taining the distance between the screw head
and the plate: ca. 3 ... 6 mm.
`
2. Close unused mounting holes on the plate
using seal (2).
`
3. Slide the actuator on to the screws.
`
4. Align the actuator and tighten the screws
to a max. 0.8 Nm.
`
5. Close used mounting holes using seal (1)
or (4).
`
6. Close mounting holes on the sensing face
using seal (3).
`
7. Installation of sensor and actuator is now
complete.
Montage du modèle 2
Montez le capteur de la même manière que
pour le modèle 1
`
1. Visser les vis pour l'actionneur, pour cela,
respecter la distance entre la tête de vis et
l'application : env. 3 à 6 mm.
`
2. Refermer à l'aide de la fermeture (2) les
ouvertures non utilisées pour le montage qui
se trouvent dans la surface d'application.
`
3. Pousser l'actionneur sur les vis.
`
4. Orienter l'actionneur et serrer les vis avec
max. 0,8 Nm.
`
5. Refermer les ouvertures destinées au
montage à l'aide des fermetures (1) ou (4).
`
6. Refermer les ouvertures destinées au
montage, situées sur la surface active, à
l'aide de la fermeture (3).
`
7. Le capteur et l'actionneur sont à présent
montés.