6 set points, Urv6, Vwsw uhdw qhw u wfqw urv6 wrwdo – Rice Lake MSI-4260 Port-A-Weigh User Manual
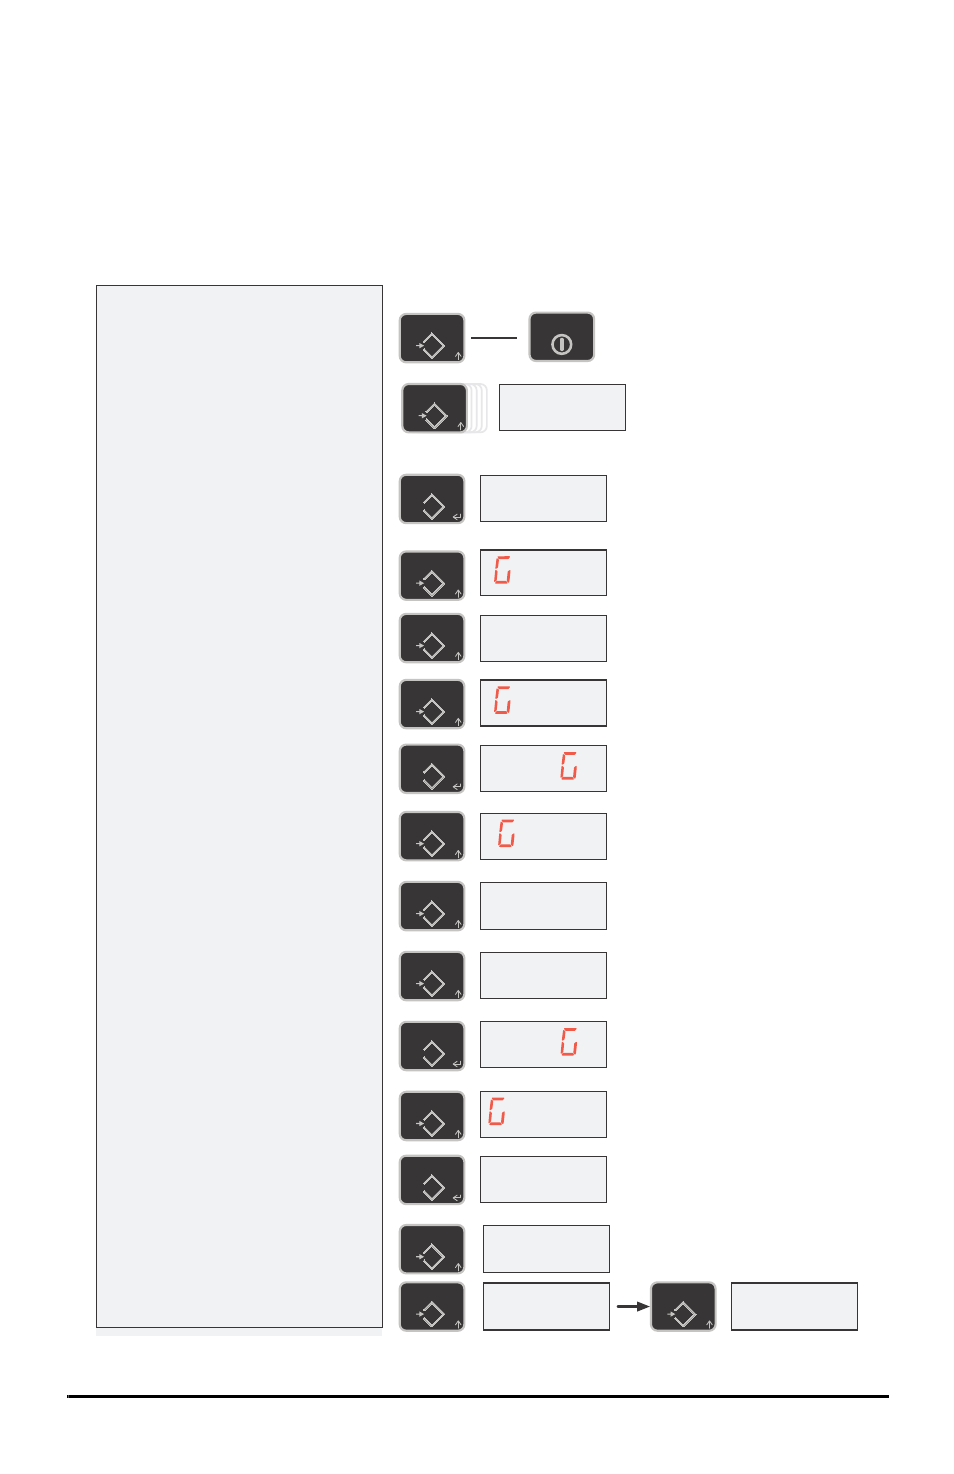
Page 30: 66 uhdw, Qhw u, Set point setup, Figure 4-6. set point setup
26 MSI-4260 Port-A-Weigh Operator’s Manual
4.6 Set Points
The MSI-4260 supports three set points. Common uses of set points are for warnings
or process control. The MSI-4260 comes standard with LED outputs for a triggered
set point. Set Point 1 is Blue, Set Point 2 is Green and Set Point 3 is Red. The MSI-
4260 has an audible output option that is triggered by Set Point 1. Contact MSI for
other Set Point Output Options.
URV6
1) With the 4260 Off, press and
hold the
USER
key, then press
the
POWER
key.
...or while the 4260 is on, press
USER
and
POWER
simultaneously.
2) Scroll through the Setup Menu
choices by pressing the
USER
key. Stop when the LED displays
“StPt1”, “StPt2”, or “StPt3”.
3) When the desired Set Point is
displayed, press
TARE
. The
display blinks “OFF”, or if
previously programmed, the last
set mode.
4) Select the Set Point mode by
scrolling through the choices with
the
USER
key. “GrEAt” (greater
than) indicates the Set Point will
trigger when the weight exceeds
the value. “LESS” (less than) will
trigger the set point when the
weight is less than the value.
This example scrolled through all available
choices for illustration purposes only.
5) When the desired Set Point
Mode is displayed, press
TARE
.
6) Next select the type of weight
value the set point is assigned
to. Use the
USER
key to scroll
through the choices.
This example scrolled through all
available choices for illustration
purposes only.In this example, we’ll
enter Gross as a weight mode because
we are going to use the set point as a
safety warning.
7) When the desired weight mode
is shown, push
TARE
. Next the
current Set Point value is
displayed.
If there was a previous
value, it is displayed. If no value has
been entered, a zero will appear. To
keep the displayed value, press
ZERO
.
8) Press the
USER
key. The first
digit blinks at zero. Use the
USER
key to scroll through the
numbers. When the desired
number is shown, push
TARE
.
In this example, we’ll enter 240 as a
Set Point value.
Set Point Setup
VWSW
UHDW
QHW U
WFQW
URV6
WRWDO
blinking
blinking
blinking
blinking
2II
blinking
/(66
UHDW
blinking
Set Point responds to Gross Weight regardless of the display.
Set Point responds to Net or Gross Weight.
Set Point responds to the Totaled Weight.
Set Point responds to the Total Count (number of samples).
Set Point responds to Gross Weight regardless of the display.
USER
F
USER
F
USER
F
Hold
USER
F
esc
POWER
USER
F
TARE
T
TARE
T
TARE
T
USER
F
USER
F
USER
F
USER
F
USER
F
blinking
USER
F
USER
F
QHW U
blinking
Set Point responds to Net or Gross Weight.
TARE
T
blinking
blinking
Figure 4-6. Set Point Setup