0 installation, 1 unpacking and assembly, 2 factory setup – Rice Lake IQ plus 2100SL Digital Bench Scale User Manual
Page 7: 1 unpacking and assembly 2.2 factory setup, Caution
Installation
3
2.0
Installation
The IQ plus 2100 digital bench scale is designed for easy
setup and installation. All models are preconfigured an
weight calibrated before shipment, with the load cell
connected to the indicator. For simple, standalone scale
applications, hardware installation consists of attaching
the indicator, mounting assembly, and bench scale, then
leveling the scale.
NOTE:
The IQ plus 2100 is weight calibrated before
shipment from the factory, but recalibration at the
installation site is strongly recommended. Calibration by
a certified scale technician is required for Legal-for-Trade
applications.
2.1
Unpacking and Assembly
Immediately after unpacking, visually inspect the IQ
plus 2100 to ensure all components are included and
undamaged. The shipping carton should contain the
indicator, the bench scale, the indicator mount (tilt
stand, column, or attachment bracket), this manual, and
a parts kit. If an y parts were damaged in shipment,
notify Rice Lak e Weighing Systems and the shipper
immediately.
The parts kit contains the items listed below:
• Capacity label (PN 42350)
• One grounding clamp (PN 53075), e
xternal
tooth lock washer, (PN 15133), and kep nut (PN
14626) for digital input or serial cable shield
grounding against the enclosure.
• Two wing knobs with n ylon washers for
attaching the indicator to the mounting
assembly, four rubber tilt stand feet (for tilt
stand option) or bench scale feet, jam nuts, lock
washers, and cap scre ws (for column and
attachment bracket options). See Section 6.7 on
page 28 for replacement part numbers.
To install, attach the mounting assembly to scale base,
then assemble the indicator to the mounting assembly .
Place the bench scale in the desired location then lift off
the scale platter and locate the b ubble level. Adjust the
corner feet until the scale is le vel and all feet are in
contact with the support surf ace. Tighten the jam nuts
against the scale to lock-in the level adjustment.
Plug power cord into power outlet to begin weighing.
The supply cord serves as the power
disconnect for the IQ plus 2100. The
power outlet supplying the indicator
must be installed near the unit and be
easily accessible.
2.2
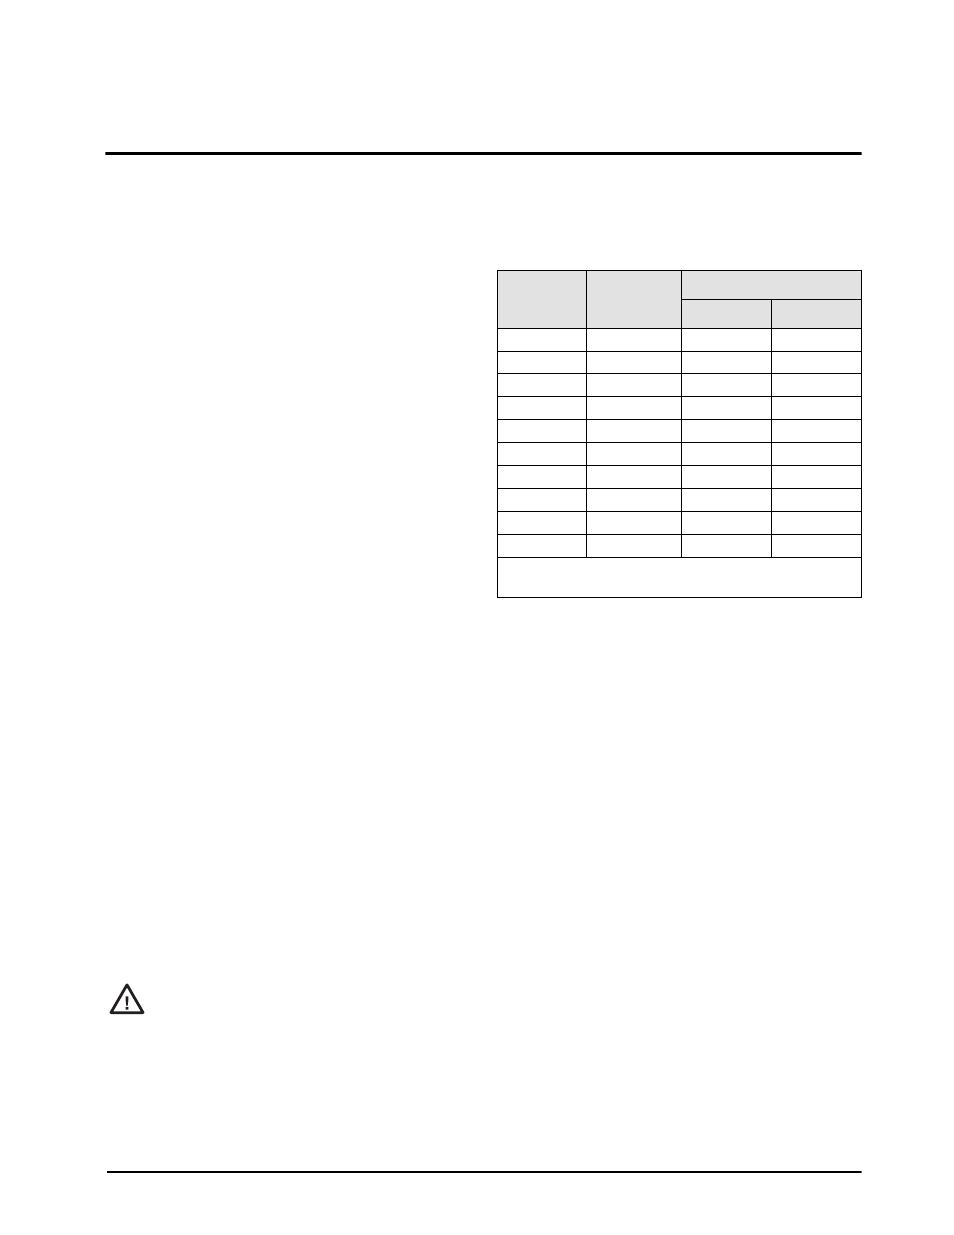
Factory Setup
The IQ plus 2100 is preconfigured and weigh
calibrated at the factory before shipment. Table 2-1 lists
the default graduations and count-by configuration fo
each scale capacity.
If scale configuration must be changed, see Section 3.0
on page 4 for detailed configuration information. Se
Section 4.0 on page 14 for calibration instructions.
Caution
Scale
Capacity
Count by
Configuration Parameters
DECPNT
DSPDIV
5 lb
0.001 lb
888.888
1D
10 lb
0.002 lb
888.888
2D
25 lb
0.005 lb
888.888
5D
50 lb
0.01 lb
8888.88
1D
100 lb
0.02 lb
8888.88
2D
2.5 Kg
0.0005 Kg
88.8888
5D
5 Kg
0.001 Kg
888.888
1D
10 Kg
0.002 Kg
888.888
2D
25 Kg
0.005 Kg
888.888
5D
50 Kg
0.01 Kg
8888.88
1D
NOTE: All capacities are preconfigured for 5000 graduations
(GRADS parameter on CONFIG menu set to 5000).
Table 2-1. Default Scale Configurations