B&M 81052 Stealth Magnum Grip Pro Stick Black Automatic Shifter. User Manual
Page 5
ing brake. Check the switch operation by attempting to start
the motor in each shifter position. The starter must crank
only when the shifter is in the Park or Neutral position. Check
the backup light operation when the shifter is shifted to the
Reverse position. Adjust the switches if required. Reconnect
the coil wire.
CHRYSLER
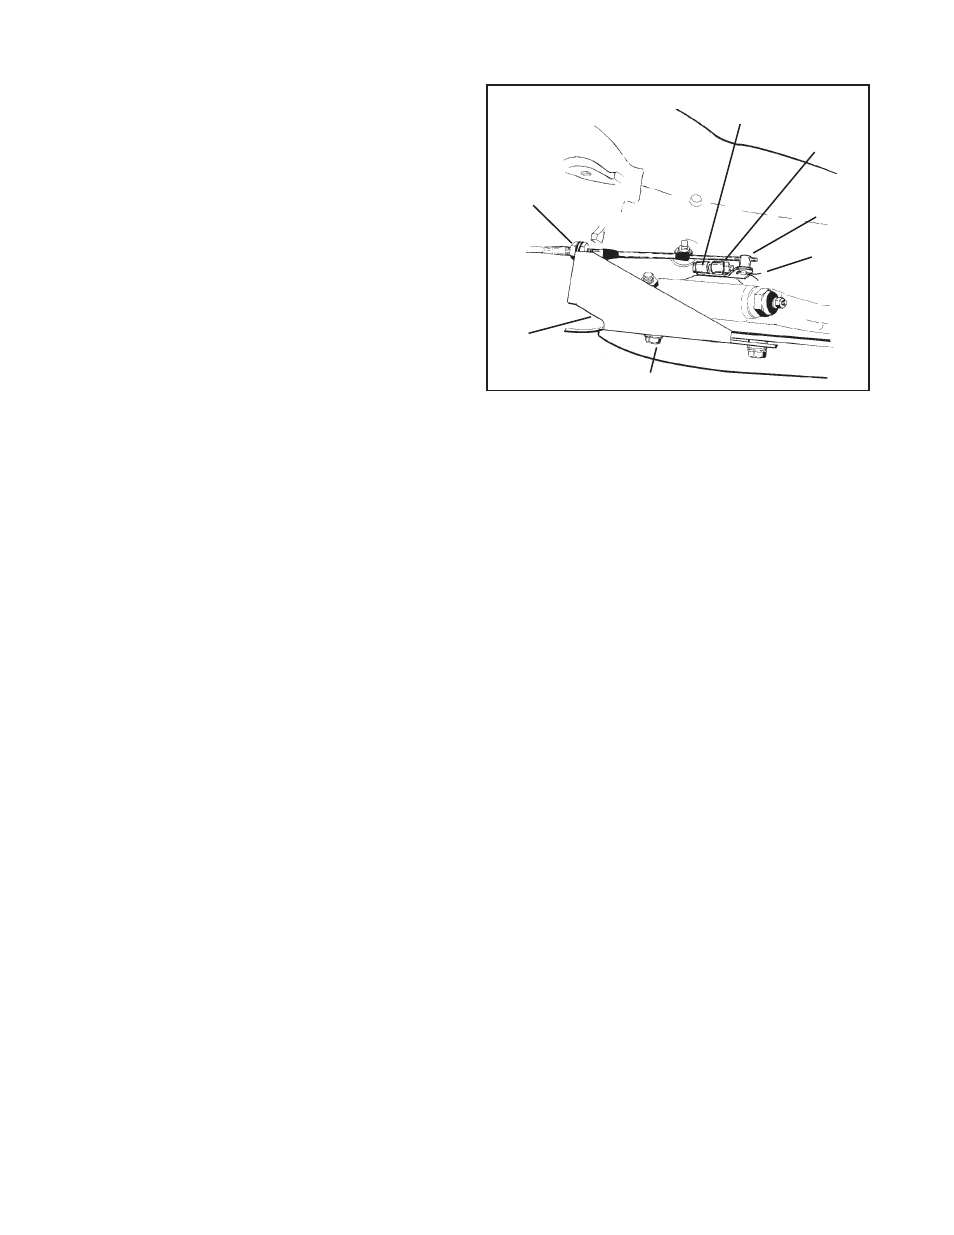
Step 19. If you have not already done so, loosen the pinch
bolt on the throttle lever on the transmission. This is the lever
on the small diameter shaft. Pry the lever off with a screw-
driver and allow the linkage to hang free. Remove and dis-
card the stock shift lever and tighten the pinch bolt securely
(See Figure #7). Make sure the lever is not pushed down so
far as to touch the transmission, it should travel smoothly from
front to back with a positive click in each gear position. Install
the stock throttle lever in position on the small diameter shaft
as removed and tighten the pinch bolt securely. The throttle
lever must operate smoothly.
Step 20. Remove the two transmission oil pan bolts directly
below the shift lever. Install the cable bracket in position (See
Figure #7) with two spacers between the pan and the bracket.
(If your transmission is equipped with a cast aluminum oil pan
these spacers can be omitted.) Install the two 5/16-18 x 1.00”
pan bolts supplied and tighten to 12-13 lbs.ft. Do not over-
tighten as this can damage the pan gasket.
Step 21. Route the shifter cable according to Figure #3. Avoid
kinks and sharp bends and route the cable away from hot
engine or exhaust parts.
Remove the two rubber boots, one large nut, and a large
lockwasher from the threaded end of the shifter cable. Slide
the end of the cable into the cable bracket, install the large
nut and lockwasher loosely over the end of the cable. Install
the two rubber boots onto the end of the cable. Install the
swivel on the threaded end of the cable and position it in the
center of the threaded portion.
Step 22. Move the transmission selector lever by hand to full
forward position (Low). Place the shifter lever to the Low gear
position (all the way back). Adjust the large nuts on the cable
so that the swivel will slide into the hole on the selector lever.
Tighten the large nuts completely. Be sure that the swivel will
slide freely in and out of the hole in the selector lever.
With the swivel in the selector lever, move the shifter to the
Park position, as far forward as the shifter will go without forc-
ing it. (The shifter has further travel that is used to reaching
the GM Park position but is not used on the Chrysler trans-
missions. Trying to force the shifter will damage the cable.)
The shift lever on the transmission should be all the way back.
Check to see that the swivel will slide freely in and out of the
hole in the lever in this position. If it does not slip in freely,
adjust the swivel slightly until it will slip into the hole in the
lever in both the Low and Park positions. Operate the shifter
through all the gear positions. Check to make sure the swivel
will slide in and out of the selector lever hole in each gear
position. Install the cotter key supplied with the shifter into
the swivel and spread the key ends.
If you have a problem DO NOT FORCE THE SHIFTER, this
will damage the cable, the shifter, or the transmission. Simply
start at the beginning and carefully check all your steps.
Important: Do not force the shifter to over-travel into the Park
position. This will move the shifter into the GM Park position
and will damage the cable or transmission.
Step 23. Check the operation of throttle linkage again. The
linkage must operate smoothly with no bind. All transmis-
sions using automatic valve bodies must have the throttle
linkage connected and operating or transmission damage
will result.
Step 24. Neutral safety/backup light switch.
66-68: The neutral safety switch will continue to function nor-
mally. It will not be necessary to hook up the neutral safety
switch wires on the shifter. Disconnect the battery ground
cable before wiring the backup light switch. Locate the origi-
nal backup light switch on the steering column or console
shifter. Run these wires to the top switch on the B&M Mag-
num Grip Pro Stick. Reconnect the ground wire and check
the light for proper operation. Adjust the switches on the shifter
if required. 69 and Later: The neutral safety/backup switch is
located on the transmission and will continue to function
normally. It will not be necessary to connect any wires to the
switches on the shifter.
POWERGLIDE
Step 25. Disconnect the throttle to transmission linkage if any
and discard. The Powerglide shift lever supplied with this shifter
has no provision for a throttle linkage. If a throttle linkage is
required, use B&M lever #70461.
Step 26. Drain the transmission oil pan. Caution: Be sure the
transmission is cool before attempting to drain the oil. Place
the drain pan under the transmission. Remove the drain plug
if so equipped. If your pan does not have a drain plug remove
the oil pan bolts one at a time working towards the front. As
you loosen the last bolts the oil pan will tilt down and allow the
oil to drain. Note: If your oil pan sticks to the gasket pry it
down with a screwdriver before loosening the last two bolts to
break it free. Remove the oil pan and set it aside.
Step 27. Remove the manual valve guide plate by removing
two bolts (See Figure #8). Unhook and remove the detent
roller spring. Allow the detent roller to pivot out of the way.
Note how the pin on the manual valve selector engages the
groove in the manual valve.
Step 28. If your transmission has a throttle valve lever on the
outside of the shift lever loosen the inner pinch bolt on the
throttle level. Slide the throttle lever and shaft out of the trans-
mission. Remove the inner throttle valve lever. Discard these
7/16" nut
5/16" x 1" bolt and spacer
Chrysler cable
bracket
Cotter pin
Cable swivel
Chrysler lever
1/4" x 1-1/2" bolt,
lockwasher, nut
Figure #7
CHRYSLER A-727 AND A-904
5