B&M 81052 Stealth Magnum Grip Pro Stick Black Automatic Shifter. User Manual
Page 3
not slip in freely, adjust the swivel slightly until it will slip into
the hole in the lever.
Move the shifter back to the Low gear position and check that
the swivel will still slide easily in and out of the front hole in
the selector level. (If you do not use the front hole in the le-
ver, it will be impossible to correctly adjust the cable.) Oper-
ate the shifter through all the gear positions. Check to make
sure the swivel will slide in and out of the front selector lever
hole in each gear position. The shift cable is now correctly
adjusted. Install the cotter key supplied with the shifter into
the swivel and spread the key ends.
If you have a problem, DO NOT FORCE THE SHIFTER, this will
damage the cable, the shifter or the transmission. Simply
start at the beginning and carefully check all your steps.
Step 12. On GM vehicles the neutral safety switch may be
located on the shifter (steering column or console), or it may
be a mechanical interlock in the steering column that pre-
vents the key from turning to the Start position unless the
shifter is in the Park or Neutral position. Identify the type of
neutral safety system you have. If the key will not turn to the
Start position unless the stock shifter is in Park or Neutral,
you have a mechanical interlock type, otherwise you have a
neutral safety switch type. If you have a neutral safety switch,
locate the switch and identify the neutral safety wires (engine
will not crank unless these wires are connected together).
With either type, disconnect the battery ground cable to pre-
vent accidental shorts. If you have a neutral safety switch,
disconnect and extend both wires from the GM switch to the
switch on the shifter. If you have a mechanical interlock cut
the wire that goes from the Start position on the ignition switch
to the solenoid on the starter. This wire is usually a 10 or 12
gauge purple wire. Run wires from both ends of the cut wire
to the switch on the shifter. Put slip on terminals on the ends
of the lengthened wire. Crimp the terminals onto the wires
using a crimping tool or pliers. Connect the wires to the switch
on the shifter. Tape the terminal connections and all other
connections to prevent shorts. Reconnect the battery ground
cable, disconnect the coil wire and set the parking brake.
Check the switch operation by attempting to start the motor in
each shifter position. The starter must crank only when the
shifter is in the Park or Neutral position. Adjust the switch if
required. Reconnect the coil wire.
FORD
Step 13. If you have not already done so, remove the nut and
lockwasher holding the downshift linkage onto the downshift
lever shaft. The downshift lever is the outer lever on C-4, C-5,
C-6 and AOD transmissions. Pull the lever off the shaft and
allow the linkage to hang free. Remove and discard the stock
shift linkage rods. Some C-6 and all (late) C-4 and C-5 trans-
missions have a neutral safety/backup light switch on the trans-
mission shift lever. If your transmission is so equipped, re-
move the two bolts holding the switch in place and slide it off
the shift shaft. Disconnect the switch at the factory plug and
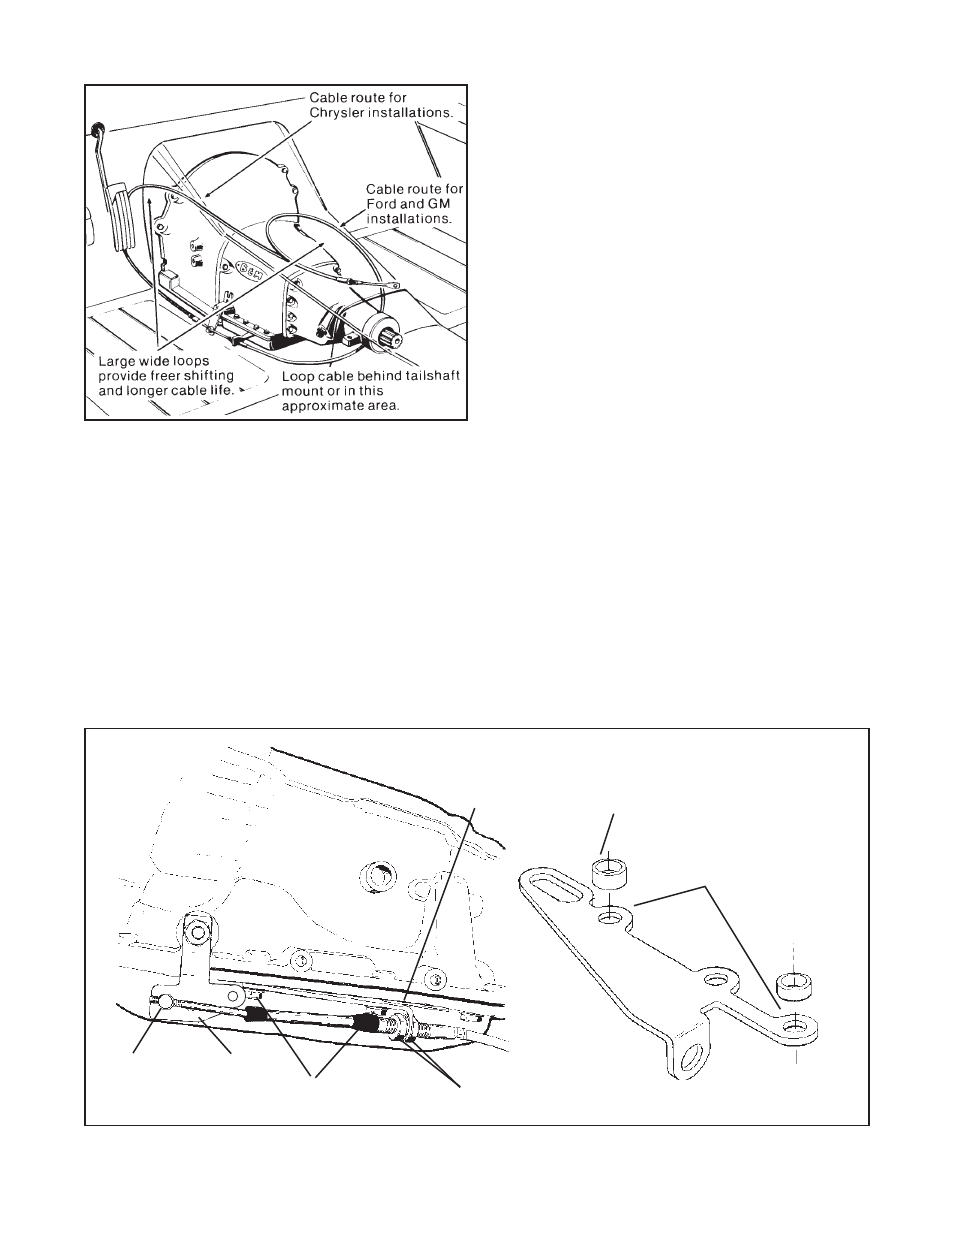
Figure #3
Cable swivel
Cotter pin (Use
front hole)
GM lever
5/16 x 1" bolt and spacer
(Metric trans use M8 x 25 bolt)
GM cable bracket (Trimming of bracket
required if used on cast aluminum pan.)
Spacer
7/16" nut
Figure #4
Use these two holes for
TH-400 transmission. Use
other two holes for other
GM transmissions.
GM cable bracket
Spacer
F
C
R
GM Transmissions
3