Assembly step 1 – Craftsman 139.53225SRT User Manual
Page 8
Attention! The text in this document has been recognized automatically. To view the original document, you can use the "Original mode".
Assembly Section: Pages 8 - 1 1
To avoid installation difficulties,
not
run the garage door opener yntH instructed to- dO' so.
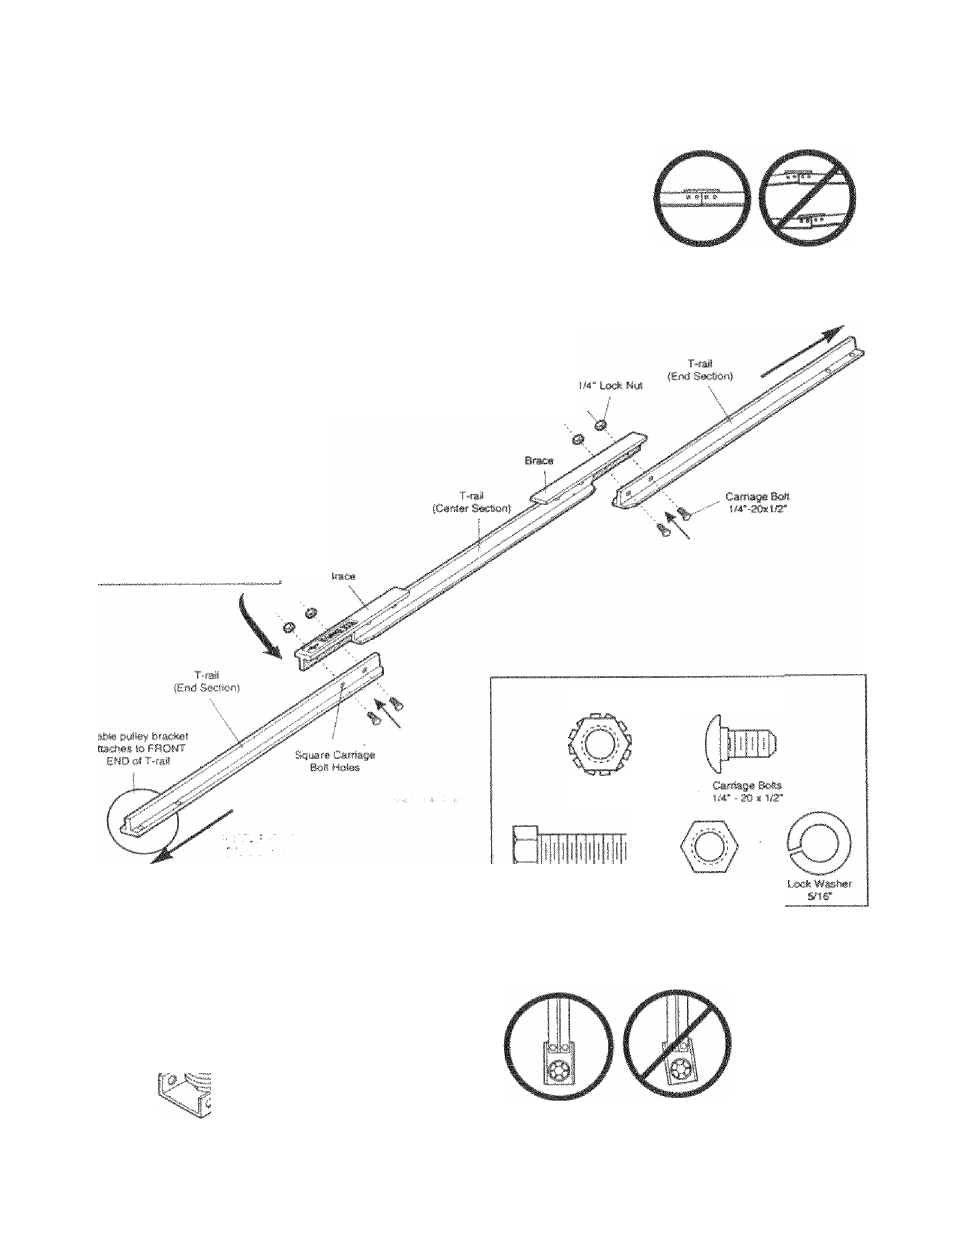
Assembly Step 1
Assemble the T~raii & Attach
the Cable Pulley Bracket
Align the 3 T rait secnons on a flat surface exactly
as showiu The end sections are identical, Make
sure the “arrov^ label* on tfre center sedion is
oosntinrj lov/ard ttw door,
In.'aat tfie carnrifjt- boit-C so ii-:o square brjit nocks
seat in Ific- .'■rquaro holes in the Tsai! end sections
and pass fhruug.h ttiO round holes m T-rail cerrter
sndiuri. Assemble lock nuts, ensure alignment and
tiqhton.
■Hake S'lire i»ft weeks are
seated in the square
holes and rails are
atlffiecl before yöw
tif iiteii lock nute. ($e#
right and wmm§ views).
Impro^r assem&lf -can
cause feity »alley
of».ralon, iioiss aftcKsr
nul«rice- reversals.
Right
Wrong
T-flÄli
BÄCK
(TO OPEHEH)
If Tmaii is not assembled
EXACTLY as shown, trolley
wilt not travel snsoolhly
along length of rail or It will
his against tfie nuts.
Hardware Shown Actual Size
LOC*Nut
wr - 20 * ?m‘
T-RAIl fttOWT
iTO DOOR)
• Position tie cable pulley bracket
on
-ftie front end of the
T-rail as shown. Fasten SKurely with the hardware.
■HB* SCfW¥
5/16* - 13 X 7/8*
Nat
.506*-18
CaKe Put«iv
Brat*«
Uli
/ ' -
1 T
'CTJrr;
toe!« m'&mm
S/ir
Right
Wrong
When tightenliif
the screws, be
sure to keep
braclcet parallel
to the rail.
Otherwise, the
rail 'Btaf bow
when opener Is
operated.
Mill
snr