Control panel board – Dell PowerVault 715N (Rackmount NAS Appliance) User Manual
Page 18
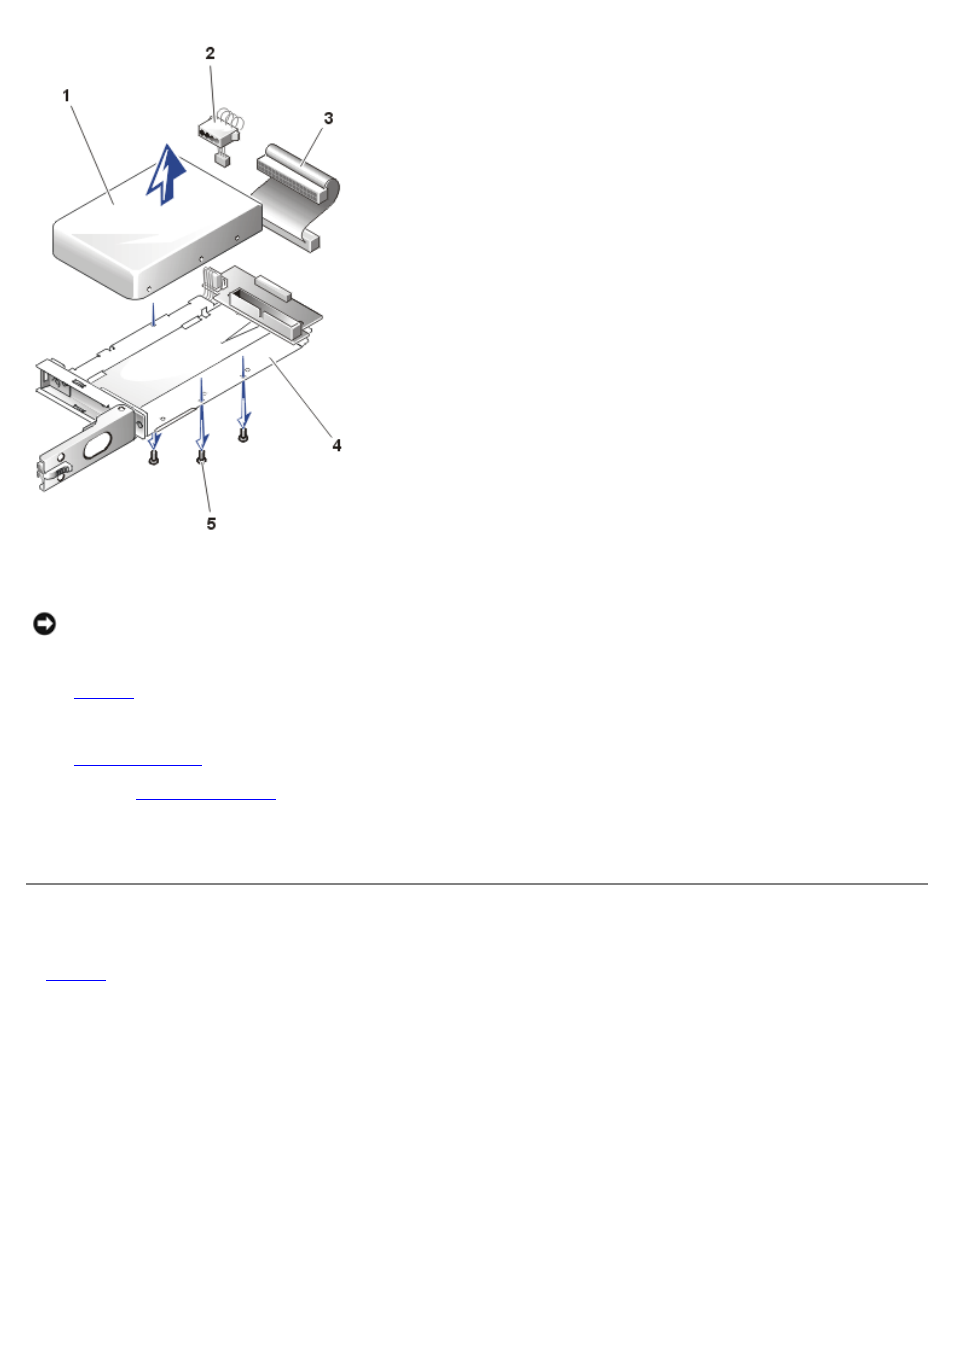
2 Power connector
3 Interface cable
4 Hard-drive carrier
5 Screws (4)
4. Insert the replacement hard drive into the carrier and install the screws you removed in step 2a to secure the drive.
NOTICE:
Ensure that the hard drive's power cables do not extend beyond the outside (left) edge of the carrier,
which might cause damage to the wires.
5. Open the handle on the carrier and install the replacement hard drive and carrier into its slot in the drive bay (see
6. Close the handle until it engages the front panel, locking the drive in place.
7.
.
to test and prepare the new drive.
9. Follow the appropriate procedure for restoring your data and adding mirrors in the section, "Managing Hard Drives"
in the System Administrator's Guide.
Control Panel Board
, the control panel is shown removed from the system chassis.
Figure 6. Control Panel Removal
1 6-32 x 0.25-inch Phillips screw (3)
2 Midplane connector (JP5)
3 Ribbon cable connector
4 Control panel board
- PowerEdge RAID Controller H700 (56 pages)
- PowerEdge RAID Controller H700 (200 pages)
- PowerEdge RAID Controller H700 (178 pages)
- PowerVault TL2000 (16 pages)
- PowerVault TL2000 (3 pages)
- PowerVault TL2000 (116 pages)
- PowerVault 130T DLT (Tape Library) (49 pages)
- PowerVault TL2000 (1 page)
- PowerVault 110T DLT VS80 (Tape Drive) (49 pages)
- PowerVault TL2000 (22 pages)
- PowerVault TL4000 (306 pages)
- PowerVault TL2000 (2 pages)
- PowerVault TL4000 (2 pages)
- PowerVault TL2000 (176 pages)
- PowerEdge 800 (58 pages)
- PowerEdge 800 (87 pages)
- PowerEdge 800 (24 pages)
- PowerEdge 800 (82 pages)
- PowerEdge 800 (2 pages)
- PowerEdge 800 (27 pages)
- PowerEdge 800 (28 pages)
- PowerEdge 6400 (86 pages)
- PowerVault 124T (79 pages)
- PowerVault 124T (2 pages)
- PowerVault 124T (64 pages)
- PowerVault 124T (56 pages)
- PowerVault 124T (66 pages)
- PowerVault 124T (57 pages)
- PowerVault 110T LTO (Tape Drive) (28 pages)
- PowerVault 124T (55 pages)
- PowerVault 124T (73 pages)
- PowerVault 124T (65 pages)
- PowerVault 124T (4 pages)
- PowerVault TL4000 (176 pages)
- PowerVault TL4000 (2 pages)
- PowerVault TL4000 (16 pages)
- PowerVault TL4000 (116 pages)
- PowerVault TL4000 (1 page)
- PowerVault TL4000 (66 pages)
- PowerVault TL4000 (22 pages)
- PowerVault TL4000 (3 pages)
- PowerEdge RAID Controller 6i (156 pages)
- PowerEdge RAID Controller 6i (120 pages)
- PowerVault 715N (Rackmount NAS Appliance) (42 pages)
- PowerVault 715N (Rackmount NAS Appliance) (57 pages)