Triton BRA 200 User Manual
Page 2
2
3
GB
GB
CONTENTS
Thank you for purchasing this Triton tool. These instructions contain information necessary
for safe and effective operation of this product.
Please read this manual to make sure you get the full benefit of its unique design.
Keep this manual close to hand and ensure all users of this tool have read and fully understand the instructions.
Contents / Symbols / Guarantee
Parts List
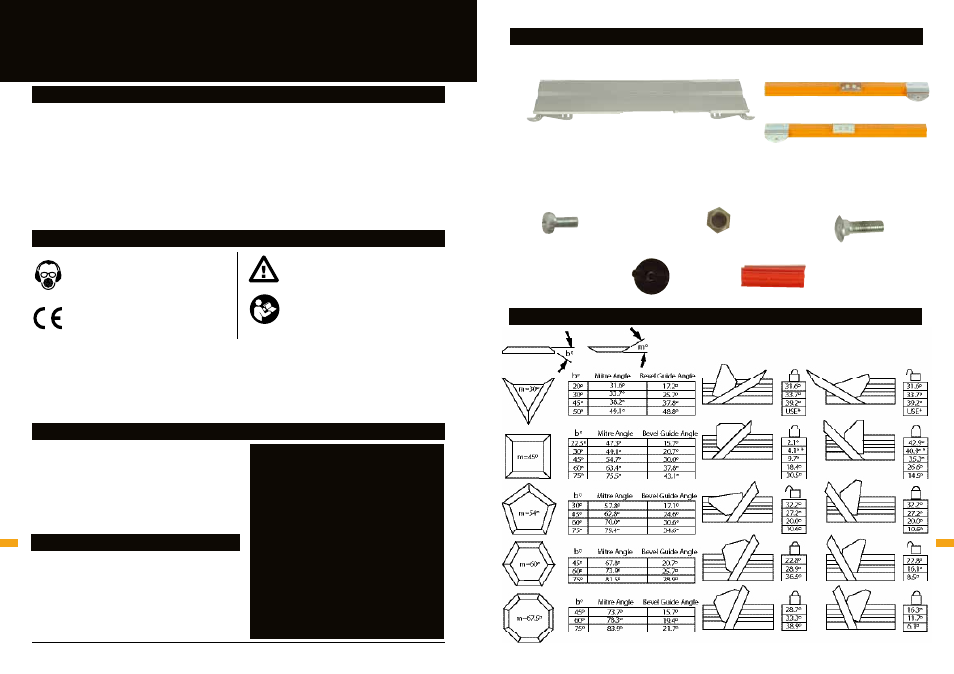
PARTS LIST
Symbols
2
Guarantee
2
Parts list
3
Angle settings
3
Safety
4
Assembly
5
Operating
6
SYMBOLS
Always wear ear, eye and respiratory
protection.
Conforms to relevant legislation
and safety standards.
Instruction warning.
Do not use before viewing and
understanding the full operating
instructions
A. Work Panel (1)
B. Front Track Arm (1)
C. Rear Track Arm (1)
Contents of Fastener Bag
D. M4 x 8mm
Phillips-Head Screw (2)
E. M4 Nyloc Nut (2)
F. M6 x 15mm
Coach Bolt (2)
G. Round Knob & Nut (2)
H. Bridge (1)
To register your guarantee visit our web site at
www.tritontools.com* and enter your details.
Your details will be included on our mailing list
(unless indicated otherwise) for information on future
releases. Details provided will not be made available to
any third party.
PURCHASE RECORD
Date of Purchase: ___ / ___ / ____
Model: BRA200
Retain your receipt as proof of purchase
Triton Precision Power Tools guarantees to
the purchaser of this product that if any part
proves to be defective due to faulty materials
or workmanship within 12 MONTHS from the
date of original purchase, Triton will repair, or
at its discretion replace, the faulty part free of
charge.
This guarantee does not apply to commercial
use nor does it extend to normal wear and
tear or damage as a result of accident, abuse
or misuse.
* Register online within 30 days.
Terms & conditions apply.
This does not affect your statutory rights
GUARANTEE
ANGLE SETTINGS