tekmar 369 Zone Control User Manuals User Manual
User brochure, U 369, Menu item
Copyright © U 369 -10/00
1 of 8
*Note: Depending on the settings the installer makes in the control, control menu items may not appear.
- User Brochure
Zone Control 369
U 369
10/00
The Zone Control 369 is designed to control the temperature in up to six heating zones using Room Temperature
Units (RTUs) or indoor sensors. The 369 uses a PID Zoning logic and allows one stage heating zones, two stage
heating zones, or a combination of one stage and two stage heating zones. The 369 is capable of operating a
single cooling output and can provide automatic or manual heat / cool change over. Standard features include
digital temperature readouts, individual zone setback, and may other useful items.
User Interface
Access Level(s) The Zone Control 369 has four access levels which are LTD (limited), USER, INST (Installer), and ADV (advanced).
This brochure only covers the LTD (Limited) and USER levels. Only qualified service people should adjust the INST (Installer) and ADV
(advanced) access levels.
View
°F
Menu
Item
Zone Control 369
Six Zones
C US
158033
Menu
Item
{
Cool
2
View
Adjust
Monitor
Time
Schd
Misc
1
sec
min hr
AM
PM
Ovr
°C
°F
Zone
5
6
1
2
3
4
UnOcc
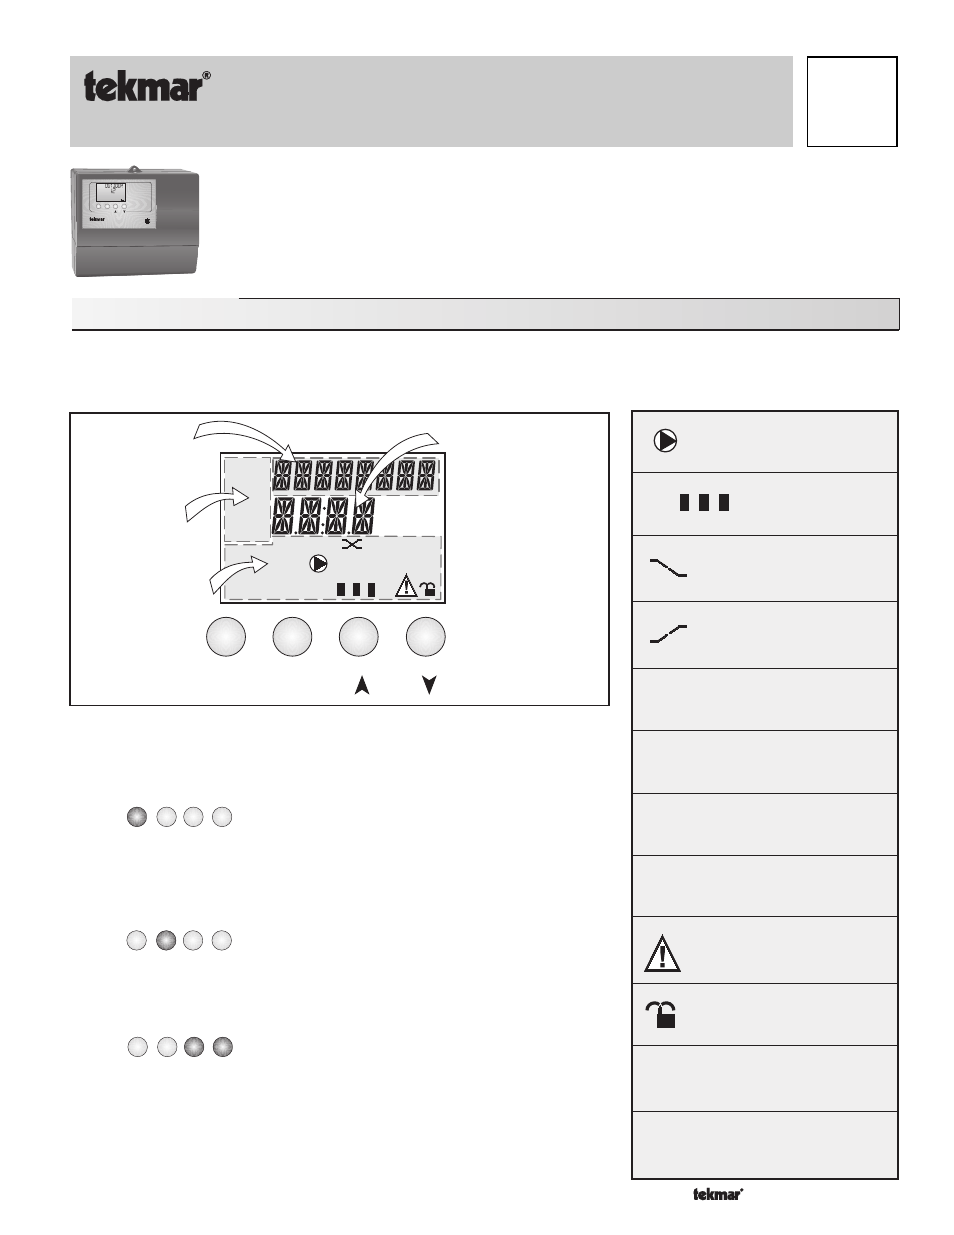
Number Field
Displays the current
value of the selected
item
Buttons
Selects Menu, Items
and adjusts settings
Menu Field
Displays the
current menu
Status Field
Displays the current
status of the control’s
inputs, outputs and
operation
Item Field
D i s p l a y s a n
abbreviated name of
the selected item
The 369 uses a Liquid Crystal Display (LCD) as the method of supplying information.
You can use the LCD in order to setup and monitor the operation of your system. The
369 has four push buttons (Menu, Item,
▼, ▲) for selecting and adjusting settings.
Menu
All of the items displayed by the control are organized into various menus. These
menus are listed on the left hand side of the display (Menu Field). To select a menu,
use the
Menu button. By pressing and releasing the Menu button, the display will
advance to the next available menu. Once a menu is selected, there will be a group
of items that can be viewed within that menu.
Item
The abbreviated name of the selected item will be displayed in the item field of the
display. To view the next available item, press and release the
Item button. Once you
have reached the last available item in a menu, pressing and releasing the
Item
button will return the display to the first item in the selected menu.
Adjust
To make an adjustment to a setting in the control, begin by selecting the appropriate
menu using the
Menu button. Then select the desired item using the Item button.
Finally, use the
▼ and / or ▲ button to make the adjustment.
Additional information can be gained by observing the Status field of the LCD. The status
field will indicate which of the control’s outputs are currently active. Most symbols in the
status field are only visible when the View Menu is selected.
°F, °C
Temperature
Displays the unit of measure that
all of the temperatures are to be
displayed in the control.
Cool
Cooling
Displays when the
Cooling
relay is on.
Ovr
Override
Displays when the control is in
override mode.
Occ
Occupied Schedule
Displays when the control is in
occupied (Day) mode.
UnOcc
Unoccupied Schedule
Displays when the control is in
unoccupied (Night) mode.
Optimum Start
Displays when a zone, which
is assigned to the control
schedule is in optimum start.
Optimum Stop
Displays when a zone, which
is assigned to the control
schedule is in optimum stop.
Zone
Displays when a zone
is in operation.
Zone
5
6
1
2
3
4
Pump
Displays when the system
pump is in operation.
Warning
Displays when an error exists
or when a limit has been
reached.
Lock/UnLock
Displays whether control is
locked or unlocked.
Time
Displays the unit of measure
that all of the times are to be
displayed in the control.
AM, PM,
sec, min,
hr