Receiver interface, Using the receiver user interface, 1 configuration dip switch – Banner EZ-ARRAY USB Serial Adapter User Manual
Page 21
P/N 126701
19
Banner Engineering Corp.
•
Minneapolis, U.S.A.
www.bannerengineering.com • Tel: 763.544.3164
A-GAGE EZ-ARRAY
QuickStart Guide
Receiver Interface
The receiver user interface comprises the six-position DIP
switch, two push buttons, 3-digit display, and other indicators
present on the receiver (see Section 1.4 for more complete
status indicator information). The receiver interface enables
configuration of standardized combinations of the EZ-ARRAY
sensing options (output configuration, scanning methods and
modes); for more advanced setup, refer to Section 5 for GUI
software configuration instructions.
4.1 Configuration DIP Switch
The DIP switch can be used to configure the sensor. Access the
switch by removing the screw-on security plate and lifting the
clear hinged access cover. The access cover may be removed
entirely (pull straight out to remove, press back in to replace) for
easier access during configuration.
Some of the switches are assigned their own functions, others
work together in combination (see table). Switches S1 and S2
in combination select one of four scanning modes. Switches S3
and S4 in combination select one of four measurement mode
pairs (one for each analog output). Switch S5 defines the analog
slope setting for both analog outputs and S6 defines whether
discrete output 2 is complementary to discrete 1, or functions as
an alarm (when configuration is accomplished via DIP switch,
discrete output 1 conducts when analog output 1 senses the
presence of a target).
Scanning Modes (S1 and S2)
Straight Scan (S1 ON, S2 ON) is the most versatile scanning
mode and can be used without the exceptions noted in the other
scanning modes. Use this scanning mode when measuring
semi-transparent materials and using the low-contrast sensitivity
setting.
Double-Edge Step 1 (S1 ON, S2 OFF) can be used when
three or fewer opaque objects are presented to the light curtain
at one time. The advantage of this mode is improved sensor
edge resolution (2.5 mm). The minimum object detection size is
10 mm.
Double-Edge Step 4 (S1 OFF, S2 ON) can be used when three
or fewer opaque objects are presented to the light curtain and
the minimum size object to be detected is 30 mm. This scanning
mode ignores objects smaller than 30 mm. Like Double-Edge
Step 1, the sensor edge resolution is 2.5 mm. See Figure 1-7 for
sensor scan times.
Single-Edge Scan (S1 OFF, S2 OFF) can be used when a
single opaque object is presented to the light curtain at one time.
The object must block the “bottom” channel (the channel closest
to the receiver display). Like the double-edge scans, the sensor
edge resolution is 2.5 mm. The minimum object detection size is
10 mm. See Figure 1-7 for sensor scan times.
4. Using the Receiver User Interface
Switch Settings
Result
S1
S2
Scan Mode
ON
ON
Straight Scan
ON
OFF
Double-Edge, Step 1
OFF
ON
Double-Edge, Step 4
OFF
OFF
Single-Edge
S3
S4
Analog 1
(Value reads on 3-digit display)
Analog 2
ON
ON
TBB
FBB
ON
OFF
LBB
MBB
OFF
ON
OD
ID
OFF
OFF
CBB
CFBB
S5 ON
Positive Analog Slope
S5 OFF
Negative Analog Slope
S6 ON
Discrete 2 Complementary
S6 OFF
Discrete 2 Alarm
EZ-ARRAY Receiver User Interface DIP Switch Settings
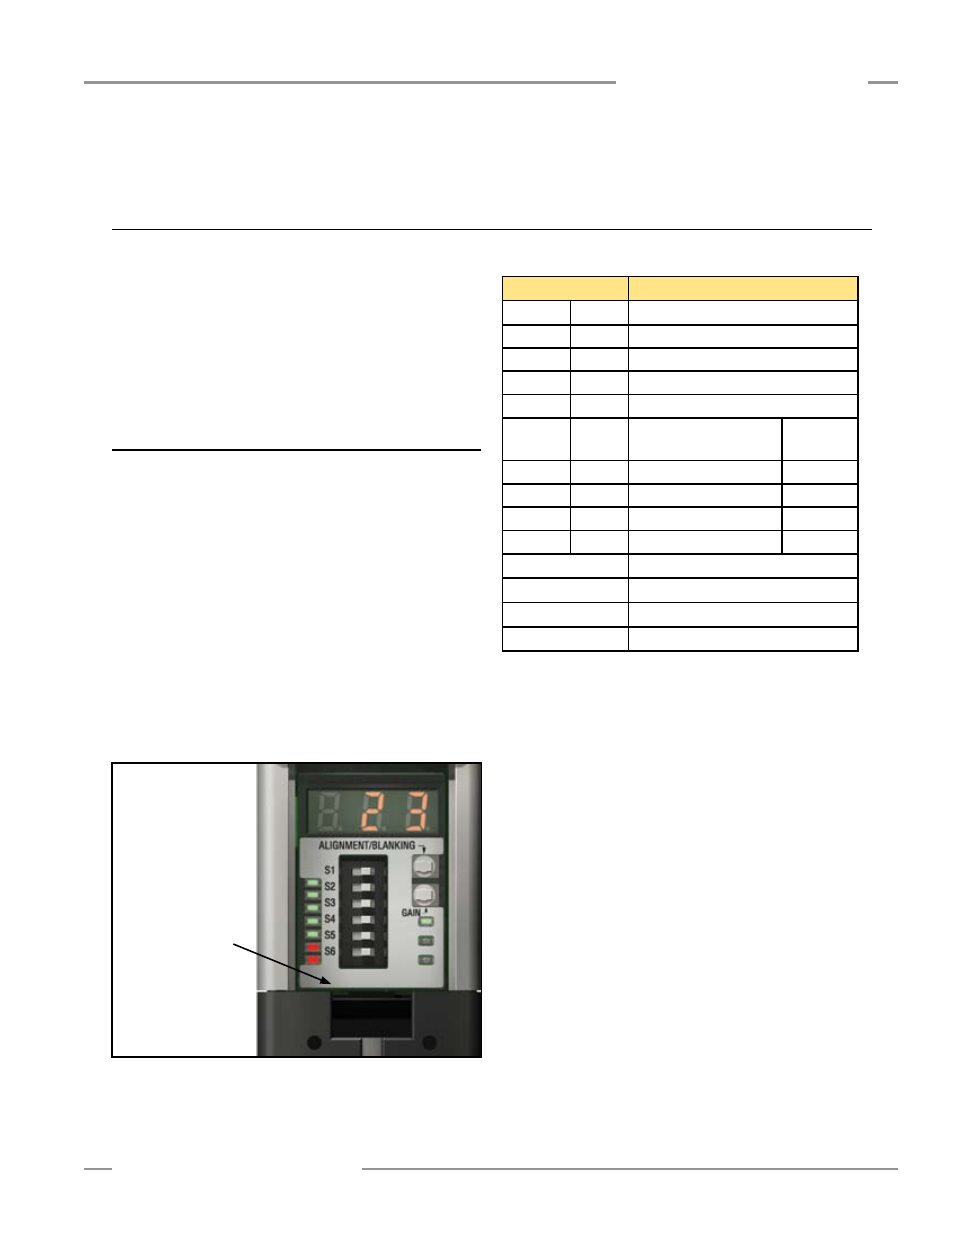
Figure 4-1. Receiver user interface. NOTE: All DIP switch
positions are shown in the ON condition.
To open access
cover, insert a
small flat-blade
screwdriver, press
up, and pull