V-verb pro rev2496 – Behringer Rev2496 User Manual
Page 8
8
V-VERB PRO REV2496
The four infinitely variable controls EDIT A - EDIT D are
used for changing all parameter values. The assigned
function and the current value are indicated on the LCD.
Additionally, these controls have a tap function, letting you
alternate between two parameters in the edit menu or
confirm your settings in the setup menu.
+
The infinitely variable controls EDIT A - D respond
dynamically. This means that the rate at which
parameters are changed depends on the speed
with which you turn these controls. The faster you
turn, the greater the parameter value change.
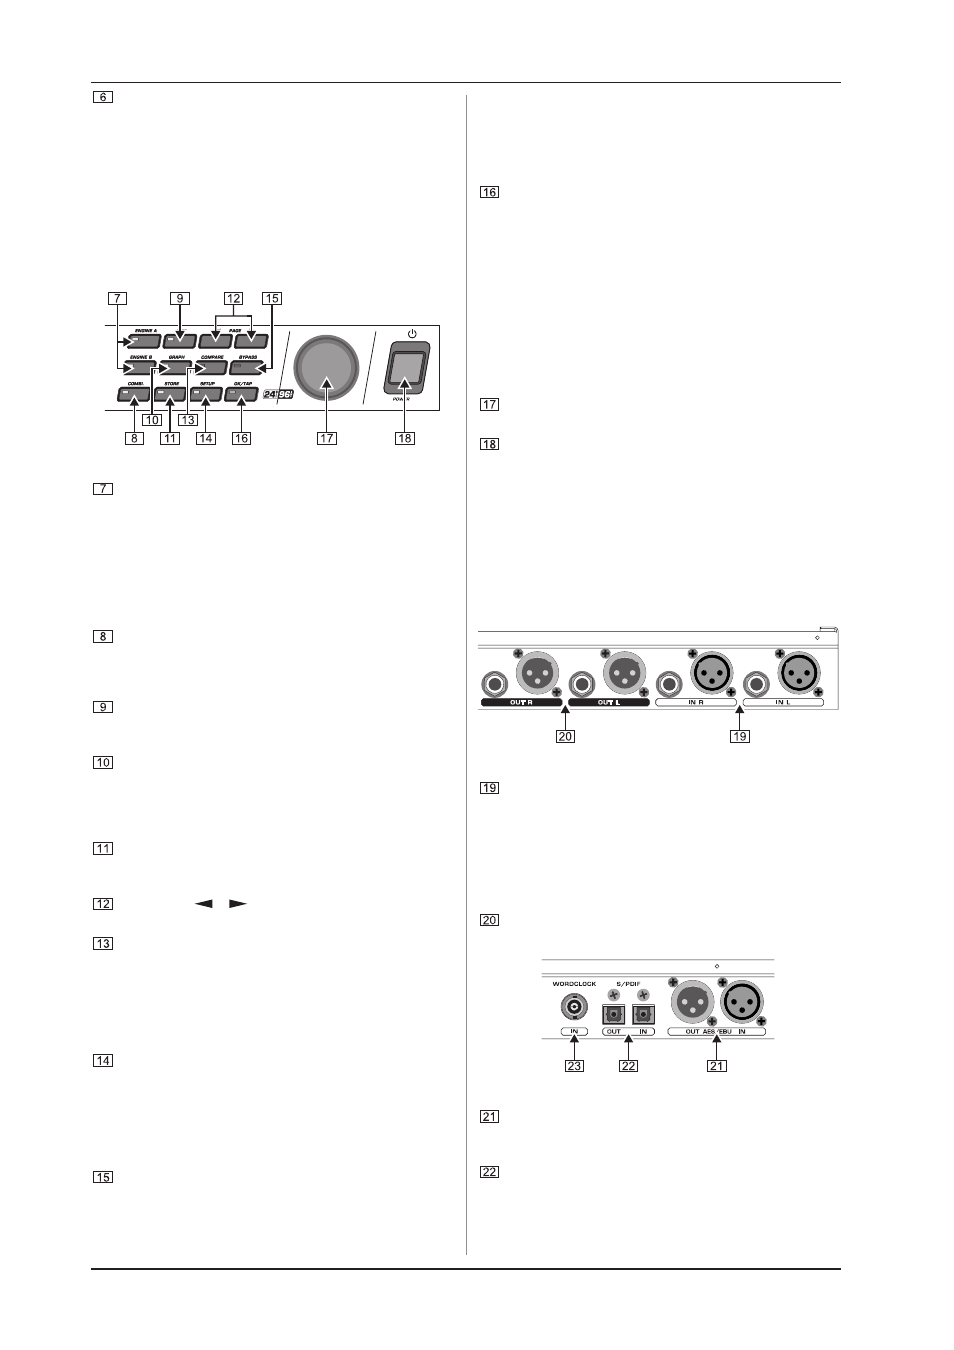
Fig. 2.3: Function keys and preset control
ENGINE A and ENGINE B. Use these keys to select the
processors (engines) you will work with. Each engine
corresponds to one stereo effect. Since both of the engines
can be directly dialed up, you can very quickly alternate
between the effect from engine A and the effect from
engine B. Pressing one of these two keys activates the
recall level. There, you can change the values of the four
most important effect parameters using the infinitely variable
controls EDIT A - D without having to activate edit mode.
Use the COMBI. key to select a combination program. A
combination program contains the values for both engines.
If you press the COMBI. key, you activate the recall level of
the combination program.
Press the EDIT key to go to the programming level. There,
you can adjust all the parameters of an effect/effect
combination.
Pressing the GRAPH key activates the GRAPH mode
located within the EDIT level. The GRAPH mode lets you
edit the effects with graphical visualization in the display.
The parameters available here are the same as the
parameters located in the EDIT level.
Use the STORE key to open the store menu. It lets you
store presets, enter preset names and select storage
locations.
Use PAGE
/
to scroll back and forth between
individual pages (max. 4) within a menu.
The COMPARE key lets you compare the changes you
just made in the previously selected preset. If you are in
combination mode, pressing the COMPARE key will load
the original combination preset with all of its settings. If
COMPARE is active, the compare key LED lights up, and no
value changes can be made. To go back to edit mode and
store your changes, press the COMPARE key again.
Pressing the SETUP key gets you into the SETUP menu,
where you have access to all global settings of your
REV2496, e.g. input and output signal level, MIDI settings
and so on. This way, you can adjust your REV2496 to the
requirements of your particular application. More information
about the extensive SETUP function can be found in chapter
3.8.
The BYPASS key has two functions, depending on the
setting of the WET DRY MIX parameter on the I/O page of
the setup menu:
If the parameter is turned to INTERN, pressing BYPASS
bypasses the effects processors, letting you hear the dry
signal.
If the parameter is turned to EXTERN, pressing the BYPASS
key mutes the entire audio signal.
The OK/TAP key has two functions:
OK: After selecting a preset, press the OK key to load the
new preset. (Each selection made using the preset wheel
must be confirmed by pressing OK.) Additionally, OK is
also used to confirm overwriting presets.
TAP lets you intuitively enter time values for delay and LFO
speed parameters: tap the TAP key several times to the
beat of the current song, and the effect adjusts
automatically to the songs beat. The value is averaged out
using the last four taps. The parameter values that can be
adjusted using the TAP key are indicated with a letter T
next to the respective parameter control on the display.
Use the PRESET infinitely variable rotary control to select
a stored program.
Use the POWER switch to power up the REV2496. This
switch should be set to Off before you connect the unit
to the mains.
+
Attention: Using the POWER switch to power down
your REV2496 does not completely disconnect it
from the mains. If you dont plan on using your
REV2496 for a prolonged period of time, please
disconnect the cable from the mains.
2.2 The rear
Fig. 2.4: Analog inputs and outputs
These are the analog INPUTS that are balanced 1/4" TRS
and XLR connectors. Please make sure that the input signal
is correctly adjusted. Signal levels that are too high (this
could overdrive the converters of your V-VERB PRO) must
always be avoided. Digital distortion is particularly
unpleasant because it doesnt occur gradually; on the
contrary, it occurs suddenly. When necessary, lower the
signal level at your mixing console as well.
Both OUTPUTS of your REV2496 are also balanced 1/4"
TRS and XLR connectors.
Fig. 2.5: Digital audio connections
The REV2496 features a digital AES/EBU interface with a
XLR connector. Use it to feed in or export data in both
AES/EBU and S/PDIF formats.
Audio data can also be fed in or exported at the digital
optical interface. The format (AES/EBU or S/PDIF) can be
selected in SETUP.
2. CONTROL ELEMENTS AND CONNECTIONS