V-verb pro rev2496, Installation – Behringer Rev2496 User Manual
Page 24
24
V-VERB PRO REV2496
7. INSTALLATION
6.4 Backing up data via MIDI
To save all of your presets outside of your V-VERB PRO in just
one step, you can use a special form of MIDI communication:
system-exclusive data. Here, the V-VERB PRO lets the
sequencer or the MIDI file know who its manufacturer is, what
type of equipment it is and transmits all parameter settings for all
presets. To activate this very practical function, please go the
SETUP mode by pressing the SETUP key. Use PAGE
/
to
get to the MIDI page. Activate the SysEx function by using the
SEND parameter (EDIT B) (see table 6.1).
Now, by turning the EDIT D controller, you can determine if the
entire memory contents (ALL) or only the current setting (EDIT)
will be sent.
Select a track on your MIDI sequencer, put it into recording
mode, start the recording and press the EDIT D control to start
the dump. Now, your V-VERB PRO transmits its memory contents
as system-exclusive data.
To load up this recorded data back to the REV2496, you have
to first activate the SysEx function on the receiving end. This is
done through the EDIT C control (select SYSEX, PGM+SX, CC+SX
or ALL ON). The REV2496 can now receive data. Start your MIDI
sequencer, and the preset data will be automatically loaded into
the internal memory. Upon being received, a preset previously
recorded on the MIDI sequencer will automatically be stored in its
old location, and this will happen without a confirmation being
given about it.
+
During receiving/loading memory data, the entire
current memory contents of the USER bank will be
overwritten.
7. INSTALLATION
7.1 Installation in a rack
The REV2496 requires one height unit (1 HE) for mounting in a
19" rack. Please keep in mind that an additional 10 cm (4") of
depth in the back are required to enable trouble-free access to
the connectors on the rear panel.
Please make sure that your REV2496 has enough cooling air,
and never put it on an amp or other heat-emitting equipment to
avoid overheating.
For rack installation, please use M6 machine screws and nuts.
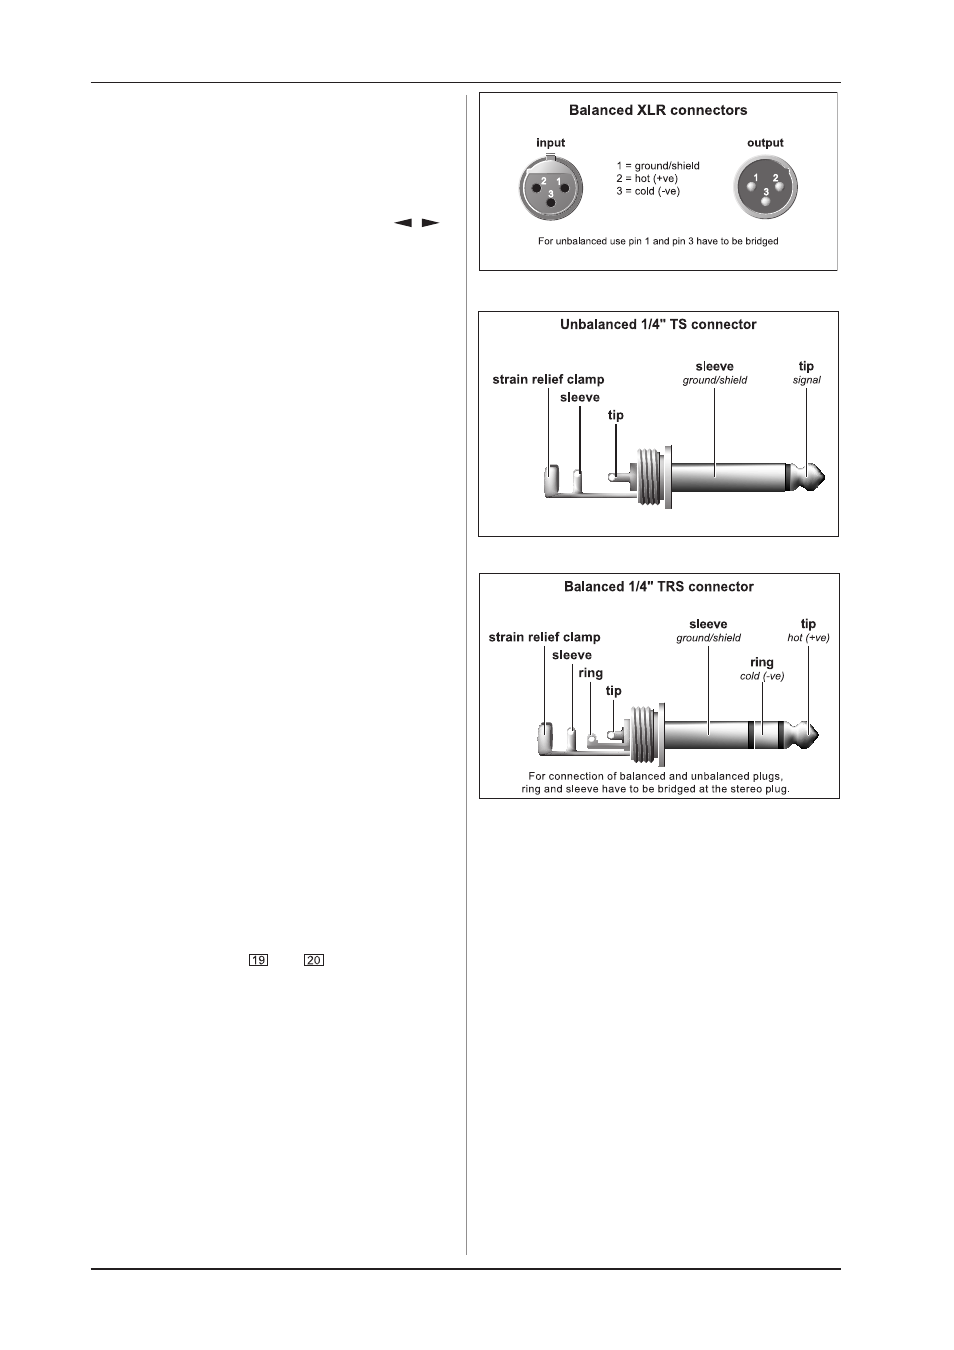
7.2 Audio connections
You will require different cable types for different types of
applications. The illustrations that follow show you how these
cables are connected. Always use only good-quality cables.
The analog connections
and
of your REV2496 are
laid out as balanced connection to avoid hum.
You can also connect equipment with unbalanced connections
to the balanced inputs and outputs of your REV2496. Use either
mono jacks or connect the ring of stereo jacks with the shaft (or
connect Pin 1 to Pin 3 for XLR connectors).
Fig. 7.1: XLR connections
Fig. 7.2: 1/4" TS connector
Fig. 7.3: 1/4" TRS connector
7.3 Digital inputs and outputs
The AES/EBU interface whose name is derived from the Audio
Engineering Society and the European Broadcasting Union, is
mainly used in professional studio environments and broadcasting
studios for the transmission of digital signals over longer
distances. The connection is made via balanced XLR cables
with a resistance of 110 ohms. Cables can be up to 100 m long.
With some minor adaptations, even cable lengths of over 1 km
are possible (not rare in radio and TV applications). According to
our own experience, cable selection does not play a major role.
With cables whose length does not exceed 20 m (66 ft),
commercially available microphone cables dont have a negative
effect on sound quality. When dealing with greater cable lengths
or when the quality standards are set higher (mobile operation,
stronger high-frequency fields), you should definitely use special
110-Ohm cables with double electromagnetic shielding.
The interface complies with the AES3 format, which allows
for two-channel transmission of signals with a resolution of up
to 24 bits. The signal has an auto-clock and auto-synchronization
feature (important when several digital devices are used). The
sample rate is not fixed and can be chosen freely. Typical rates
are 44.1 kHz, 48 kHz, 88.2 kHz and 96 kHz. The AES/EBU interface
is largely compatible with the popular S/PDIF interface. A
connection can be made using an adapter. The format can be
switched to S/PDIF (Sony/Philips Digital Interface Format).
Digital inputs/outputs on optical connectors are also available.