Str46spvg — setup – Multiquip STR46SPVG User Manual
Page 21
STR46SPVG • RIDE-ON POWER TROWEL — OPERATION AND PARTS MANUAL — REV. #2 (07/09/07) — PAGE 21
Trowel Setup Instructions
The purpose of this section is to assist the user in the setting up
of a
NEW
trowel. If your trowel is already assembled (seats,
handles, knobs and battery, then this section can be skipped.
Before packaging and shipping this Whiteman Ride-On Power
Trowel was run and tested at the factory. If there are problems,
please let us know.
Control Handle Assembly
The steering control handles are not attached to the trowel's two
lower handles at the time of shipment. To attach the steering
control handles to the two lower handle assemblies perform the
following:
1. Remove the bolts from the plastic bag tied to the control
towers.
2. Remove all protective wrapping and straps from the control
handles.
3. Slip the top (loose) piece into the base of the
corresponding handle, making sure to line up the holes.
4. Install the bolt through the lined up holes and tighten the
acorn nut onto the threaded end.
5. Pay close attention to any wires that may be inside the control
handles. DO NOT pinch or cut any wires during installation.
6. Inside the plastic bag of parts are two knobs for the pitch
control tower cranks. Install these two knobs onto the tower
crank levers.
1. Remove the seat from the protective wrapping.
2. Remove the bolts on the bottom of the seat, and place seat
on the seat mounting plate, then insert the bolts through the
holes or slots on the seat mounting plate and tighten. Attach
wires to seat.
Seat Assembly
The seat is not installed on the trowel for shipping purposes.
To attach the seat perform the following:
The new ride-on trowel cannot be
put into service until the setup
installation instructions are
completed. These pre-setup
instructions only need to be
performed at the time of unpacking
a
NEW
trowel.
NOTE
NOTE
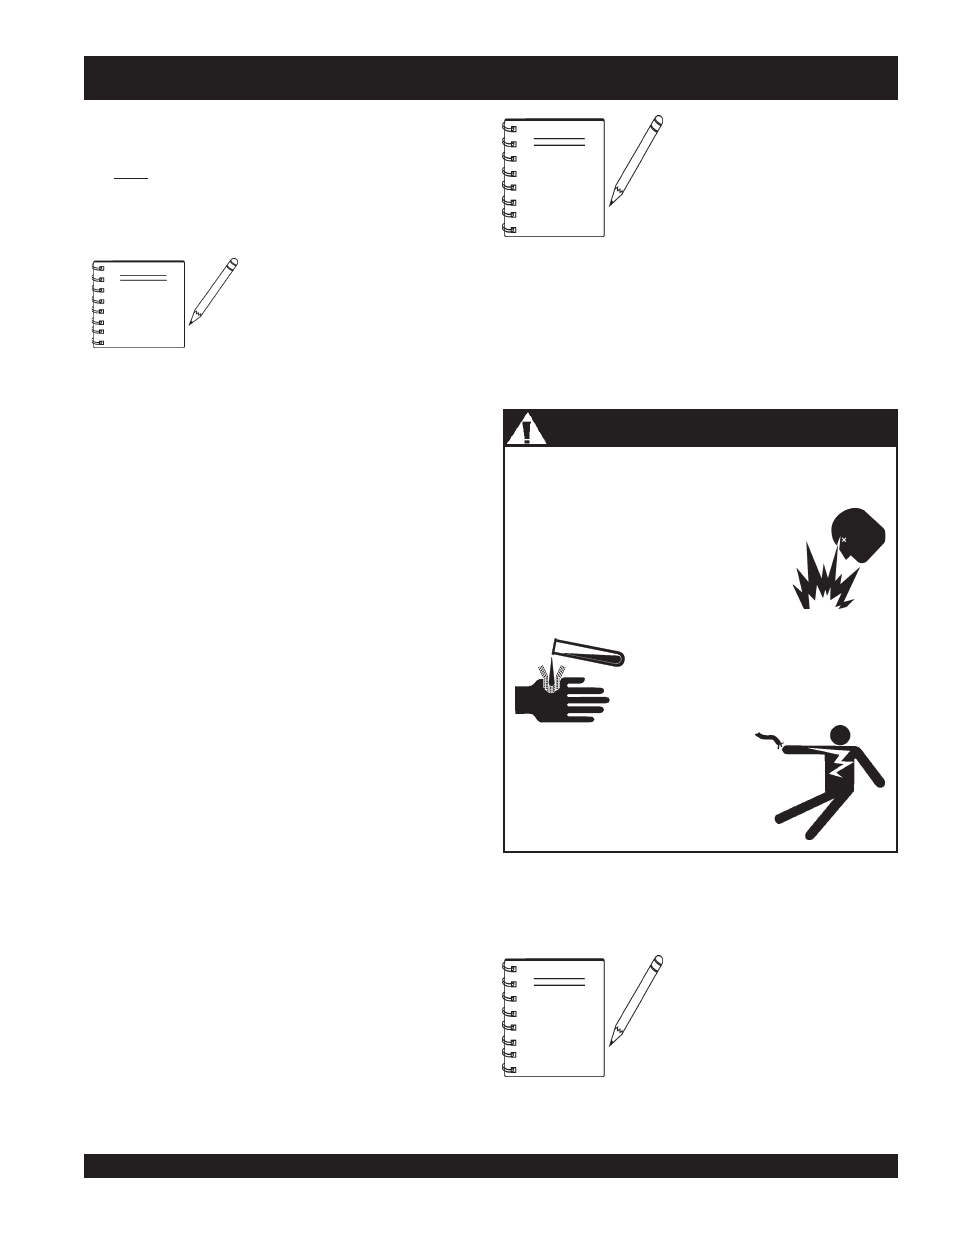
Battery electrolyte contains corrosive,
toxic chemical. (dilute sulfuric acid).
Avoid contact with eyes and skin.
WARNING - Battery Safety
Flammable, explosive gas. (produces
hydrogen gas while charging or during
operation). Keep area around battery well
ventilated and keep from any fire source.
Shock or Fire due to electric short-
circuit. Disconnect battery cables
before inspecting electrical system
and never "spark" battery terminals to
test for charge.
Use all safety precautions specified by the battery
manufacturer when working with the battery.
There are two types of seats,
depending on what type of trowel
you have. J and B series trowels
have slots on the seat mounting
plate that allow fore and aft
adjustment of the seat. H-series
trowels have a seat that is mounted
on tracks, similar to an automobile seat. This seat can be adjusted
fore and aft via the control lever under the front of the seat.
ALWAYS be sure the battery
cables are properly connected to
the battery terminal. The RED cable
is connected to the positive terminal
of the battery, and the BLACK cable
is connected to the negative
terminal of the battery.
To install the battery on the trowel, make sure that the battery is
well seated in the battery box and the terminals are properly
connected. Close the plastic battery box cover and secure the
battery box.
NOTE
Battery Setup
This trowel was shipped with a wet charged battery. This battery
may need to be charged for a brief period of time as per the
manufacturer instructions.
STR46SPVG — SETUP