Adjusting the fence angle, Detail 6a fig. 6, Detail 7a – INCRA Pro Fence System User Manual
Page 5: Fig. 7, Fig. 8
5
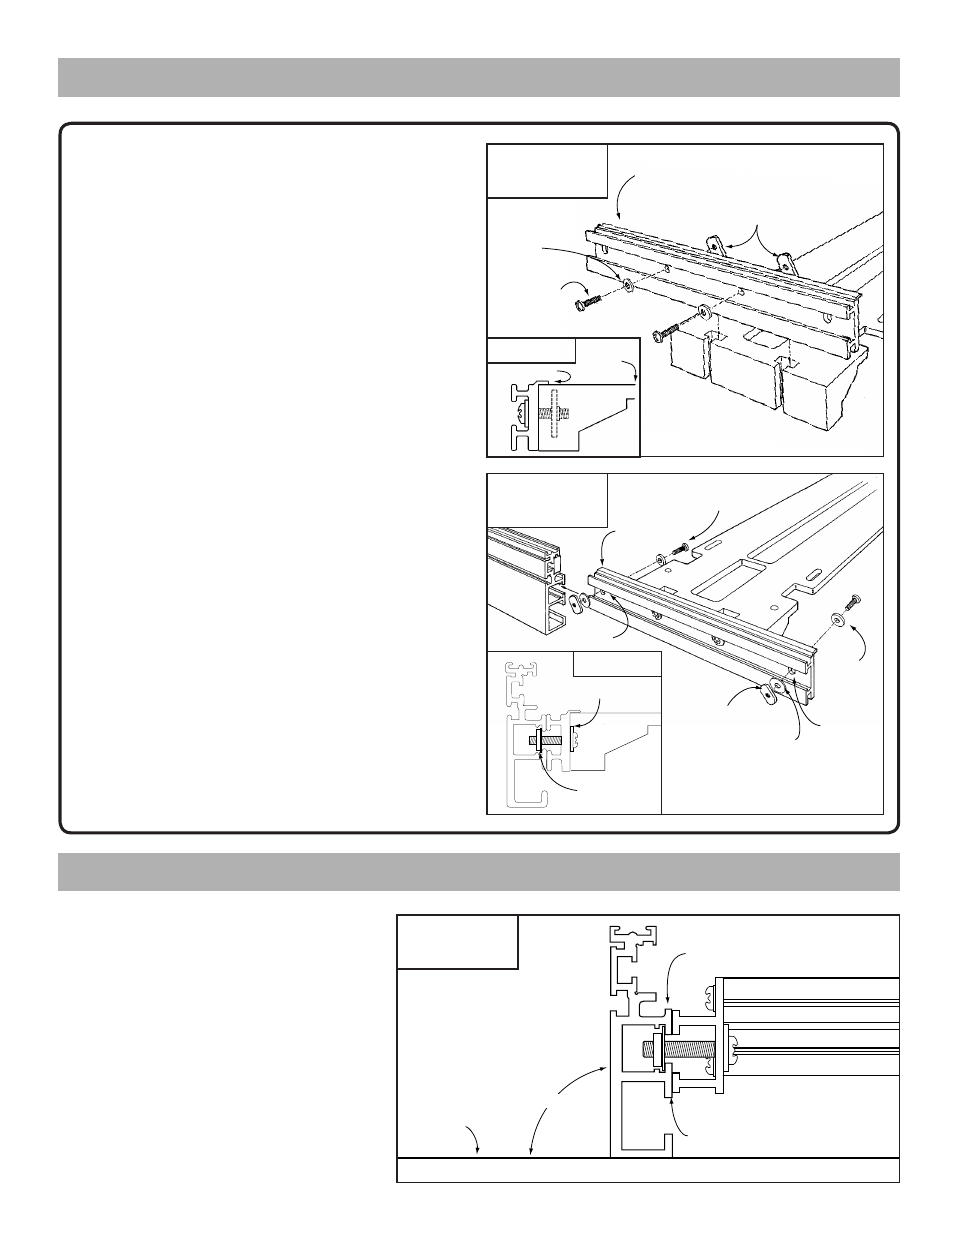
Adjusting the Fence Angle
Note: Only the 18" INCRA PRO Fence can be
mounted to the Original INCRA JIG.
Important: Your Original INCRA JIG must be mounted
to a
3
⁄
4
" plywood base and the black clamping knob
must be fully tightened before installing the fence.
Attach the fence mounting bracket supplied with
your 18" INCRA PRO Fence to the front end of your
Original INCRA JIG using the two #10
–
32 x
3
⁄
4
" phillips
pan head screws, #10 flat washers and rectangular
nuts as shown in Fig 6. The “L” feature on the fence
mounting bracket should rest on the top of your INCRA
JIG as shown in Detail 6a.
Insert the #10
–
32 x
7
⁄
8
" phillips pan head screw
through the thicker (gold)
5
⁄
8
" o.d. flat washer, then
through hole “A” (see Fig. 7) on the fence mounting
bracket. While holding the screw in place, add the thin
5
⁄
8
" o.d. flat washer then thread on the rectangular nut.
The raised rim around the threaded hole on the nut
should face the washer. With the rectangular nut still
loose, slide your INCRA PRO Fence onto the washer
and rectangular nut so that both are captured in the
T-slot in the back of the fence. Make sure the washer
is captured in the slot provided as shown in Detail
7a. Repeat the above fastener installation for hole “B”,
sliding the fence to capture the washer and rectangular
nut. Position the fence so that the mounting bracket
is centered on the length of the fence and securely
tighten the two machine screws.
Detail 6a
Fig. 6
Attach fence
mounting bracket
#10 flat
washer
…to the Original INCRA JIG:
#10 – 32 x
3
/
4
"
phillips pan
head screw
Thin (silver)
5
⁄
8
" o.d. flat washer
Thick
(gold)
5
⁄
8
" o.d.
flat
washer
#10-32 x
7
⁄
8
"
phillips pan head screws
Detail 7a
Thick (gold) washer
Fence mounting bracket
Rectangular nuts
Fig. 7
Mounting to your
INCRA JIG
Fence
mounting
bracket
Fig. 8
Adjusting the
fence angle
After mounting the INCRA PRO Fence, clamp
your INCRA Jig to the stationary tool of your
choice and with the INCRA Jig set to mid-
range, check the angle of your fence to the
table using a machinist’s or carpenter’s square.
Sometimes, as a result of the plywood base
not being perfectly flat, the angle may be
slightly more or less than 90°. To correct the
angle, place a masking tape shim along the
length of the mounting bracket between the
bracket and the fence as shown in Fig. 8.
Place shim here if angle
is
less than 90°
Place shim here if angle
is
greater than 90°
Table top
Thin washer
captured here
Hole “A”
Rectangular nut
Top of
INCRA
Jig
“L” feature
Hole “B”
90°