Assembly, Assemble the incra stop, Loosely install the racks in the incra fence – INCRA Pro Fence System User Manual
Page 3: Tighten the racks on the incra fence, Fig. 1, Fig. 2, Fig. 3
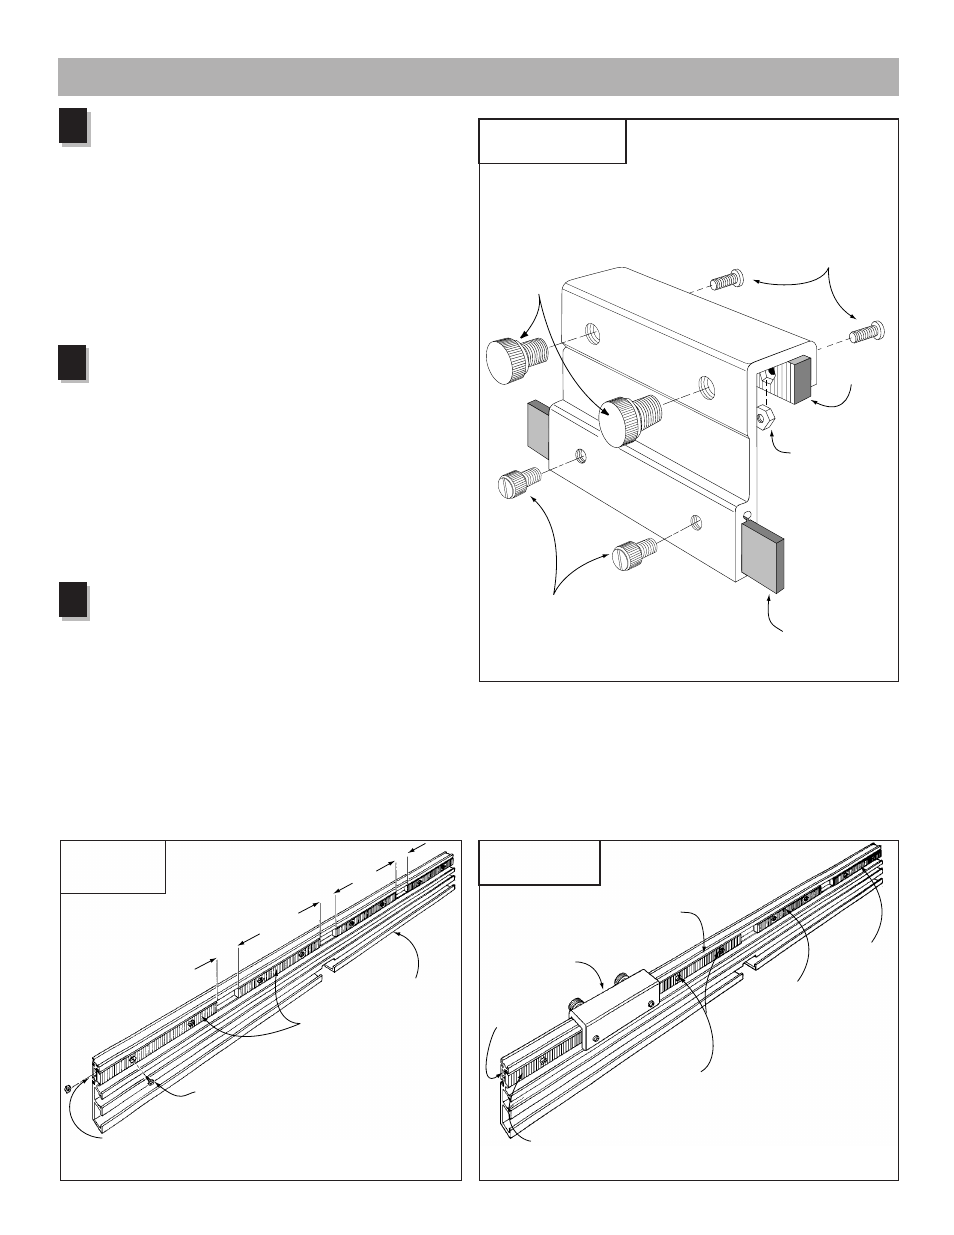
Assemble the INCRA Stop
Using the (2) #8
–
32 x
3
⁄
8
" phillips pan head screws
and #8
–
32 hex nuts, fasten the 4" long blue INCRA
rack to the INCRA Stop and tighten the screws. See Fig.
1. Slide the
3
⁄
4
" x 5" plastic strip into the slot in the stop
and secure with (2)
1
⁄
4
"
–
20 x
1
⁄
2
" nylon thumbscrews.
Thread the (2)
3
⁄
8
"
–
16 x
1
⁄
2
" nylon thumbscrews
into the INCRA Stop as shown. One or both of these
thumbscrews can be used to clamp the INCRA Stop to
the fence. In use, the plastic strip provides a non-metallic
stop surface which can be shaped for special stop setups
and can be micro adjusted by loosening the smaller
thumbscrews.
Loosely install the racks in the
INCRA Fence
Insert the #8
–
32 x
3
⁄
8
" phillips pan head screws through
the racks as shown in Fig. 2 and loosely attach the
#8
–
32 hex nuts. Slide each of the hex nuts on the racks
into the smaller T-slot in the back of the INCRA Fence.
Position the two outer racks approximately flush with the
ends of the fence with the remaining two racks spaced
about 1
5
⁄
16
" apart. (For the 18" INCRA PRO Fence,
leave about
1
⁄
32
" between the ends of the racks.) With
the racks loosely installed, you should be able to shift
each rack from side to side easily with your finger.
Tighten the racks on the
INCRA Fence
Begin by tightening the two mounting screws for rack #1,
as shown. Next, clamp the INCRA Stop to your fence
so that it bridges the gap between the ends of racks #1
and #2 (see Fig. 3), and tighten the mounting screws
for rack #2. Now move the INCRA Stop to bridge the
gap between racks #2 and #3 and tighten the mounting
screws for rack #3. Finally, bridge the gap between racks
#3 and #4 and tighten the rack #4 mounting screws. This
process aligns the racks so that the INCRA Stop will
operate accurately along the entire length of the fence.
3
Assembly
Fig. 1
INCRA Stop Assembly
1
#8 – 32 x
3
/
8
"
phillips pan
head screws
1
/
4
– 20 x
1
/
2
"
nylon thumbscrews
3
/
8
– 16 x
1
/
2
"
nylon
thumbscrews
Plastic stop strip
INCRA
rack
#8 – 32 hex nut
2
3
Fig. 2
Loosely install
fence racks
#
8
-
32 x
3
/
8
"
phillips pan head screw
INCRA racks
28" INCRA PRO Fence
Loosely attach the #8-32 hex nuts to the screws on each
rack then slide the racks in place on the back of the fence
capturing the nuts in this T-slot
Fig. 3
Tighten the racks
Rack #4
Rack #3
First:
Tighten this rack’s mounting screws
BEFORE putting on the INCRA Stop
Second:
Bridge the gap between
racks #1 and #2 with
the INCRA Stop
Third:
Tighten the rack mounting
screws on rack #2
Rack #2
Rack #1
Fourth:
Repeat the steps to
tighten racks #3 and #4
1
5
⁄
16
"
1
5
⁄
16
"
1
5
⁄
16
"