Sht2, Drawing view7, Drawing view8 – ERICO CADDY ROD LOCK Bottom-Mount Duct Bracket User Manual
Page 2: Drawing view9, Drawing view10, Detail view a (1 : 1)
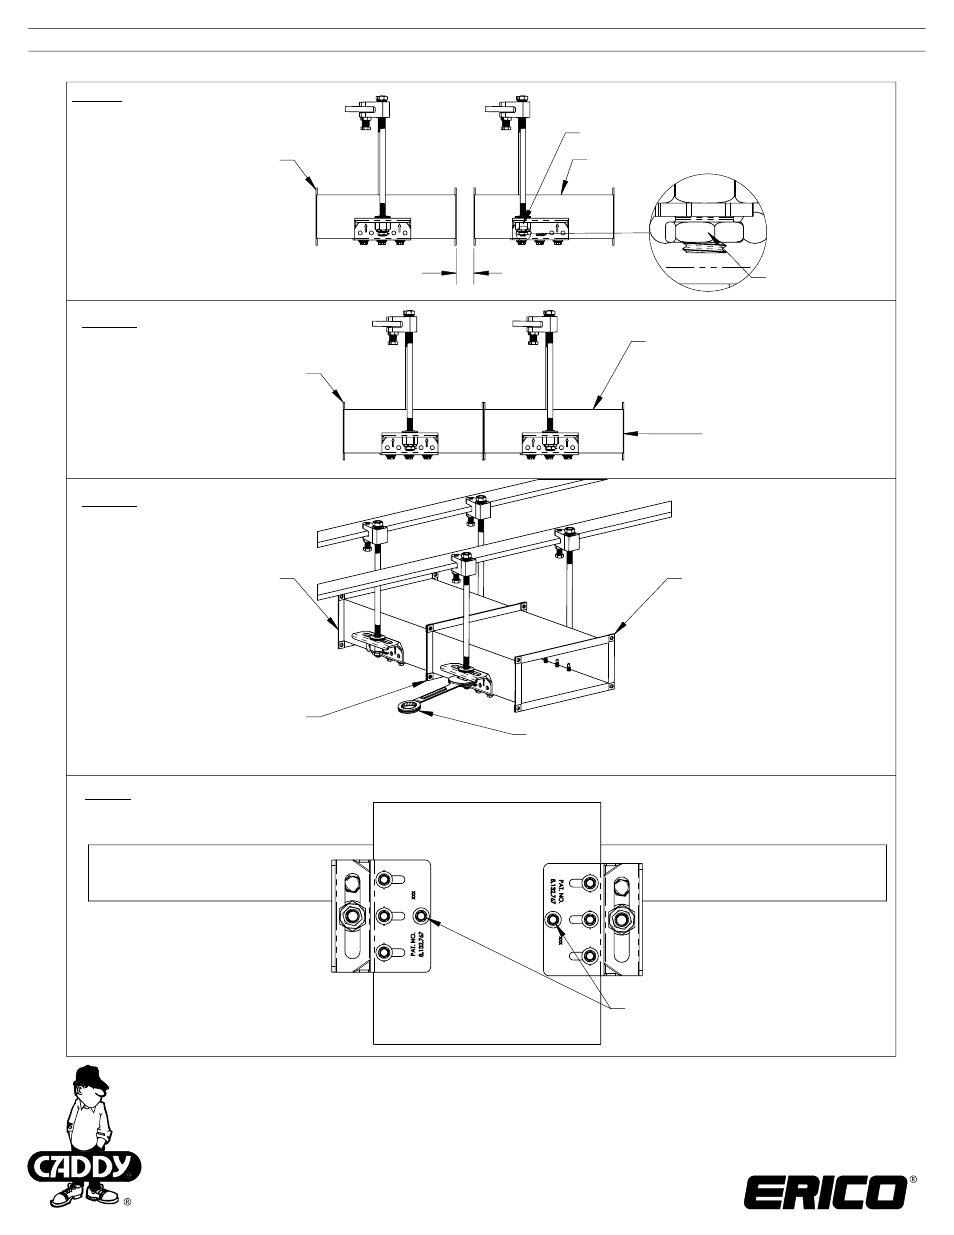
Push new duct toward
previously installed duct.
New duct
Previously installed duct
Previously installed duct
New duct
Fine duct height adjustment by wrench:
Clockwise = duct down
Counter-Clockwise = duct up
Complete duct
joint for Flange or
Slip and Drive
connection.
Step 6: (Optional)
Install fourth screw to
each bracket.
Fourth screw on each
bracket is optional if bracket
is excessively tilted inward.
Gap 1-1/2" [38mm] for Flanged duct or
1/2" - 1" [13mm - 25mm] for Slip and Drive duct
Previously installed duct
New duct
Positioned at nearest end
Tighten lock nut
Step 5:
Complete duct joint.
Step 4:
Push duct together.
Step 3:
Position duct for assembly
TECHNICAL SUPPORT:
www.erico.com
CFS473_F
INSTRUCTION SHEET
2 OF 2
© 2013, 2014 ERICO International Corporation.
CADDY, CADWELD, CRITEC, ERICO, ERIFLEX, ERITECH, and LENTON are registered trademarks of ERICO International Corporation.
- 6Z34VF14 Rod Hanging Basket Tray Clip (1 page)
- 766PM Far Side Box Support (1 page)
- 766PMD Far Side Box Support (1 page)
- CADDY MPVTI Low Voltage Mounting Clip (2 pages)
- H-Series CADDY PYRAMID Support System (3 pages)
- CADDY PYRAMID RL, PIPE RETAINERS (2 pages)
- CADDY PYRAMID Rooftop Equipment Support (4 pages)
- CADDY PYRAMID Single Post Support (1 page)
- CADDY PYRAMID TF Series, Fixed Height Tool-Free Supports (2 pages)
- CADDY ROD LOCK Anchor Screw (2 pages)
- CADDY ROD LOCK Beam Clamp (2 pages)
- CADDY ROD LOCK Channel Nut (2 pages)
- CADDY ROD LOCK L-Bracket (2 pages)
- CADDY ROD LOCK Strut (2 pages)
- CADDY SPEED LINK Riveted Accessories (4 pages)
- CADDY SPEED LINK SLK-Keyless Locking Device and Bulk Cable (2 pages)
- CADDY SPEED LINK SLK-Keyless Locking Devices (2 pages)
- CADDY SPEED LINK-Accessory Cables (1 page)
- CADDY SPEED LINK-SLK Cable End Accessories (4 pages)
- TSGB Series Screw Gun Bracket (2 pages)
- GLIDER Electrical Box Attachment (2 pages)
- H Series-Electrical Box Bracket (2 pages)
- ROD LOCK Plywood Pre-set Anchor (2 pages)
- ROD LOCK Strut End Bracket (2 pages)
- ROD LOCK Strut (2 pages)
- CADDY ROD LOCK Strut Nut (2 pages)
- CER4 Cable from Stud (2 pages)
- High Performance CADDY CAT HP J-Hook Assemblies (6 pages)
- KBT Wire Basket Tray Clip (1 page)
- MPCB1220 (2 pages)
- SBC Series, Beam Clamp, 3/8" and M10 (1 page)
- TSR200 Telescoping Strut Replacement Bracket (2 pages)
- TSRBS1625 Telescoping Box (3 pages)
- Universal Pedestal Clamp (2 pages)
- Branch Line Restraint Device (2 pages)
- Branch Line Restraint Strucural Attachment Fitting for Steel 12 gauge (2 pages)
- Branch Line Restraint, Structural Attachment Fitting for Concrete or Wood (2 pages)
- Branch Line Restraint, Structural Attachment Fitting with 3/8"-16 male thread" (2 pages)
- 510 CADDY EZ RISER (2 pages)
- 429 CADDY MACROFIX PLUS NI (1 page)
- Seismic Hanger Clamps (3 pages)
- CADDY PYRAMID Equipment Supports (3 pages)
- Bottom-Mount Duct Bracket, Narrow (2 pages)
- Top-Mount Duct Bracket (2 pages)