Robo-arm – COATS Kit 8184045, Robo Arm User Manual
Page 3
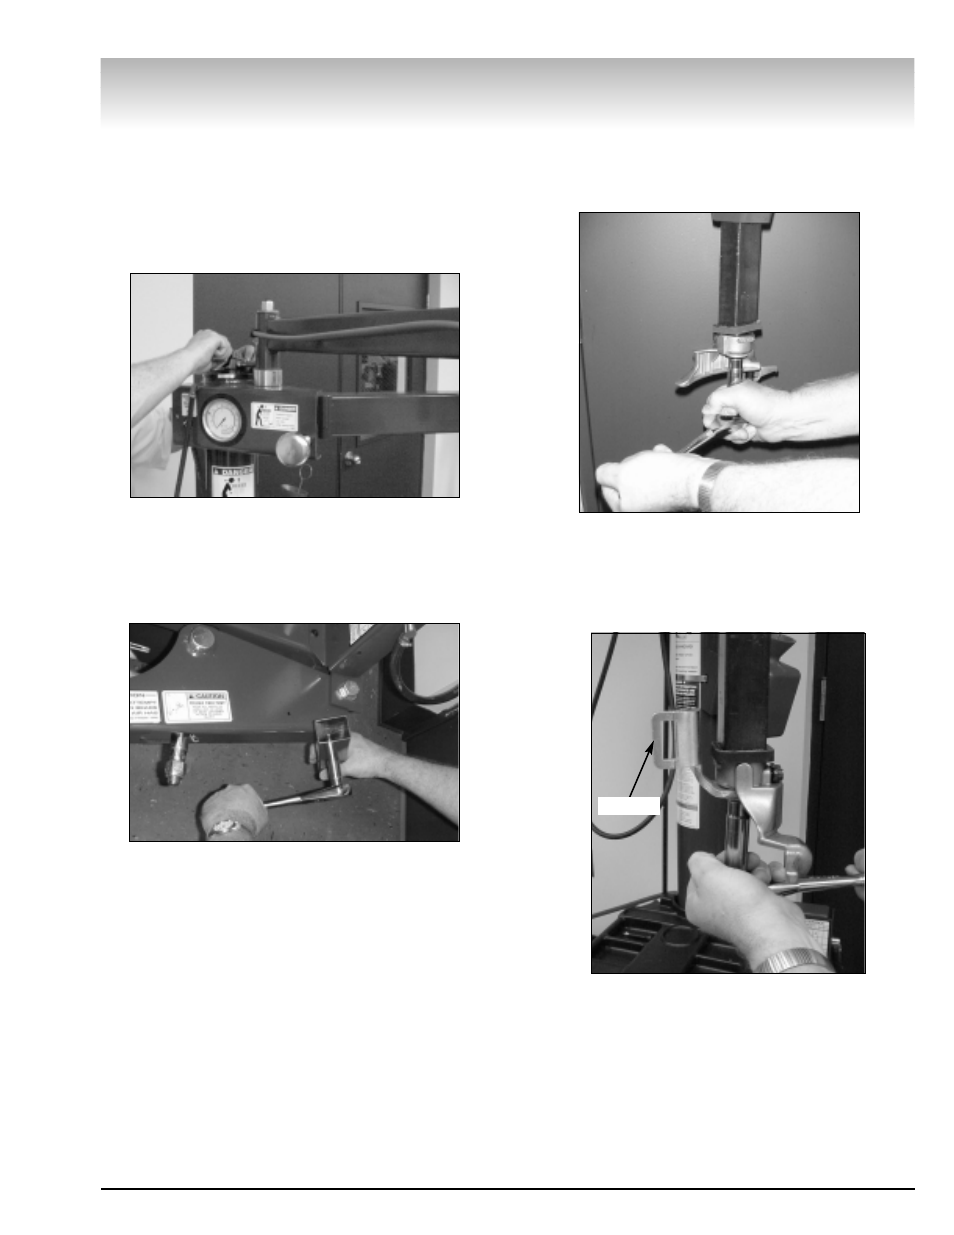
9. Next, unwrap the red hose from valve, guide
through hose clamps; and, with the hose pushed
over the barbed fitting, tighten the screw type hose
clamp.
Next, reconnect the air pressure source and check
for leaks. Cycle the cylinder on the Robo-Arm™ sev-
eral times to understand function.
10. For installing bead roller assist tool, attach the
rectangular tube in the kit to the “Bead Loosener
Arm”. Use the existing hole in the bead loosener
arm. Position the tube at a slight angle and tighten.
11. Next will be the installation of the duckhead
bracket. Start by removing the bolt in the bottom of
the vertical slide bar. This bolt is very tight; use cau-
tion when loosening.
12. Next install the bracket to the vertical slide
using the hex bolt; discard the washer. Note that the
metal duckhead is shown; the plastic duckhead can
be substituted for the metal duckhead.
Robo-Arm™
Robo-Arm™ Installation • 3
Figure 9
Figure 10
Figure 11
Figure 12
Bracket
- 16 Bit PCB & Metal Arm Temporary (4 pages)
- 520 Wheel Lift (12 pages)
- 700 Decal Location (1 page)
- AirNut (12 pages)
- Application Chart, Balancing Solutions (12 pages)
- Autoflate Nitrogen (1 page)
- Balancer Adapter Wall Storage Board Kit (1 page)
- Balancer Adapter, 5 lug x 135mm Bolt Pattern (1 page)
- Balancer Adapter, 5 lug x 150mm Bolt Pattern (1 page)
- Balancer Adapter, 5 lug x 4.750 Bolt Pattern (1 page)
- Balancer Adapter, 5 lug x 5.5 Bolt Pattern (1 page)
- Balancer Adapter, 6 lug x 150mm Bolt Pattern (1 page)
- Balancer Adapter, 6 lug x 5.5 Bolt Pattern (1 page)
- Balancer Adapter, 8 lug x 170mm Bolt Pattern (1 page)
- Balancer Adapter, 8 lug x 180mm Bolt Pattern (1 page)
- Balancer Adapter, 8 lug x 6.5 Bolt Pattern (1 page)
- Conversion Instructions (1 page)
- Extended Balancer Stub Shaft (1 page)
- Fixed Finger Plates (2 pages)
- Hood Installation (1 page)
- Hood Installation Instruction (1 page)
- Hood Installation Sheet (1 page)
- Hood Installation Tip (1 page)
- Hubnut Removal (1 page)
- Side Accessory Tray (1 page)
- Kit 1.125-inch, Kit 40 mm, Light Truck Cone (1 page)
- Kit 1.125-inch, Kit 40 mm, XL Pressure Drum (1 page)
- Kit 8111177 Three Phase to Single Phase Conversion (1 page)
- Kit 8111864 Motorcycle Wheel Adapter (4 pages)
- Kit 8111935 Light Truck Back Cone Spacer (1 page)
- Kit 8112877 Touch Panel Replacement (2 pages)
- Kit 8113082 40mm Conversion Shaft (1 page)
- Kit 8113223 (1.125-inch), Kit 8113228 (40 mm), VW/Porsche Adapter (1 page)
- Kit 8113592, Wheel Lift Link (1 page)
- Kit 8113645 Radial Runout Sensor Adjustment Kit (2 pages)
- Kit 8113860 Splash Guard (1 page)
- Kit 8113881 Printer Serive (1 page)
- Kit 8113883 Printer Bracket Serive (1 page)
- Kit 8113887 XR 1800 Upgrade to XR 1850 (2 pages)
- Kit 8113893 Lateral Run Out Service (1 page)
- Kit 8113900 Monitor Replacement (1 page)
- Kit 8113932 16 Bit PCB & Metal Arm (1 page)
- Kit 8114025 PCB Assembly (1 page)
- Kit 8114105 PCB Assembly Kit (1 page)
- Kit 8114155 Serial Loader (4 pages)