COATS Inflation Guard Structure Assembly User Manual
Inflation guard structure assembly instructions
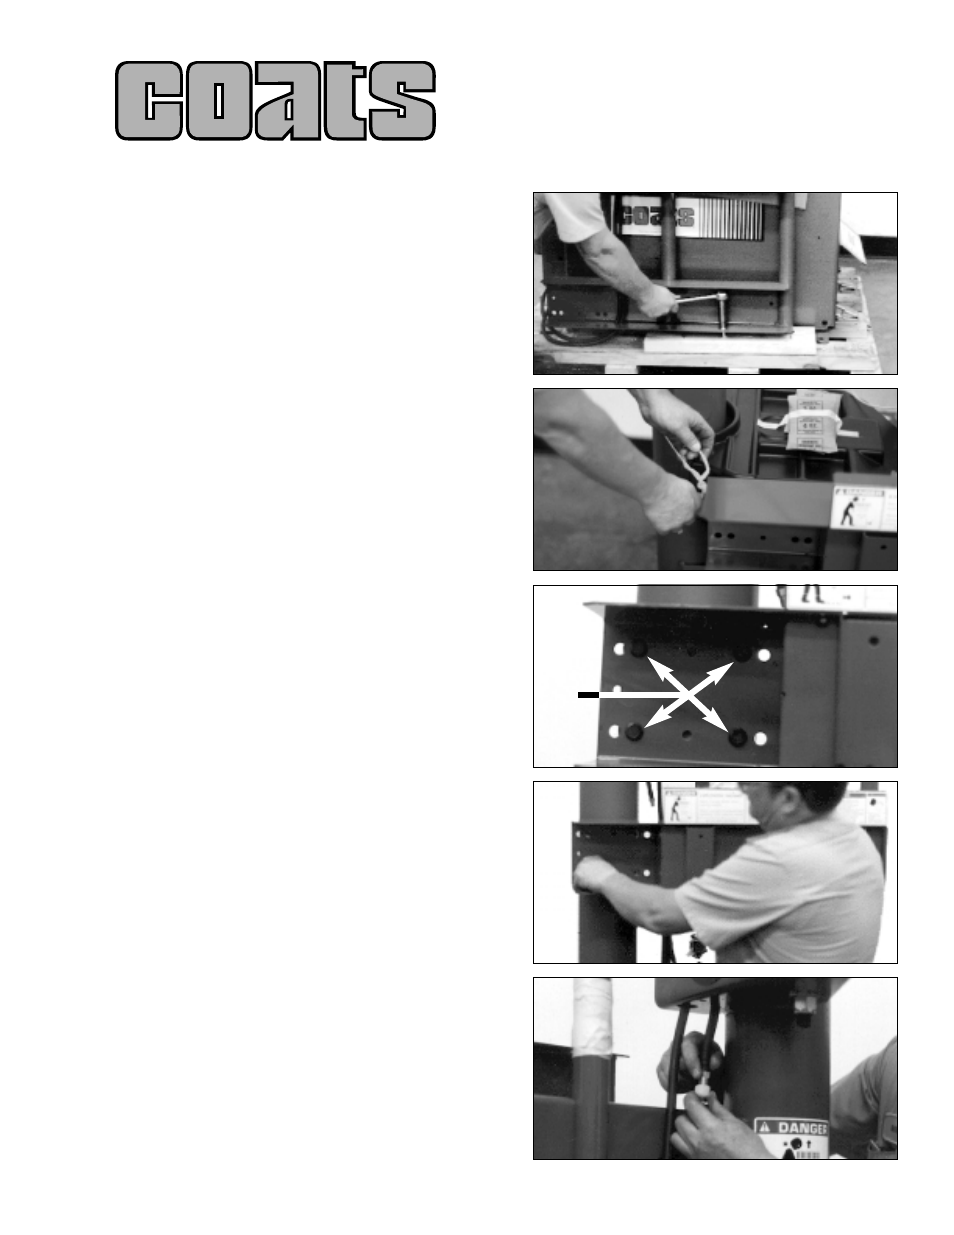
Inflation Guard Structure
Assembly Instructions
6.
Connect the rubber air hose from the inflation guard
to the tube end at the tower top.
7.
Read the machine operating instructions to
understand all the functions and safety operations of
the tire changer.
8.
Practice changing and operating the new inflation
system using a typical tire and wheel combination.
1.
Remove the lag bolt from the inflation guard support
bracket with a 9/16 socket wrench.
2.
Remove the rope used to secure the inflation guard
structure and the bead loosener arm to the chassis.
3.
Locate the mounting holes in the inflation guard
support and the tower column support brackets.
Position the inflation guard structure against the
tower column support brackets and align the
mounting holes.
5.
Secure structure to support brackets with 8 bolts.
Use a 9/16 socket wrench.
Printed in U.S.A. 8182994 00 1/96
4 Holes
Each
Bracket
- 16 Bit PCB & Metal Arm Temporary (4 pages)
- 520 Wheel Lift (12 pages)
- 700 Decal Location (1 page)
- AirNut (12 pages)
- Application Chart, Balancing Solutions (12 pages)
- Autoflate Nitrogen (1 page)
- Balancer Adapter Wall Storage Board Kit (1 page)
- Balancer Adapter, 5 lug x 135mm Bolt Pattern (1 page)
- Balancer Adapter, 5 lug x 150mm Bolt Pattern (1 page)
- Balancer Adapter, 5 lug x 4.750 Bolt Pattern (1 page)
- Balancer Adapter, 5 lug x 5.5 Bolt Pattern (1 page)
- Balancer Adapter, 6 lug x 150mm Bolt Pattern (1 page)
- Balancer Adapter, 6 lug x 5.5 Bolt Pattern (1 page)
- Balancer Adapter, 8 lug x 170mm Bolt Pattern (1 page)
- Balancer Adapter, 8 lug x 180mm Bolt Pattern (1 page)
- Balancer Adapter, 8 lug x 6.5 Bolt Pattern (1 page)
- Conversion Instructions (1 page)
- Extended Balancer Stub Shaft (1 page)
- Fixed Finger Plates (2 pages)
- Hood Installation (1 page)
- Hood Installation Instruction (1 page)
- Hood Installation Sheet (1 page)
- Hood Installation Tip (1 page)
- Hubnut Removal (1 page)
- Side Accessory Tray (1 page)
- Kit 1.125-inch, Kit 40 mm, Light Truck Cone (1 page)
- Kit 1.125-inch, Kit 40 mm, XL Pressure Drum (1 page)
- Kit 8111177 Three Phase to Single Phase Conversion (1 page)
- Kit 8111864 Motorcycle Wheel Adapter (4 pages)
- Kit 8111935 Light Truck Back Cone Spacer (1 page)
- Kit 8112877 Touch Panel Replacement (2 pages)
- Kit 8113082 40mm Conversion Shaft (1 page)
- Kit 8113223 (1.125-inch), Kit 8113228 (40 mm), VW/Porsche Adapter (1 page)
- Kit 8113592, Wheel Lift Link (1 page)
- Kit 8113645 Radial Runout Sensor Adjustment Kit (2 pages)
- Kit 8113860 Splash Guard (1 page)
- Kit 8113881 Printer Serive (1 page)
- Kit 8113883 Printer Bracket Serive (1 page)
- Kit 8113887 XR 1800 Upgrade to XR 1850 (2 pages)
- Kit 8113893 Lateral Run Out Service (1 page)
- Kit 8113900 Monitor Replacement (1 page)
- Kit 8113932 16 Bit PCB & Metal Arm (1 page)
- Kit 8114025 PCB Assembly (1 page)
- Kit 8114105 PCB Assembly Kit (1 page)
- Kit 8114155 Serial Loader (4 pages)