Advance adapters inc. p/n: ranger od – Advance Adapters RANGER OD User Manual
Page 4
CLEAN
CLEAN
CLEAN
CLEAN
CLEAN
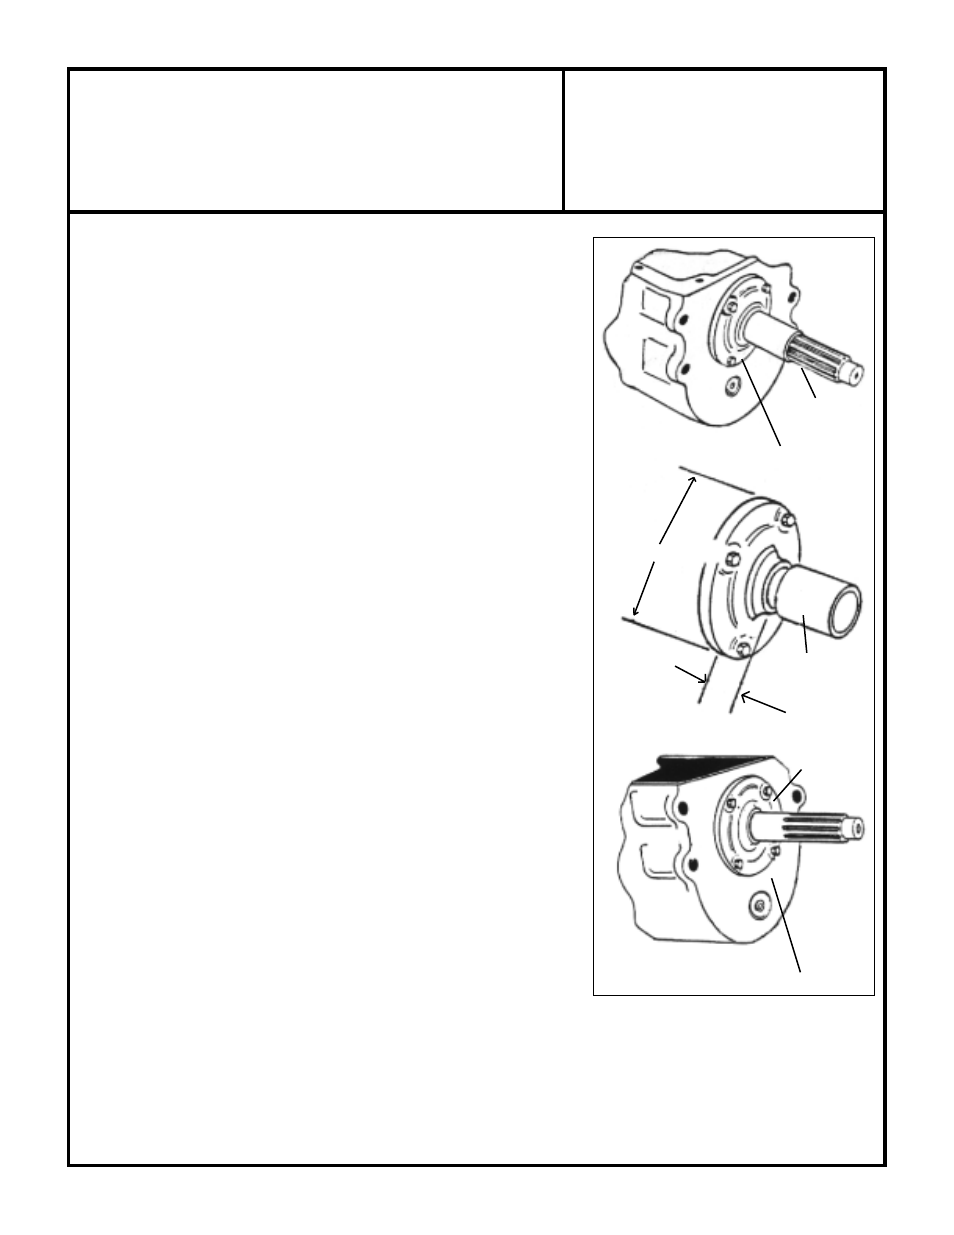
"A" DIAMETER
"A" DIAMETER
"A" DIAMETER
"A" DIAMETER
"A" DIAMETER
"A" DIAMETER
"A" DIAMETER
"A" DIAMETER
"A" DIAMETER
"A" DIAMETER
REMOVE
REMOVE
REMOVE
REMOVE
REMOVE
"A" DIA.
"A" DIA.
"A" DIA.
"A" DIA.
"A" DIA.
SILICONE AROUND
SILICONE AROUND
SILICONE AROUND
SILICONE AROUND
SILICONE AROUND
RETAINER DIAMETER
RETAINER DIAMETER
RETAINER DIAMETER
RETAINER DIAMETER
RETAINER DIAMETER
CUT OFF BEARING RETAINER
CUT OFF BEARING RETAINER
CUT OFF BEARING RETAINER
CUT OFF BEARING RETAINER
CUT OFF BEARING RETAINER
INSTALLED ON TRANSMISSION
INSTALLED ON TRANSMISSION
INSTALLED ON TRANSMISSION
INSTALLED ON TRANSMISSION
INSTALLED ON TRANSMISSION
WITH SEAL STILL IN POSITION
WITH SEAL STILL IN POSITION
WITH SEAL STILL IN POSITION
WITH SEAL STILL IN POSITION
WITH SEAL STILL IN POSITION
.750" (3/4")
.750" (3/4")
.750" (3/4")
.750" (3/4")
.750" (3/4")
ADVANCE ADAPTERS INC.
P/N: RANGER OD
P.O. Box 247, 4320 Aerotech Center Way
Paso Robles, CA 93447
PAGE 4 OF 11
Telephone: (800) 350-2223
Fax: (805) 238-4201
Page Rev. Date:
04-16-02
SPECIAL NOTE:
The components packaged in this kit have been assembled and machined for specific type of conversions. Modifications to any of the components
will void any possible warranty or return privileges. If you do not fully understand modifications or changes that will be required to complete your conversion, we
strongly recommend that you contact our sales department for more information. This instruction sheet is only to be used for the assembly of Advance Adapter
components. We recommend that a service manual pertaining to your vehicle be obtained for specific torque values, wiring diagrams and other related equipment. These
manuals are normally available at automotive dealerships and parts stores.
transmission. On most models, the rear of the engine and
transmission are supported by a crossmember bolted to the
frame, and then to the transmission with a cushion between
the crossmember and the transmission. It is essential that the
rear of the engine be properly supported before proceeding.
11.
When you are certain that the rear of the engine is firmly supported,
remove the bolts in the crossmember and take it off.
12.
Place a transmission jack under the transmission and secure it
firmly to the transmission.
CAUTION: Failure to secure the
transmission to the jack, could result in serious bodily injury.
13.
When the jack has been securely fastened to the transmission,
remove the four bolts holding the transmission to the bellhousing.
14.
Remove the transmission. This is an excellent opportunity to check
the condition of the clutch disc, pressure plate, throw-out bearing,
and pilot bearing. Replace worn parts if necessary.
15.
Clean the transmission input shaft thoroughly. Measure the opening
in the bellhousing carefully, and then the outside diameter of the
bearing retainer on the Ranger Overdrive. SEE THE ILLUSTRA-
TIONS marked "A".
If the bearing retainer size is smaller or
larger then the opening in the bellhousing, please contact us
toll free at 1-800-350-2223.
Both bearing retainers must fit snugly
for proper alignment of the transmission to the Ranger, and the
Ranger to the bellhousing.
16.
Remove the front bearing retainer on the original transmission
carefully so as not to tear the gasket. Also, check the oil seal in the
base of the retainer and replace it if necessary. (The oil seal is not
supplied in the Ranger kit. The snout of the retainer must be cut off
and the seal must be retained. The normal cutoff location is .750".
However, we have had a customers require a longer length to retain
the stock seal. Make sure you cut enough off so that the snout does
not bottom out in the back of the Ranger.
Reinstall the retainer on the original transmission using the original
gasket and bolts (without lock washers). Lock washers will raise the
bolt head heights enough to cause severe damage and interference.
We recommend that you use "BLUE LOCTITE" for the bolts in place
of lock washers.
On Land Cruiser 4 speed installations, the Ranger uses the trans-
mission front bearing for alignment. This step, as mentioned above,
is not necessary. Simply remove the front retainer and clean the front
of the transmission. On Land Cruiser 3 speed transmissions, our
bearing retainer
P/N 716222
and seal
P/N 716719
should be
used. The snout on this retainer must be shortened as list above.