Jkcable shift linkage upgrade kit – Advance Adapters 715596 User Manual
Page 4
ADVANCE ADAPTERS INC. P/N: 715596
P.O. Box 247, 4320 Aerotech Center Way
New Item: (11/10)
Paso Robles, CA 93447
PAGE 4 of 7
Telephone: (800) 350-2223
Fax: (805) 238-4201
Page Rev. Date:
09-14-12
SPECIAL NOTE:
The components packaged in this kit have been assembled and machined for specific type of conversions. Modifications to any of the
components will void any possible warranty or return privileges. If you do not fully understand modifications or changes that will be required to complete your
conversion, we strongly recommend that you contact our sales department for more information. This instruction sheet is only to be used for the assembly of
Advance Adapter components. We recommend that a service manual pertaining to your vehicle be obtained for specific torque values, wiring diagrams and other
related equipment. These manuals are normally available at automotive dealerships and parts stores.
JKCABLE SHIFT LINKAGE UPGRADE KIT
The shifter kits comes with a new shifter lever for the transfer case. The lever
must be installed to achieve the proper throw on the linkage. Unfortunately,
the NP241 Rocktrac transfer case design does not allow you access to the #40
torx bit without removing the transfer case front yoke (NP241 with the 2:72:1
low does not require the yoke to be removed). This also means you have to
remove the front driveshaft at the transfer case. Once the yoke is removed
and the lever bolt is removed, install the new lever on the transfer case with
the supplied 8mm bolt and 1/4" flat washer.
The new cable can now start to
be installed. First, the (2) 5/8"
flat washers must be installed between the large nuts on the cable as
shown. Next, equip the new cable with a heim joint and tighten the
jam nut. Slide the cable into the stock bracket with a nut and washer
on each side of the bracket. You can now install the cable up through
the hole in the floorboard and into the
cab. NOTE: If you desire to retain the
stock floorboard rubber grommets (and
it is recommended) that were used on
the factory cable, then you must cut
the stock cable in half and remove the
grommet and then install it onto the
new cable before feeding it through the
floorboard.
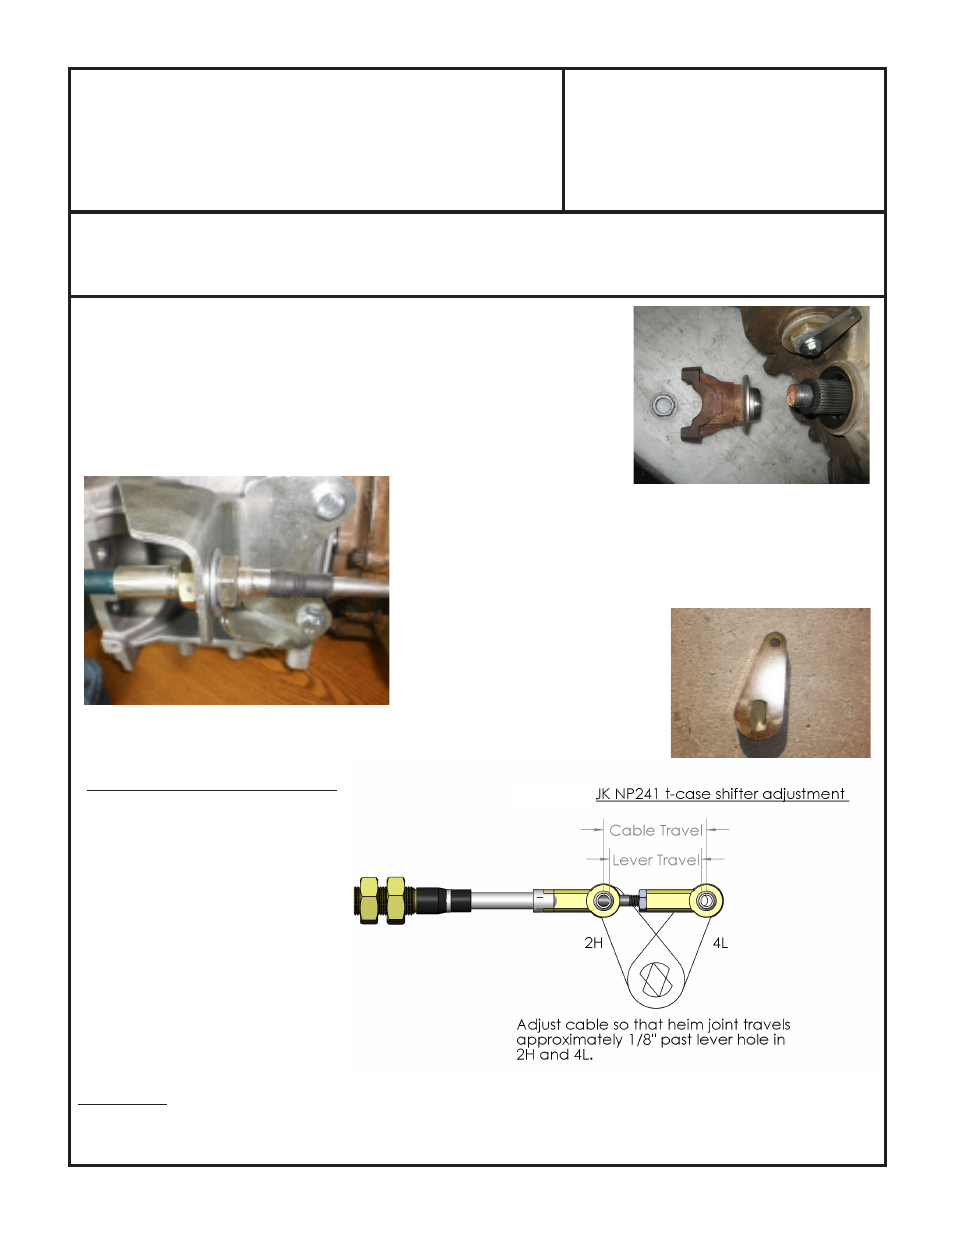
Cable adjustment to transfer case:
NP241 Rocktrac transfer cases the heim is bolted to the out-
side of the shift lever with the 1/4"-20 x 1" bolt and lock nut.
On the non-Rubicon NP241, the heim joint
bolts to the outside of the shift lever
with the addition of the 1/2" spacer
between the heim joint and the T/C
lever. Use the 1/4"-20 x 1-1/2" bolt
and lock nut.
Adjust the linkage so that the heim joint travels approximately
1/8" past the lever in 2 high and 4 low.
On the Rubicon applications, reinstall the transfer case yoke.
We recommend the use of black RTV silicone to the splines
of the yoke (about a 1/4" bead) to prevent leakage. Install